
What is CST Studio Suite®? I’ve had students asking about this software and how they could obtain access. As a Professor of Emeritus in the Mechanical Engineering department and advisor to the WPI FSAE electric team, I had no knowledge of the CST Studio Suite. I did know that CST Studio Suite is offered by Dassault Systèmes and is connected to the 3DEXPERIENCE Platform from SOLIDWORKS.
During team meetings, the Electrical Computer Science Engineering (ECE) and Robotics department students discuss common problems in static and low frequency issues with applications on electromagnetic compatibility (EMC), printed circuit boards (PCB), electric motors, sensors, and shielding. And don’t forget the dreaded cable harnesses.
CST Studio Suite offers the ability to identify and mitigate electromagnetic compatibility and electromagnetic interference (EMI) risks in electronic devices. It can also be used to simulate human body exposure to electromagnetic fields.
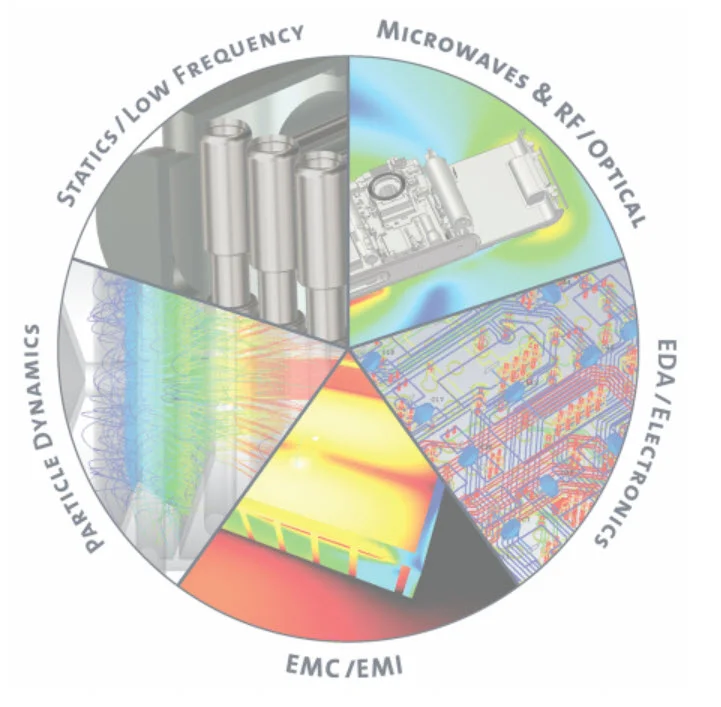
In this lesson, review a fraction of the CST Studio Suite. CST stands for Computer Simulation Technology. The CST Studio Suite software is a 3D Electromagnetic (EM) analysis package. The Suite (For Education) consists of a collection of modules.
Load a simple SOLIDWORKS model to the 3DEXPERIENCE Platform. Install and load the CST Studio Suite Connected App on your desktop.
Explore the initial CST Studio Suite interface.
Create a Low Frequency, Electromechanical, Connector Project template using the LF Frequency Domain solver.
Load a model (Physical Product) from the 3DEXPERIENCE Platform into the CST Studio Suite. Save the model and support folders to a selected folder location on your hard drive.
Input various parameters. Modify the mesh. Mesh the Project. Run the simulation. Review the results. Save the Project (Physical Simulation) to the 3DSpace in your Collaborative Space/Bookmark on the 3DEXPERIENCE Platform.
Before we start, there are a few items that you need to know.
In this lesson, use your default Collaborative space. An internet connection is required. A 3DEXPERIENCE ID is required.
The CST Studio Suite Software is a 3D Electromagnetic (EM) analysis software package. The Suite (For Education) consists of a collection of modules: CST MICROWAVE STUDIO, CST EM STUDIO, CST PARTICLE STUDIO, CST MPHYSICS STUDIO, CST DESIGN STUDIO and CST CABLE STUDIO. Note: This example was taken from the SIMULIA Simulation Software | Dassault Systèmes (3ds.com).
3DEXPERIENCE Launcher needs to be installed. 3DEXPERIENCE Works Lesson 1: Getting Started with SOLIDWORKS.
The 3DEXPERIENCE platform is browser driven. Your existing cookies and cache determine what you will see on your computer desktop or during a SOLIDWORKS login. A full installation of SOLIDWORKS 2019 SP0 or later is required.
Launch 3DEXPERIEINCE Platform and Start SOLIDWORKS
Start a SOLIDWORKS session from your desktop.
Double-click the SOLIDWORKS icon.
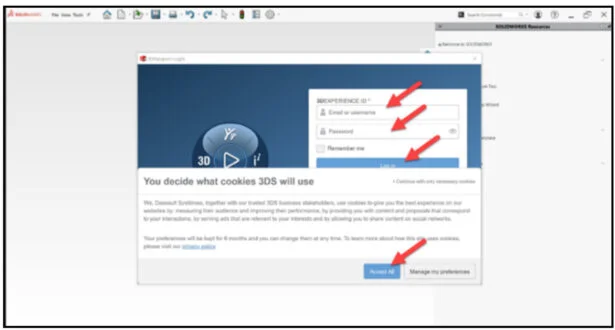
View the illustration below. Depending on your system setup, cookies, and cache, it will be different. Read the provided information.
Input the requested data.
Click Accept All.
The Welcome – SOLIDWORKS dialog box is displayed.
You are logged into the 3DEXPERIENCE platform.
Close the Welcome dialog box.
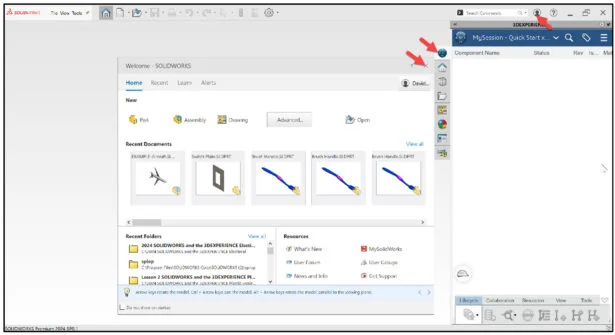
Click the 3DEXPERIENCE icon in the Task Pane. The MySession panel is displayed. This displays the two-way communication between SOLIDWORKS running on your desktop and the 3DEXPERIENCE platform running in the cloud.
In this lesson, I’m using a Collaborative space named Quick Start xDesign.
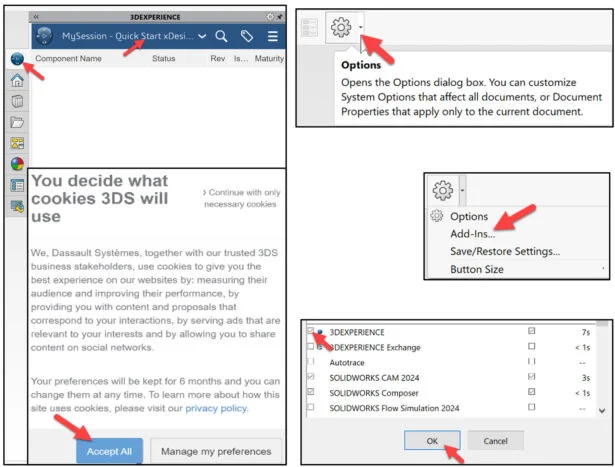
Note: If you do not see the 3DEXPERIENCE icon, click the Options drop-down arrow, click Add-Ins, check the 3DEXPERIENCE box, click OK, from the SOLIDWORKS Main menu.
Click Accept All if needed.
Open SOLIDWORKS LF Copper Disc Part and Save to Platform
Download the SOLIDWORKS LF Copper Disc part.
Open the LF Copper Disc part that has not been previously uploaded or saved to the 3DEXPERIENCE platform.
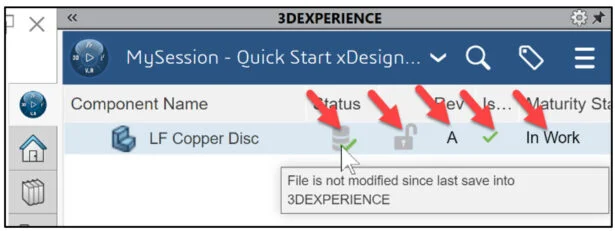
Expand the Task Pane bar. The MySession panel displays the Components Name, Status (Displays an icon that represents the status of a given revision, save or not saved to the platform), Locked status (Locked or Unlocked), Rev (Revision #), Is Last Revision (Yes/No), Maturity State (Lifecycle state of the family, for example: Private, In Work, Frozen, Released, Obsolete), Description, File Name (Displays the PLM external ID of the object for reference objects and the PLM external ID of the connection for instances) and Type (Physical Product or Drawing).
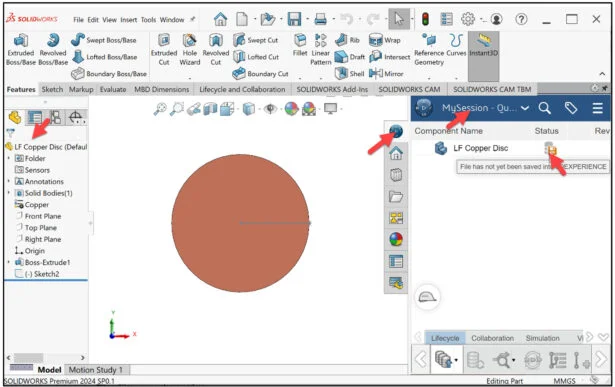
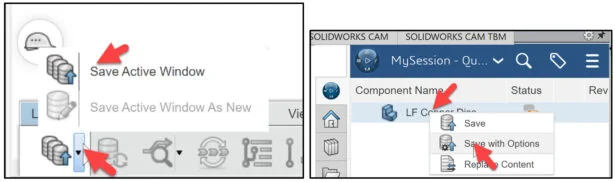
The orange save Status icon for the LF Copper Disc part informs you that the local file on your computer has not been saved to the platform. Save the part to the 3DEXPERIENCE platform.
Click Save Active Window from the Lifecycle tab in the Action bar. Note: You can also right-click LF Copper Disc in MySession, and click Save with Options.
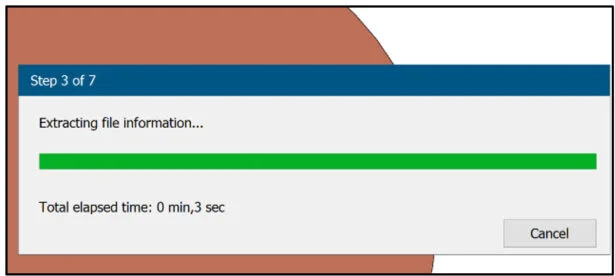
The file is temporarily being saved to a local cache area. The platform is checking for out-of-date components, modified components from the last save to the platform, different revisions, missing components, etc.
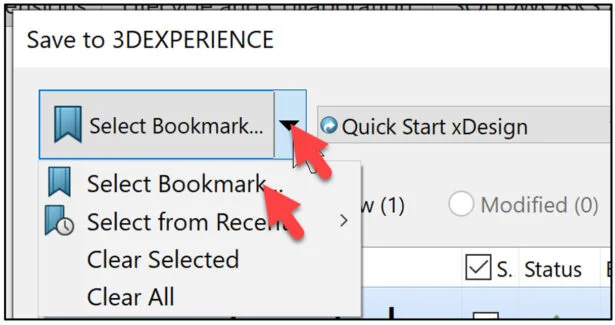
The Save to 3DEXPERIENCE dialog box is displayed. Product lifecycle management (PLM) attributes are displayed. The PLM attributes include: Bookmark locations, Selected Collaborative space, Owner, Title, Saved Status (3DEXPERIENCE), Revision, Maturity Lifecycle State and Collaborative Space name.
Save the part. Use your existing Collaborative space. Use an existing Bookmark. Note: If needed review 3DEXPERIENCE Works Lesson 3: SOLIDWORKS Bookmarks, Share and Delete. Use Bookmarks (links) to delete entire groups of data or just a single file. For assemblies within the Bookmark folder, there is an option to delete the entire structure of the assembly and all reference components.
Click the Select Bookmark down arrow.
Click Select Bookmark. The Select a Bookmark dialog box is displayed.
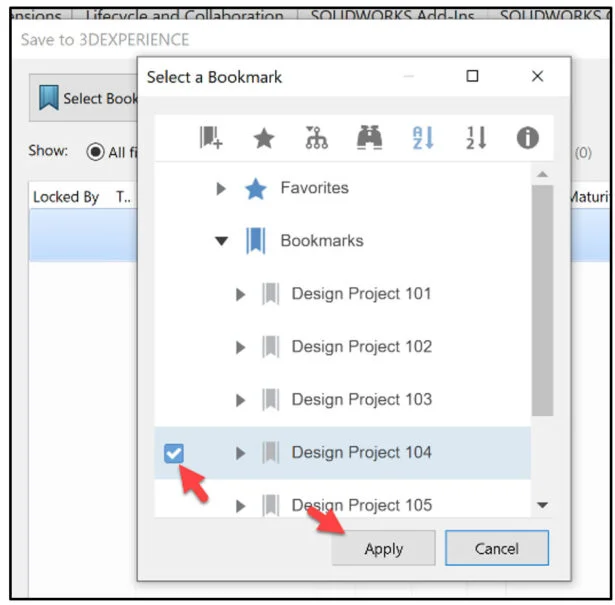
In the below example, I selected Design Project 104 as my bookmark.
Click Apply from the Select a Bookmark dialog box.
Click Save from the Save to 3DEXPERIENCE dialog box.

The part is directly loaded into your Collaborative space and Bookmarked on the 3DEXPERIENCE platform. You are returned back into your SOLIDWORKS desktop session.
View the Status column in the updated MySession panel. The Status icon displays a green check mark. This means that the current file on your SOLIDWORKS desktop is updated and saved to the platform. The default Revision is A. The Maturity State is “In Work”. This is the default Lifecycle state after you saved the model to the 3DEXPERIENCE platform.
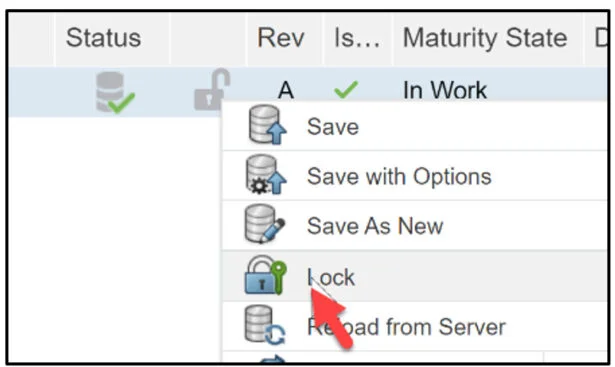
Lock the part in the MySession panel. This prevents anyone in making a change to the part.
Right-click the part name.
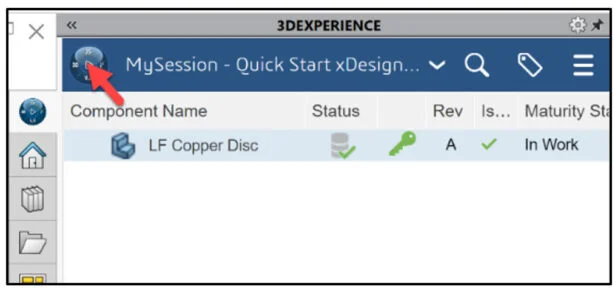
Click Lock. The part is locked.
Select the LF Copper Discfrom the MySession panel.
Launch CST Studio Suite App
If this is your first-time using CST Studio Suite, load and launch the CST Studio Suite Connected App.
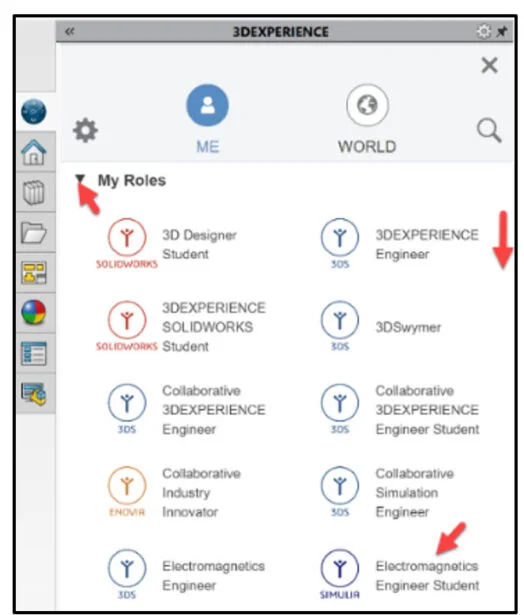
Click the center of the Compass.
Drag the slider downward under My Roles to view the Electromagnetics Engineer Student role.
Click the Electromagnetics Engineer Student role as illustrated.
Click the CST Studio Suite Connected App. Note: If this is your first time, load the App, access all roles and restart your desktop computer.
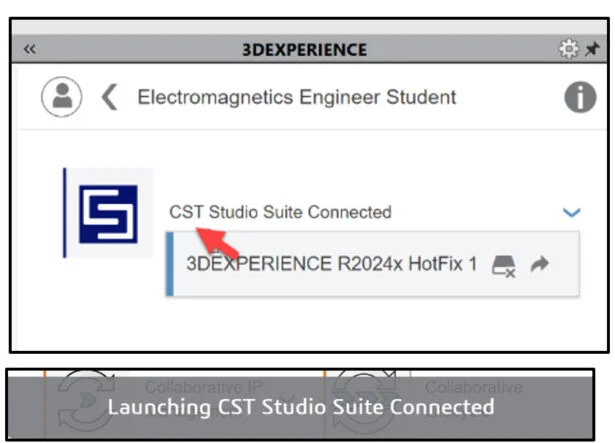
This can take 10 – 15 seconds. The CST Studio Suite 2024 icon is displayed at the bottom of the Windows menu.
Click the CST Studio Suite 2024 icon at the bottom of the Windows menu as illustrated.
The CST Studio Studio interface is displayed. View your options.
This software is licensed for non-commercial use only.
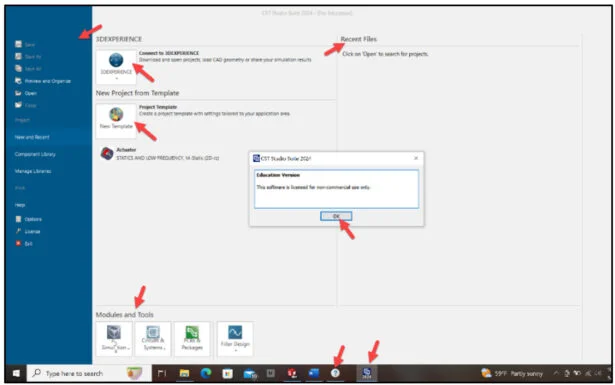
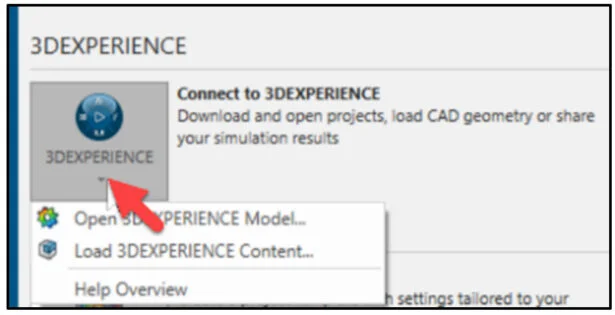
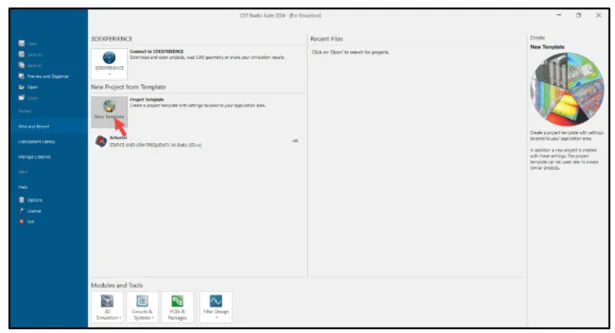
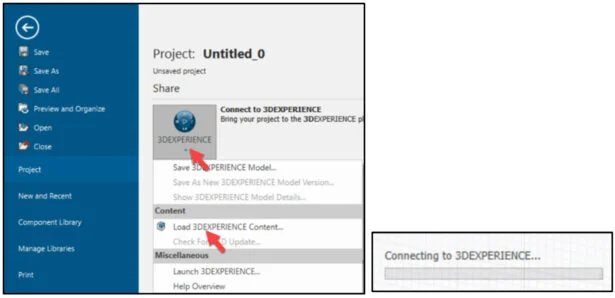
The 3DEXPERIENCE section provides the ability to download and open projects, load CAD geometry or share your simulation results. The drop-down menu provides the ability to: Open 3DEXPERIENCE Model, Load 3DEXPERIENCE Content, and view Help Overview.
The Open 3DEXPERIENCE Model command loads and saves the project and model to a chosen location on your hard drive. The Load 3DEXPERIENCE Content searches for the model in your Collaborative Space on the 3DEXPERIENCE platform.
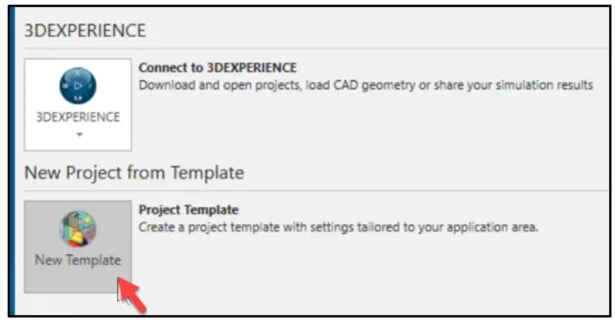
Create a New Project Template and Review Interface
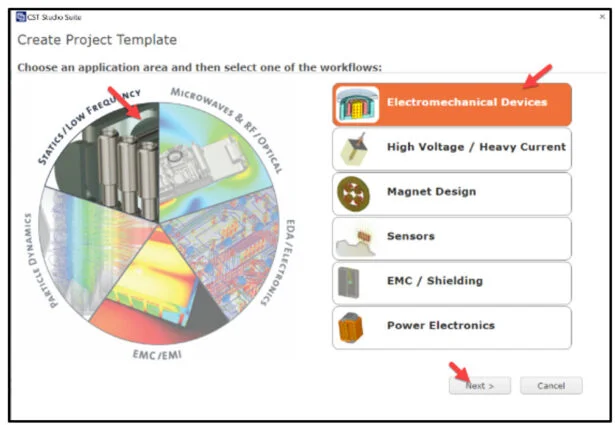
The New Project from Template section provides the ability to create a Project Template with tailored settings to your selected application area.
There are five application areas: STATICS/LOW FREQUENCY, MIRCOWAVES & RF/OPTICAL, EDA/Electronics, EMS/EMI, and PARTICLE DYNAMICS.
Each area provides various workflows as illustrated below for the application. In this example, the STATICS/LOW FREQUENCY application is selected.
A list of your created Project Templates is displayed under the New Project Template icon. This area would be empty if you are new to the software.
On the right side, there is a list of Recent Files. This area would be empty if you are new to the software.
On the left side, there is the Ribbon menu. View the available options. Click Component Library. View the three default tabs: All Components, Examples, and Tutorials. If you are new to the software, spend time investigating the tabs and reviewing the the tutorials.
Click OK from the CST Studio Suite 2024 dialog box.
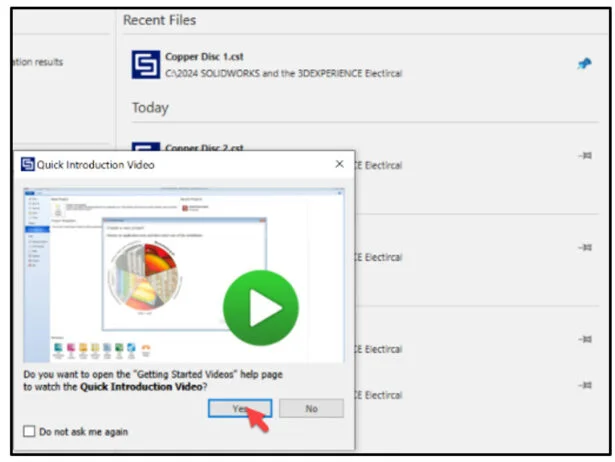
The Quick Introduction Video dialog box is displayed.
Click Yes.

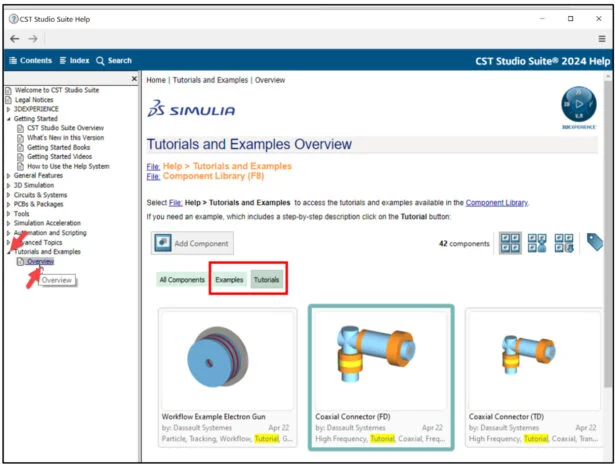
View the available videos. If this is your first time using the CST Studio Suite, it’s highly recommended that you review the tutorials. Note: There are three tabs in the section: Contents, Index, and Search. A question mark icon is displayed at the bottom of the Windows menu. Use the question mark icon and CST Studio Suite icon to move between menus in the CST Studio Suite.
Click and explore the various folders on the left side of the CST Studio Suite Help dialog box as illustrated.
Expand the Tutorials and Example folder.

Click Overview. View the available tutorials and examples. A Project needs to be open before you can obtain direct access to the tutorials and component library. I will address this later in the lesson.
Click the Search tab. Enter one or more keywords to perform a Search in CST Studio Suite.
Use the back arrow to move back a page.
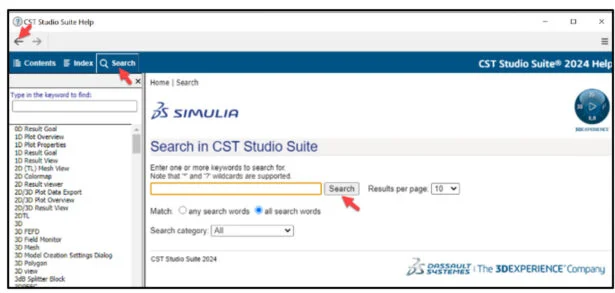
Return to the main CST Studio Suite menu.
Click the CST Studio Suite 2024 icon at the bottom of the Windows menu bar.
Create a Project Template.
Click the Project Template icon as illustrated.
Select an Application area.
Click STATICS/LOW FREQUENCY.
Click Electromechanical Devices for workflow.
Click Next>.
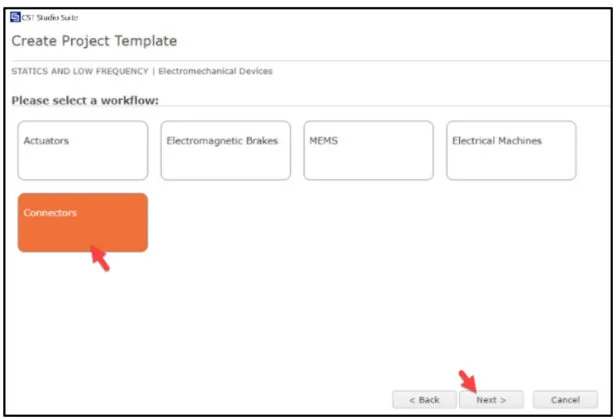
The STATICES and LOW FREQUENCY | ELECTROMECHANICAL Devices dialog box is displayed. Select a workflow.
Click Connectors.
Click Next>.
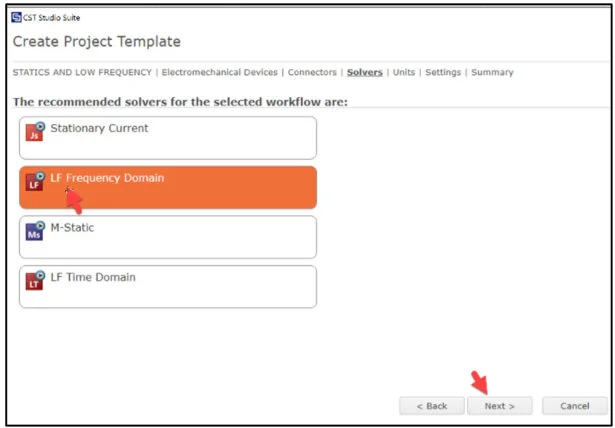
Select the LF Frequency Domain solver. The LF Frequency domain solver is applicable for the simulation of the electromagnetic fields excited with the periodic low frequency signals. The main task for this solver is to calculate the electromagnetic fields, resulting current densities (In the general time harmonic case of Maxwell equations), as well as losses, energies, parameters of the excitation sources and that of the lumped elements. The results are displayed automatically in the Navigation Tree after the solver runs.
Click Next>.
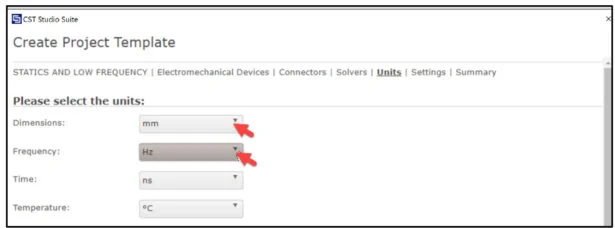
Select Units.
Select mm for Dimensions. Select Hz for Frequency.
Accept the default values.
Click Next>.
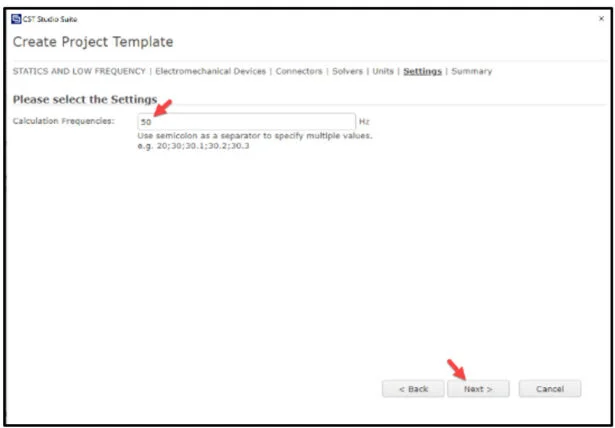
Select Settings.
Enter 50.
Click Next>.
Accept the default Template Name.
Click Finished.

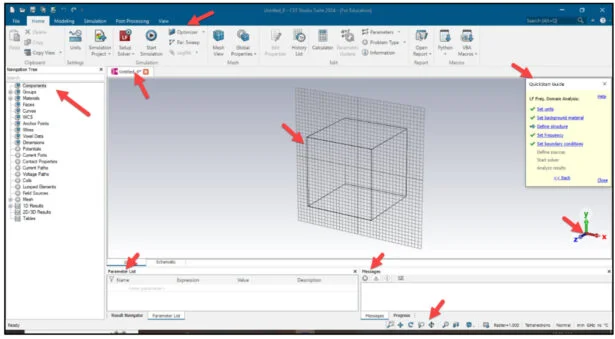
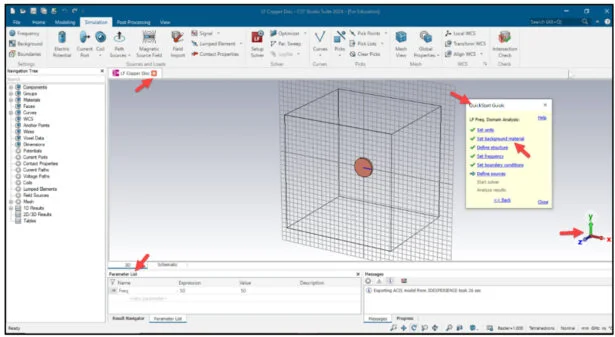
Review the CST Studio Suite Interface
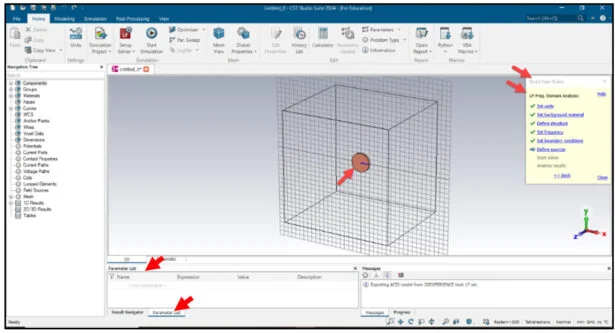
The Boundary box is displayed in the center. The Ribbon or Backstage menu displays various tabs. The default tab is Home.
The Navigation tree is displayed on the left side. The QuickStart Guide is displayed on the right side. The QuickStart Guide is referencing our created Project template.
The Messages window displays general information, solver progress, warnings, and errors during Project setup or simulation.
Load a model from the 3DEXPERIENCE Platform (LF Copper Disc) into the Boundary box.
Click File from the Ribbon menu.
Click the 3DEXPERIENCE icon as illustrated.
Click Load 3DEXPERIENCE Content from the drop-down menu.
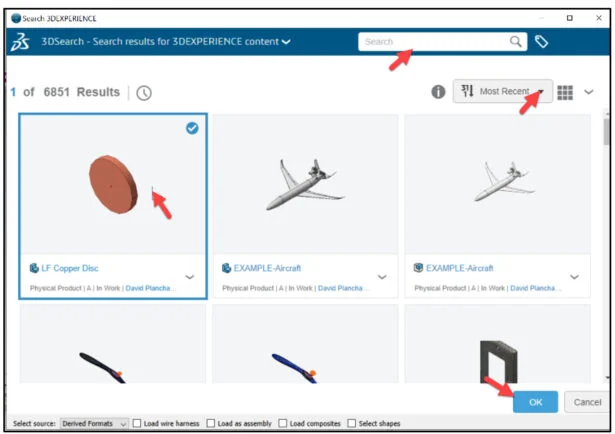
The 3DSearch – Search results for 3DEXPERIENCE content dialog box is displayed. Note: The tabs at the bottom of the dialog box.
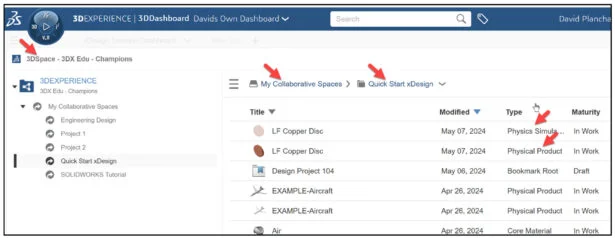
Use Search or Most Recent to locate the LF Copper Disc in your Collaborative space on the 3DEXPERIENCE platform.
Select LF Copper Disc. This is the model (Physical Product) that was uploaded to my Collaborative space in the 3DEXPERIENCE Platform from SOLIDWORKS.
Click OK. Note: The location of CST Studio on your hard drive.
The Bounding box displays the LF Copper Disc.
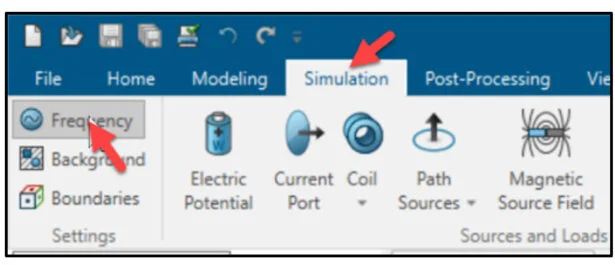
Define Frequency and Parameters
Define Calculation Frequency using a parameter.
Click Frequency from the Simulation tab in the Ribbon menu.
The Define Calculation Frequency dialog box is displayed.
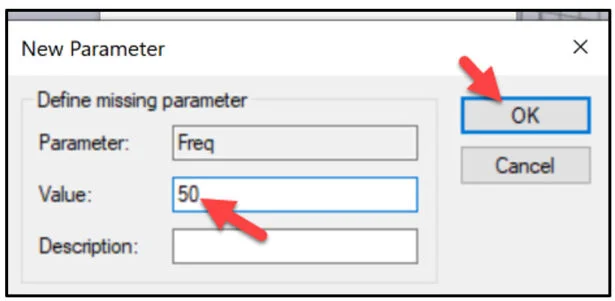
Enter Freq. Click OK.
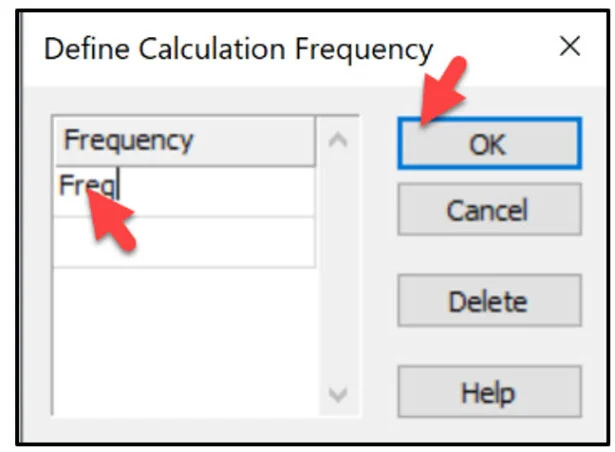
Enter 50 for Value.
Click OK from the New Parameter dialog box.
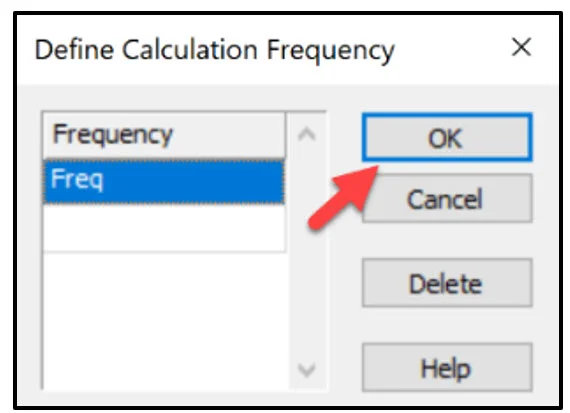
The Define Calculation Frequency dialog box is displayed.
Click OK from the Define Calculation Frequency dialog box.
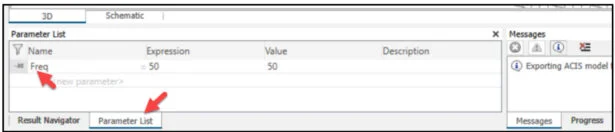
View the results in the Parameter List box.
Save the Project.
Click File from the Ribbon menu.
Click Save As.
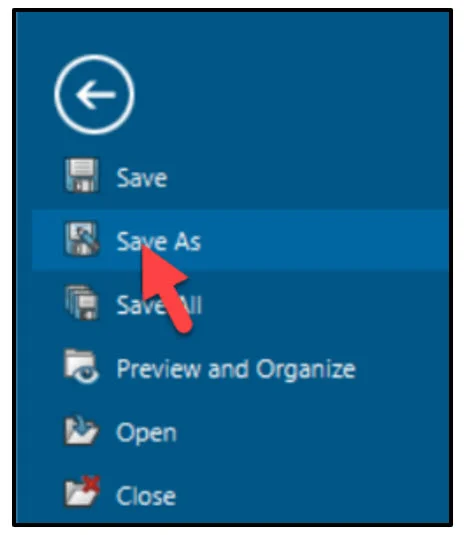
The Save As dialog box is displayed.
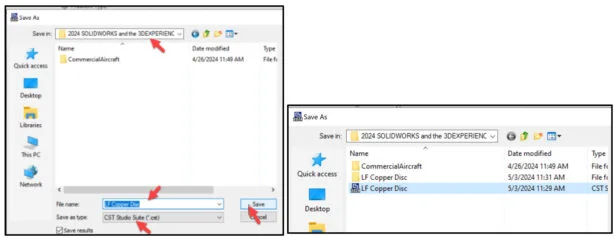
Enter File name and location (hard drive) in the Save As dialog box.
Click Save. The LF Copper Disc.cst and support folders are saved in the selected location.
Set Materials and Boundary Conditions
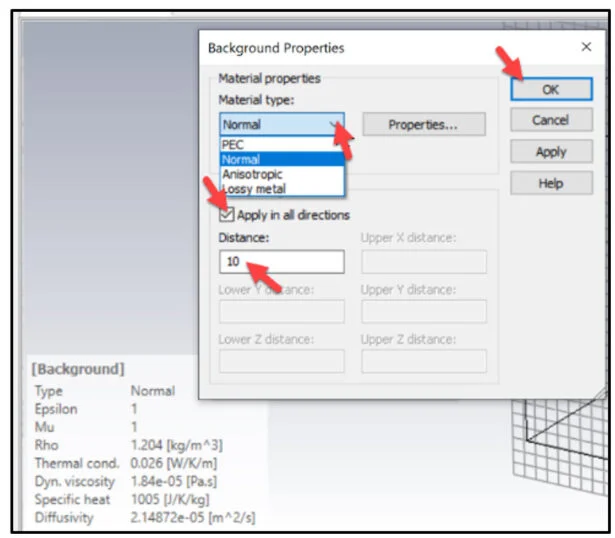
Set background materials.
Click Set background material from the QuickStart Guide.
The Background Properties dialog box is displayed. The dialog box provides the ability to fill the undefined space within the boundaries. Set distance between the model and bounding box. Note: The default Material type is air. The properties of air are applied.
Check the Apply in all directions box.
Enter 10.0 for Distance.
Click OK from the Background Properties dialog box. Note: Click Background from the Modeling tab in the Ribbon menu to view the bounding box.
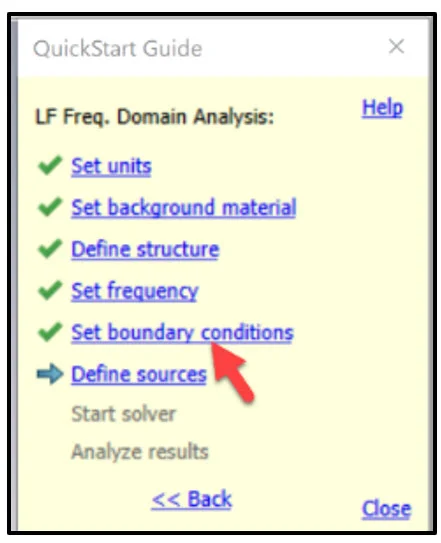
Click Set boundary conditions from the QuickStart Guide dialog box.
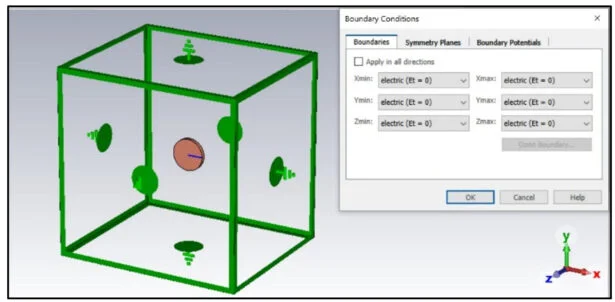
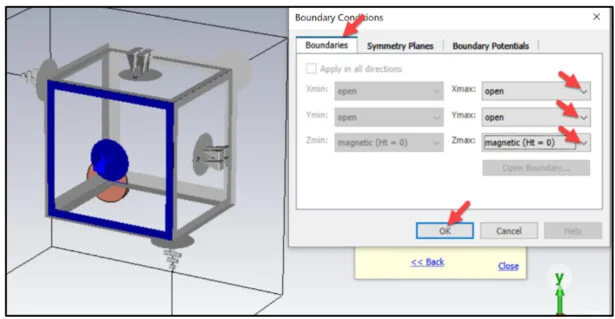
The Boundary Conditions dialog box is displayed. A computer simulation requires boundary conditions. In Low Frequency simulations, electric fields are normal to the boundary and magnetic fluxes are parallel to the boundary.
There are three tabs: Boundaries, Symmetry Planes, and Boundary Potentials. View the default values of the Boundaries tab.
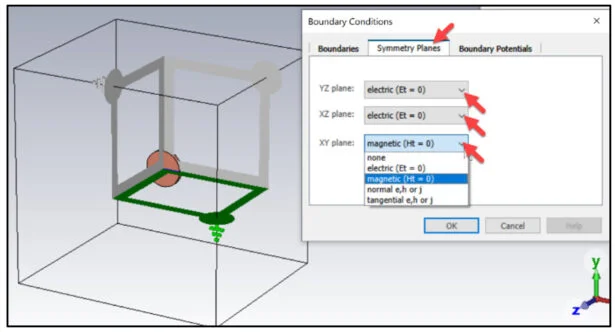
Set the Symmetry planes. We want to have a homogeneous magnetic source field in the Z-direction. Set the YZ and XZ planes to electric (Et = 0). Set XY plane to magnetic (Ht = 0).
Click the Symmetry Planes tab.
Select electric (ET = 0) for YZ and XZ plane. Select magnetic (Ht = 0) for the XY plane.
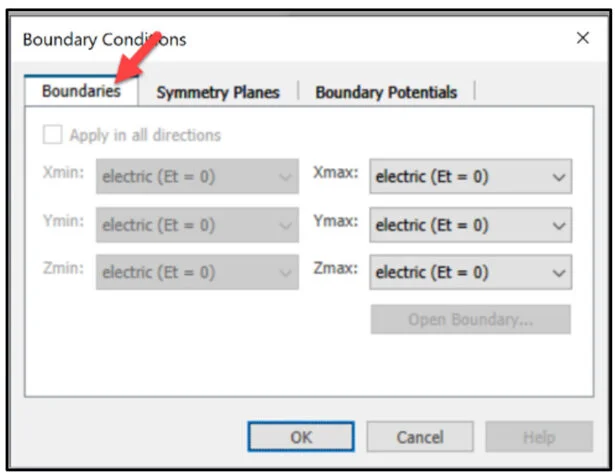
Return to the Boundaries tab.
Click the Boundary Conditions tab.
Set the source field.
Select boundary type for Zmax to magnetic (Ht = 0).
Set Xmax and Ymax to open.
Select open from the drop-down menu for Xmax.
Select open from the drop-down menu for Ymax.
Select magnetic (Ht = 0) from the drop-down menu for Zmax.
Click OK from the Boundary Conditions dialog box.
The Eddy currents are induced by Magnetic Source fields.
Define the Magnetic Source field.
Click Magnetic Source Field from the Simulation tab as illustrated.
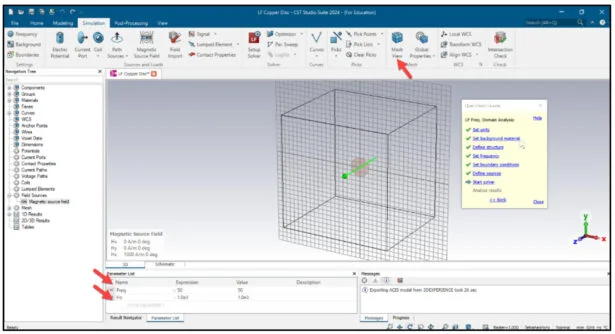
The Define Magnetic Source Field dialog box is displayed. A homogeneous magnetic source field can be defined as a source for the magnetostatic and for the LF frequency domain and time domain solver. This feature is supported by the tetrahedral and hexahedral solvers.
Input Hz for Z Field vector.
Click OK from the Define Magnetic Source Field dialog box.
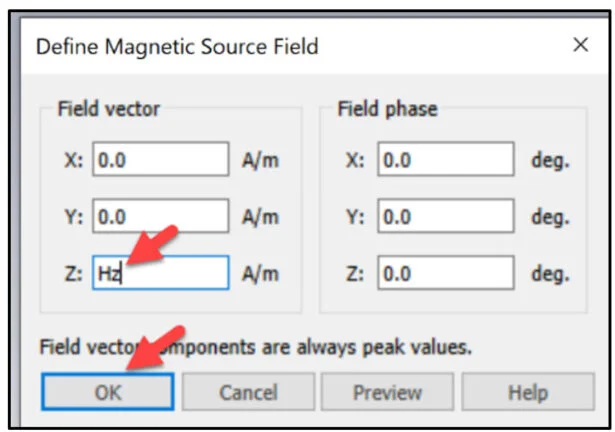
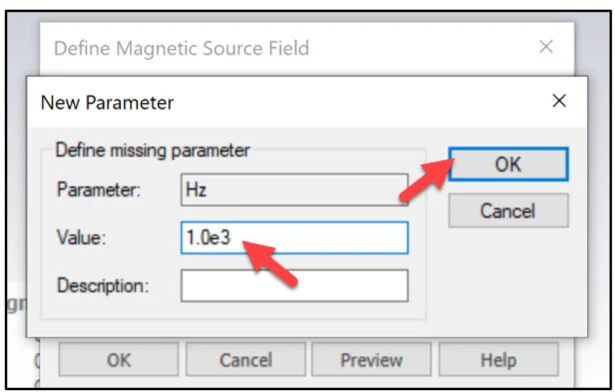
The New Parameter dialog box is displayed.
Enter 1.0e3 for Value.
Click OK from the New Parameter dialog box.
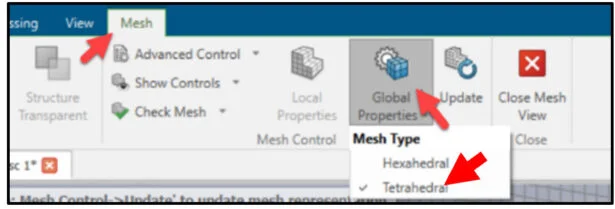
Define the Mesh
Refine the mesh.
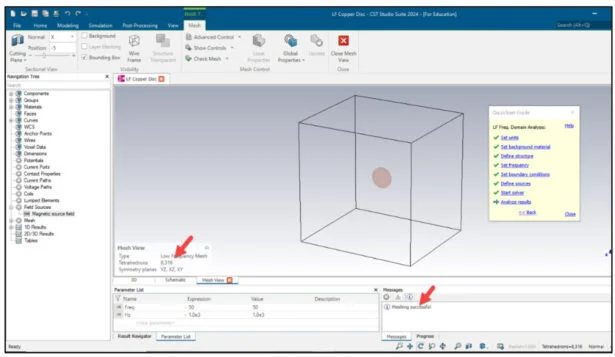
Click Mesh View from the Simulation tab.

The Student edition has a limit of 10,000 mesh cells for a tetrahedral mesh.
Expand Global Properties under the Mesh tab as illustrated.
Click Tetrahedral.
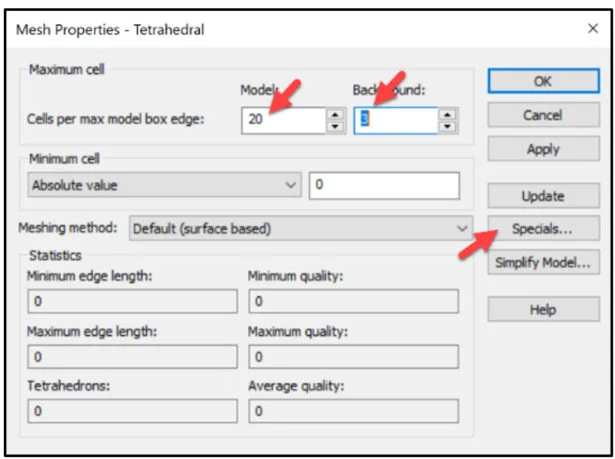
The Mesh Properties – Tetrahedral dialog box is displayed.
Enter 20 for Model.
Enter 3 for Background.
Click the Specials button.
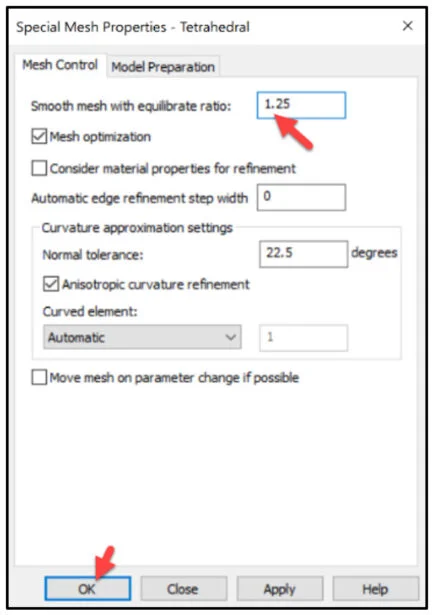
The Special Mesh Properties – Tetrahedral dialog box is displayed.
Enter 1.25 in the Smooth mesh with equilbrate ratio box.
Click OK from the Special Mesh Properties – Tetrahedral dialog box.
Click OK from the Mesh Properties – Tetrahedral dialog box.
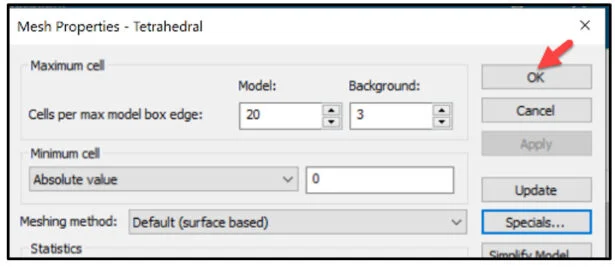
Update the mesh representation.
Click Update from the Mesh tab in the Ribbon menu.
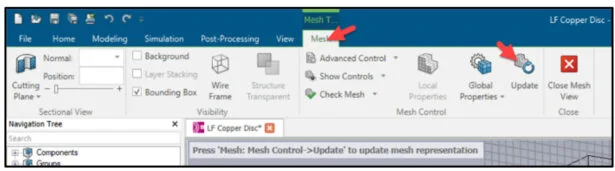
Meshing is successful. We are under the Student edition limit of 10,000 mesh cells for a tetrahedral mesh.
Run the Simulation
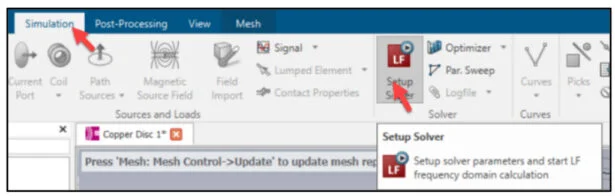
Start the Simulation.
Click the Setup Solver icon from the Simulation tab in the Ribbon menu.
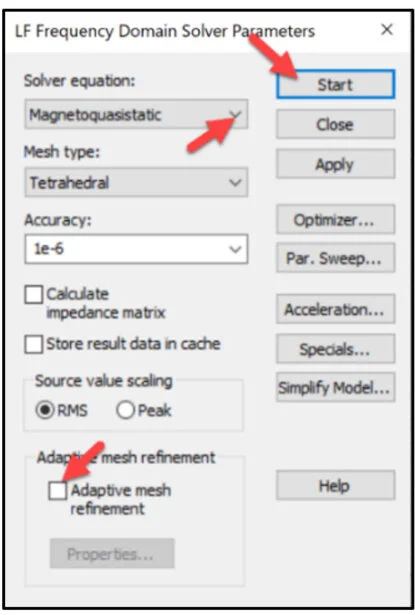
The LF Frequency Domain Solver Parameters dialog box is displayed.
Select Magnetoquasistatic for Solver equation.
Unselect the Adaptive mesh refinement box.
Click Start.
View the results section in the Navigation tree.
Read the messages.
Clear all messages.
Input the copper annealed conductivity value for an analytical result. Obtain this information directly from the Navigation tree.
Expand the Materials folder.
Double-click Copper (annealed). The Material Properties: Copper (Annealed) dialog box is displayed.
Click the Conductivity tab.
Copy the Conductivity value.
Create a new parameter and the bottom of the Parameter list box.
Enter Conductivity in the Name cell as illustrated.
Paste the Conductivity value 5.8e7 in the Expression cell as illustrated.
Click Cancel from the Material Properties: Copper (Annealed) dialog box.
Results
Click B-Field (freq) under the 2D/3D Results folder.
View the results.
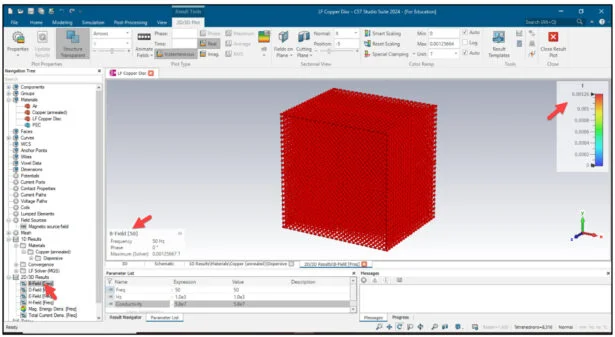
In another lesson, we will calculate the analytical value and compare it to the simulation results for the Eddy current on the copper disk.
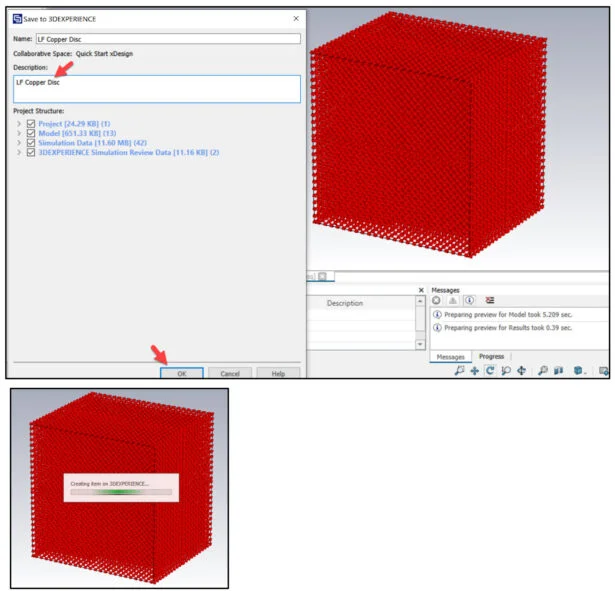
Save the LF Copper Disc Project to the 3DEXERIENCE Platform.
Click File from the Ribbon menu.
Expand the 3DEXPERIENCE icon under Share.
Click Save 3DEXPERIENCE Model.

The Save to 3DEXPERIENCE dialog box is displayed.
Enter Description.
Check all Project Structure items.
Click OK from the Save to 3DEXPERIENCE dialog box.
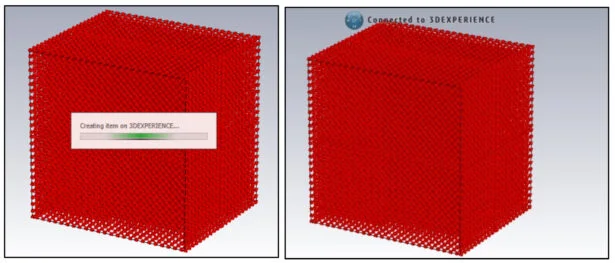
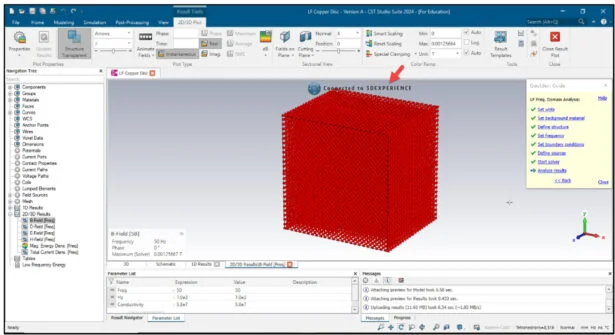
View the Connected to 3DEXPERIENCE in the Boundary box area.
Exit CST Studio Suite.
Click File from the Ribbon menu. Click Exit.
The Project (Physical Simulation) is saved to the 3DSpace in my Collaborative Space/Bookmark on the 3DEXPERIENCE Platform.
The lesson is finished.
Community
Academic Community: After you create a 3DEXPERIENCE ID, Educators, can get more information on xDesign and SOLIDWORKS. Request to join the 3DEXPERIENCE Academic Community for free at go.3ds.com/academiccommunity.
Student Community: Students, join the student community for free at go.3ds.com/studentcommunity. Check out great posts on Mechanism Mondays, FEA Fridays, Solid Saturdays (animations), Formula Student and Formula SAE exercises.
SIMULIA Community: Students and Educations, join the SIMULIA community to learn the latest in simulation technology with the Abaqus solver, CST Studio Suite for Electro-magnetics, Antenna Magus and more.
SOLIDWORKS Community: Connect with the SOLIDWORKS community with our SOLIDWORKS User Forum, SOLIDWORKS User Groups, news and info,
SIMULIA Simulation Technology
Additional Lessons in 3DEXPERIENCE Simulation Structural Analysis:
Analysis Lesson 1: SOLIDWORKS and 3DEXPERIENCE Simulation for Diving Board
Analysis Lesson 2: SOLIDWORKS and 3DEXPERIENCE Simulation Linear Structural Validation Part 1
Analysis Lesson 3: SOLIDWORKS and 3DEXPERIENCE Simulation Linear Structural Validation Part 2
Analysis Lesson 4: SOLIDWORKS and 3DEXPERIENCE Simulation Linear Structural Validation for Assembly
Analysis Lesson 5: SOLIDWORKS and 3DEXPERIENCE Simulation Structural Model Creation
CFD Lesson 1: SOLIDWORKS and 3DEXPERIENCE Fluid Scenario Creation (Part1)
CFD Lesson 2: SOLIDWORKS and 3DEXPERIENCE Fluid Scenario Creation (Part 2)
CFD Lesson 3: SOLIDWORKS and 3DEXPERIENCE Fluid Scenario Creator (Part 3)
CFD Lesson 4: SOLIDWORKS Duct and 3DEXPERIENCE Fluid Scenario Creator (Part 1)
CFD Lesson 5:SOLIDWORKS Duct and 3DEXPERIENCE Fluid Scenario Creator (Part 2)
CFD Lesson 6:SOLIDWORKS Race Car and 3DEXPERIENCE Fluid Scenario Creator
Plastics Lesson 1: SOLIDWORKS Plate and 3DEXPERIENCE Plastic Injection App
Plastics Lesson 2: SOLIDWORKS Toothbrush and 3DEXPERIENCE Plastic Injection App
From SOLIDWORKS Desktop to the 3DXPERIENCE Platform
Additional Lessons in this series on 3DEXPERIENCE Works:
3DEXPERIENCE Works Lesson 1: Getting Started with SOLIDWORKS and the Platform
3DEXPERIENCE Works Lesson 2: SOLIDWORKS and Save and Revision
3DEXPERIENCE Works Lesson 3: SOLIDWORKS and Bookmarks, Share and Delete
3DEXPERIENCE Works Lesson 4: SOLIDWORKS and Lifecycle Maturity States
3DEXPERIENCE Works Lesson 5: SOLIDWORKS, Collaborative Space and Bookmarks
3DEXPERIENCE Works Lesson 6: SOLIDWORKS with Search Tools
3DEXPERIENCE Works Lesson 7: SOLIDWORKS with 3DPlay
3DEXPERIENCE Works Lesson 8: SOLIDWORKS with 3DDrive
3DEXPERIENCE Works Lesson 9: SOLIDWORKS and 3DSWYM
3DEXPERIENCEWorks Lesson 10: SOLIDWORKS and 3DEXPERIENCE Simulation
Cloud Apps by SOLIDWORKS (100% Browser Based)
Additional Lessons in this series on SOLIDWORKS xDesign
SOLIDWORKS xDesign Lesson #1: Getting Started
SOLIDWORKS xDesign Lesson #2: Mouse Control and Collaborative Space
SOLIDWORKS xDesign Lesson #3: Sketch Planes
SOLIDWORKS xDesign Lesson #4: Create A Dashboard
SOLIDWORKS xDesign Lesson #5: Views and Orientations
SOLIDWORKS xDesign Lesson #6: Importing Files and Using Bookmarks
SOLIDWORKS xDesign Lesson #7: Assemblies
SOLIDWORKS xDesign Lesson #8: 4Bar Linkage and Kinematics
SOLIDWORKS xDesign Lesson #9: External References and Copy with Mates
SOLIDWORKS xDesign Lesson #10: Sketching, Constraints and Dimensions
SOLIDWORKS xDesign Lesson #11: Sketch Based and Applied Features
Design well. Marie