

After teaching 1000’s of students and writing about SOLIDWORKS for over 25 years, David Planchard, emeritus WPI, is exploring SOLIDWORKS desktop and the integrated 3DEXPERIENCE Platform. Through the 3DEXPERIENCE Works Lesson series, David helps educators understand the 3DEXPERIENCE Engineer, Fluid Scenario Creation App (CFD) with simple examples and industry practices. The Platform offers are available thru your Education Partner (VAR).
In CFD Lesson 2 Part 2, we opened a SOLIDWORKS session. Connected to the 3DEXPERIENCE platform. Utilized the 3DSpace widget from the MySession panel in the SOLIDWORKS Task Pane. Located the Physics Simulation study named Ball valve in the saved Collaborative space. Used the sort by last method.
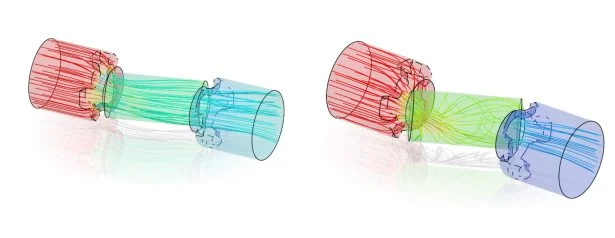
Launched the Fluid Scenario Creation App. Opened the Ball valve Physics Simulation study. Viewed the last displayed contour plot. Explored various Help options. Added streamlines to illustrate flow through the valve. Saved the Physics Simulation study. Closed the study. Closed the SOLIDWORKS session.
In this lesson, start a SOLIDWORKS session. Open the SOLIDWORKS part from CFD Lesson 2 (Part 2). View the Status State, Revision and Maturity State in the Task Pane. Launch the 3DSpace Widget from the SOLIDWORKS Task Pane. View your Collaborative space. Locate the Physics Simulation study named Ball valve in the saved Collaborative space. Use the sort by last method.
Launch the Fluid Scenario Creation App. Return to the active SOLIDWORKS session. Modify the Ball valve control angle from 165 degrees to 145 degrees relative to the Front Plane. This will increase flow restriction and pressure drop.
Create a new revision (B). Save the new revision (B) to the My Work folder in the 3DEXPERIENCE vault. Load the new revision (B) into the Physics Simulation study on the 3DEXPERIENCE platform using the Collaborative Lifecycle App.
Link the Physics Simulation study with the new revision. Apply the Replace Model By Revision command. Link the Physics Simulation study to the new model revision. Run the Physics Simulation study. View the results.
Save the Physics Simulation study. Close the Physics Simulation study. Return to SOLIDWORKS.
Delete the Simulations study Ball valve (Physics Simulation and Finite Element) along with the assembly and reference components (Physical Products) in the 3DEXPERIENCE Platform. Use the 3DSpace Widget from the SOLIDWORKS Task Pane.
Launch the 3DEXPERIENCE Platform and Start SOLIDWORKS
Before we start, there are a few items that you need to know.
In this lesson, use your default Collaborative space. An internet connection is required. A 3DEXPERIENCE ID is required.
The Flow Simulation lesson provides a foundation to users who are new to using simulation to solve real-world engineering and design problems. A Solid body is used. You should have a basic understanding of flow, pressure, velocity and the Computational Fluid Dynamics (CFD) method.
3DEXPERIENCE Launcher needs to be installed. 3DEXPERIENCE Works Lesson 1: Getting Started with SOLIDWORKS.
The 3DEXPERIENCE platform is browser driven. Your existing cookies and cache determine what you will see on your computer desktop or during a SOLIDWORKS login. A full installation of SOLIDWORKS 2019 SP0 or later is required.
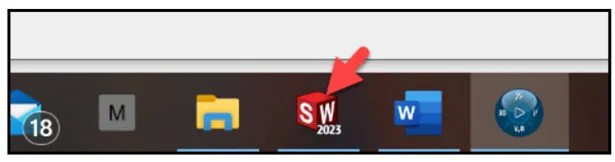
Start a SOLIDWORKS session from your desktop.
Double-click the SOLIDWORKS icon.

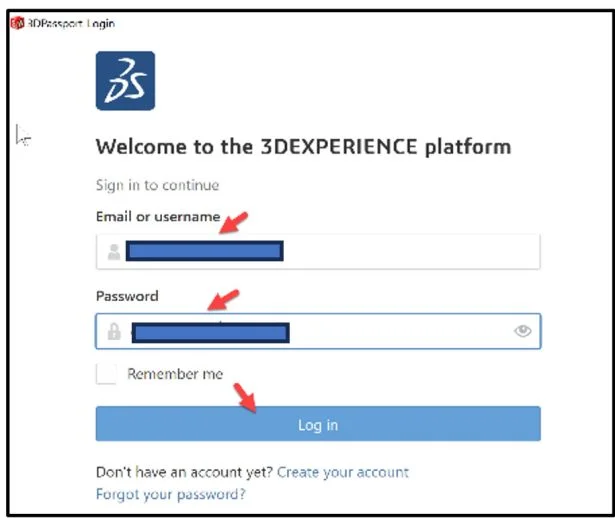
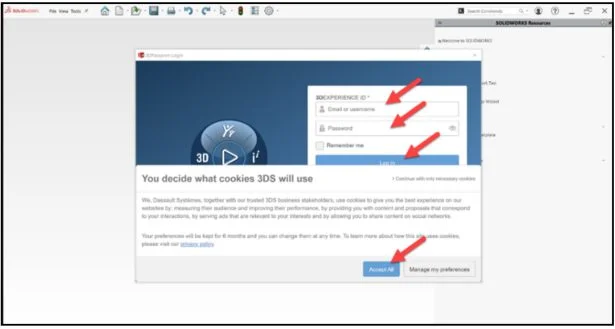
View the illustration below. Depending on your system setup, cookies, and cache, it will be different. Read the provided information.
Input the requested data.
Click Accept All.
The Welcome – SOLIDWORKS dialog box is displayed.
You are logged into the 3DEXPERIENCE platform.
Close the Welcome dialog box.

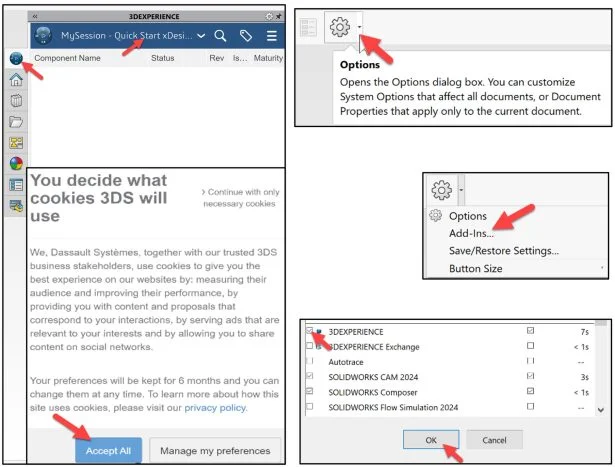
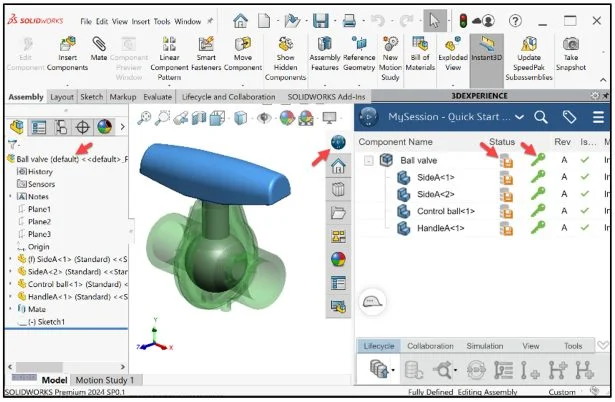
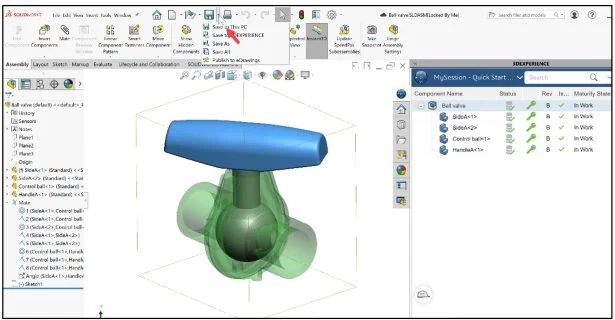
Click the 3DEXPERIENCE icon in the Task Pane. The MySession panel is displayed. This displays the two-way communication between SOLIDWORKS running on your desktop and the 3DEXPERIENCE platform running in the cloud.
In this lesson, I’m using a Collaborative space named Quick Start xDesign.
Note: If you do not see the 3DEXPERIENCE icon, click the Options drop-down arrow, click Add-Ins, check the 3DEXPERIENCE box, click OK, from the SOLIDWORKS Main menu.
Click Accept All if needed.
Open the Ball value assembly
Open the Ball valve assembly that was download, used in CFD Lesson 1 (Part 1) and saved at the end of the lesson. This Ball valve was previously uploaded and saved to the 3DEXPERIENCE platform.
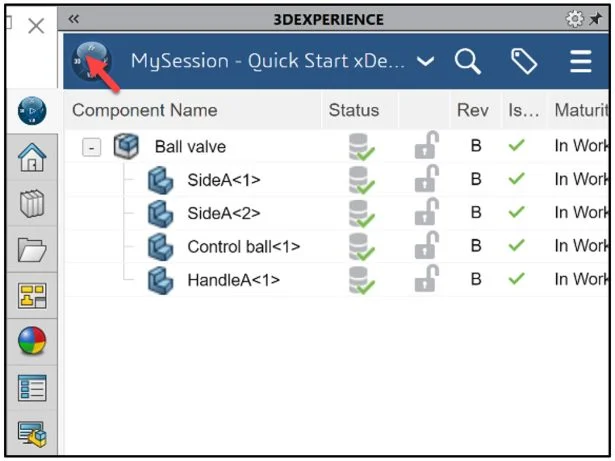
Expand the Task Pane bar. The MySession panel displays the Component Name (Ball valve), Status (File is modified since the last time saved to the platform), Locked status (Locked), Rev (Revision A), Is Last Revision (Yes), Maturity State (In Work) and more.
The orange save Status icon for the Ball valve assembly and reference components informs you that the file was modified since the last save into the 3DEXPERIENCE platform.
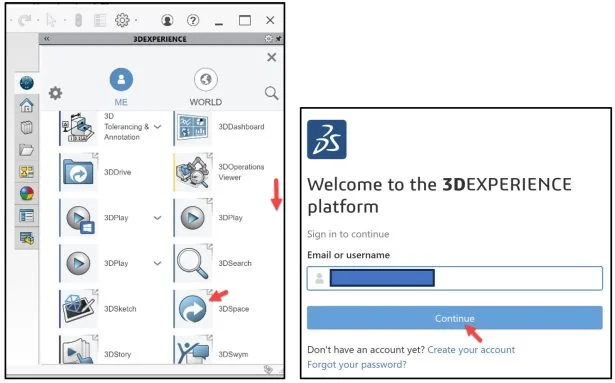
Use the 3DSpace widget to view your Collaborative space, review 3DEXPERIENCE Works Lesson 5: SOLIDWORKS, Collaborative Space and Bookmarks. A widget is an extension of the App that allows you to use it in the Dashboard. A widget is displayed with an arrow in the upper right corner of the icon as illustrated.
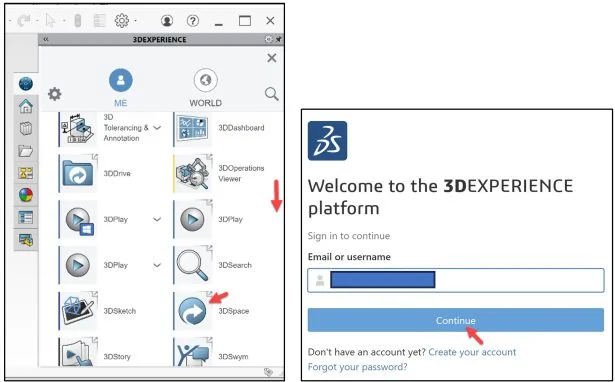
Drag the slider downward to view the 3DSpace widget.
Click the 3DSpace widget. Note: The 3DSpace widget is used to create a Collaborative space. The default location defines the Collaborative space (cloud storage) where your models and data are saved.
Log into the 3DEXPERIENCE platform.
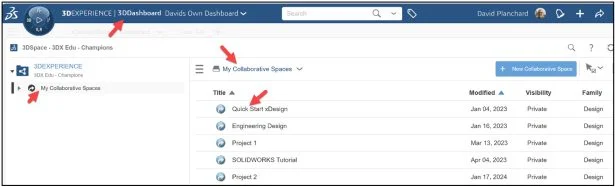
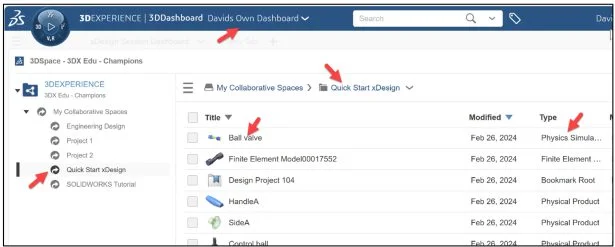
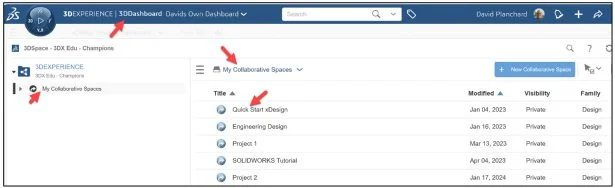
Your 3DEXPERIENCE | 3DDashboard is displayed.
Collaborative Space
In CFD Lesson 1 Part 1, I saved the Fluid Scenario Creation Simulation study (Model, Scenario and Result) in my Quick Start xDesign Collaborative space.
Double-click your Collaborative Space. In this example it is Quick Start xDesign.
Locate the Physics Simulation study (Ball valve). In this example, I use the sort by last method.
Click the Sort icon. A drop-down menu is displayed.
Select Modification date (31-1).
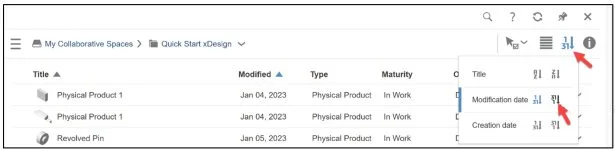
View the results.
Fluid Scenario Creation App
Right-click Ball valve (Physics Simulation) as illustrated in the Title column below.
A Pop-up menu is displayed.
Expand Open With. View your options.
Launch the Fluid Scenario Creation App.
Click the More Apps icon.
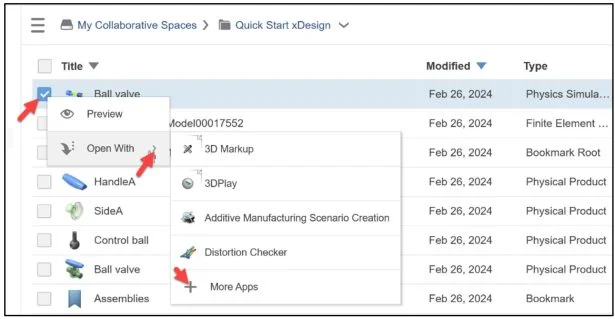
Click the Fluid Scenario Creation App.

This can take 10 – 15 seconds.
Click Restore if needed.
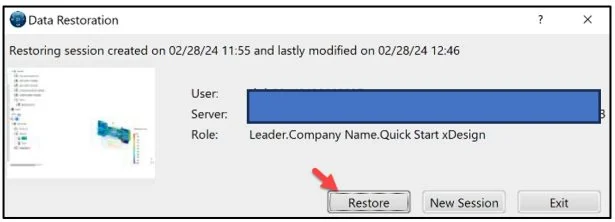
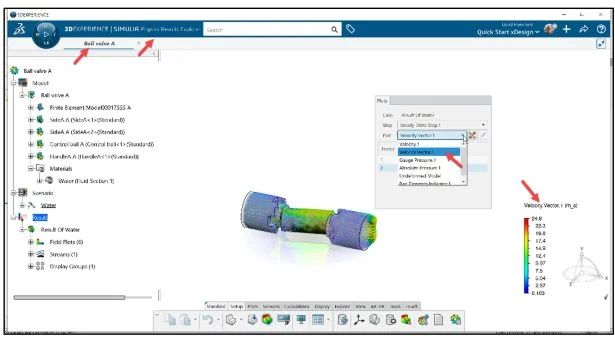
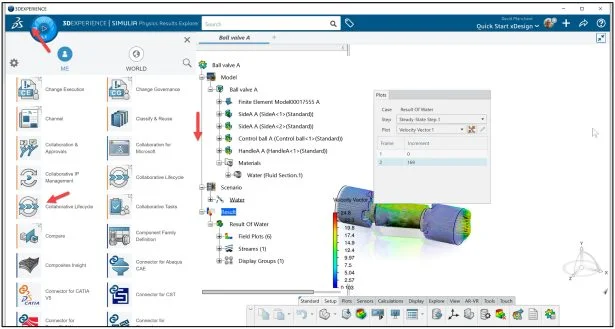
3DEXPERIENCE | SIMULIA Fluid Scenario is displayed.
Center the model if needed.
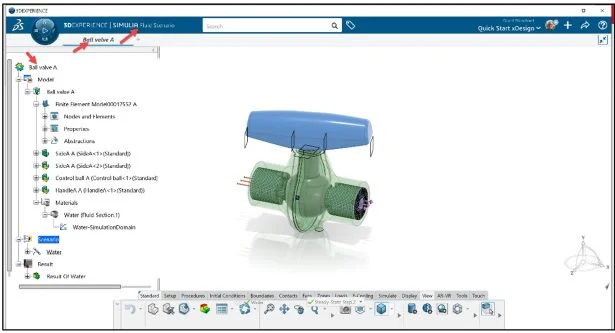
Review Result
Expand the Result folder.
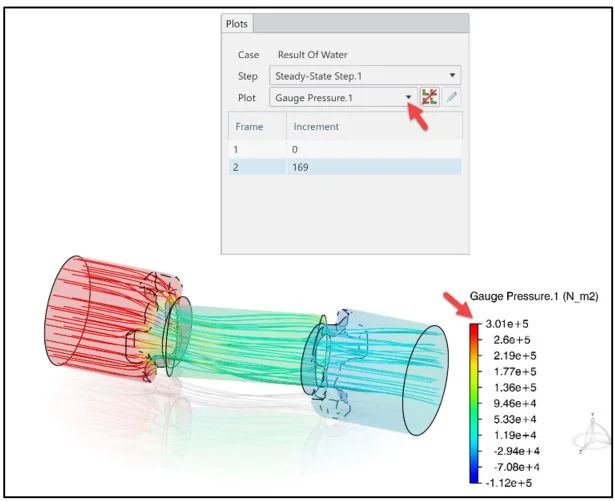
Display the last contour plot.
Double-click the Result folder.
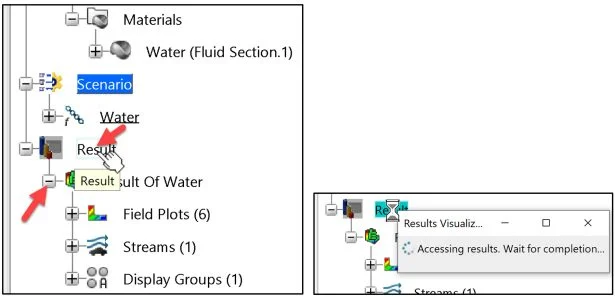
The last Simulation study contour plot from CFD Lesson 2 Part 2 is displayed.
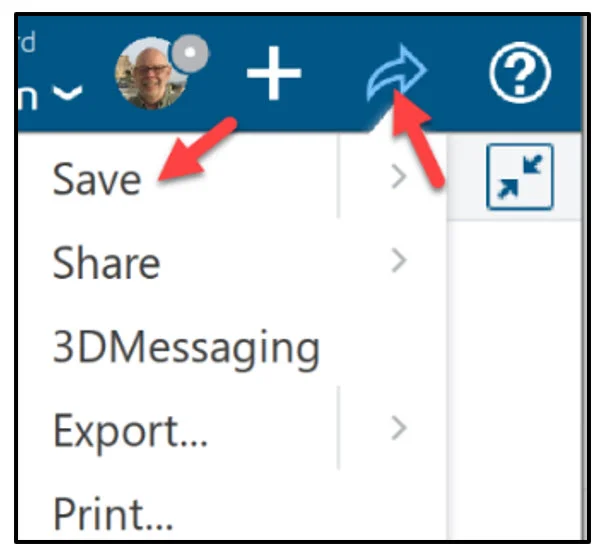
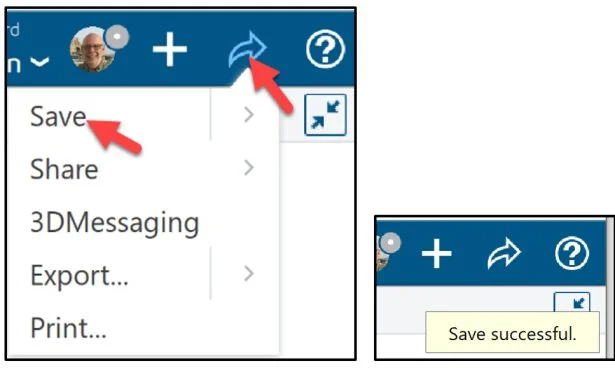
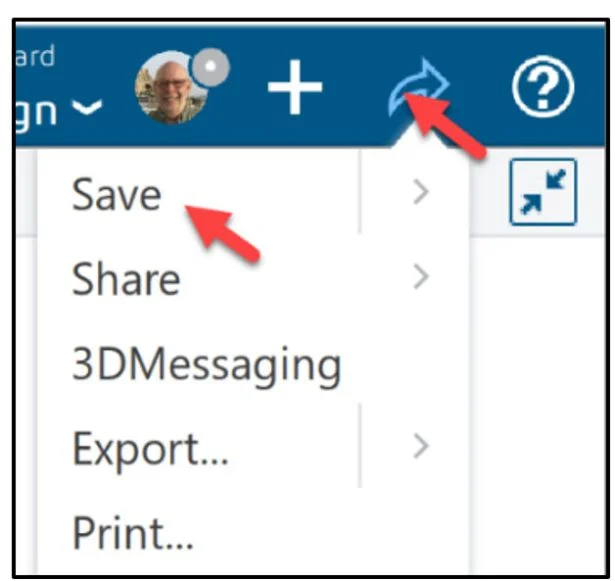
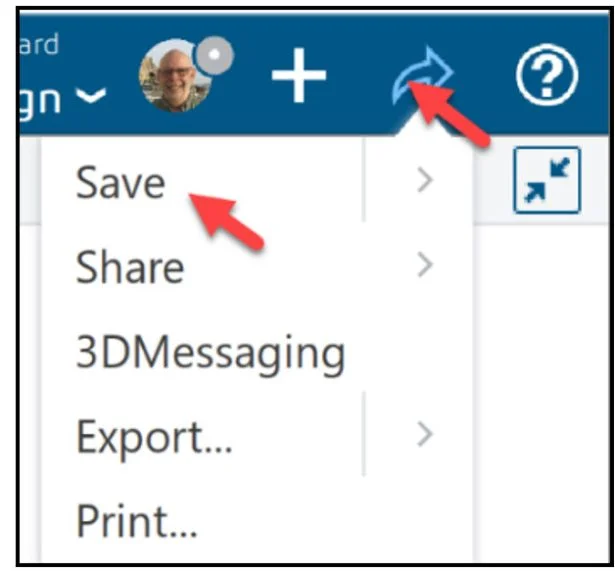
Save the Physics Simulation study (Model, Scenario and Result).
Click the Share icon as illustrated.
Click Save.
Modify the Ball value
Modify the Ball valve control angle from 165 degrees to 145 degrees relative to the Front Plane.
Create a new Revision. Load the new Revision (B) into the Physics Simulation study.
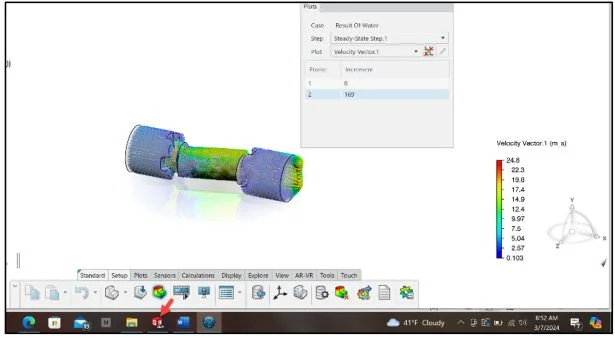
Return to your active SOLIDWORKS session.
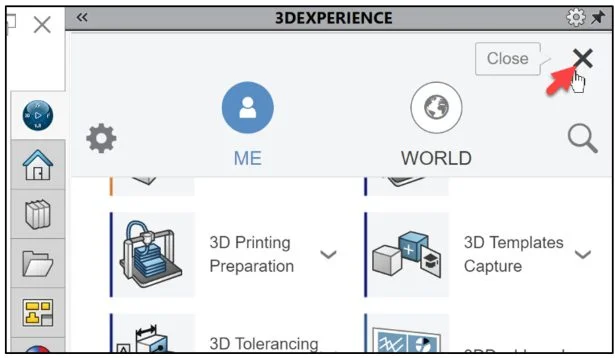
Click the SOLIDWORKS icon in the WindowsTask Pane as illustrated.
Display the 3DEXPERIENCE Compass in the MySession panel.
Click Close in the 3DEXPERIENCE Task Pane.
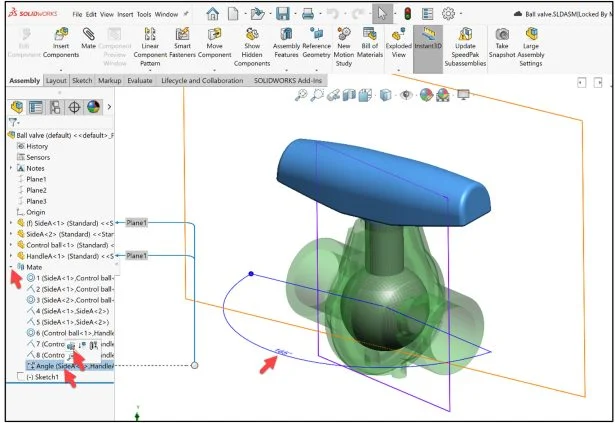
Modify the angle from 165 degrees to 145 degrees relative to the Front Plane. This will increase flow restriction and pressure drop.
Expand the Mates folder.
Right-click Angle.
Click Edit Feature.
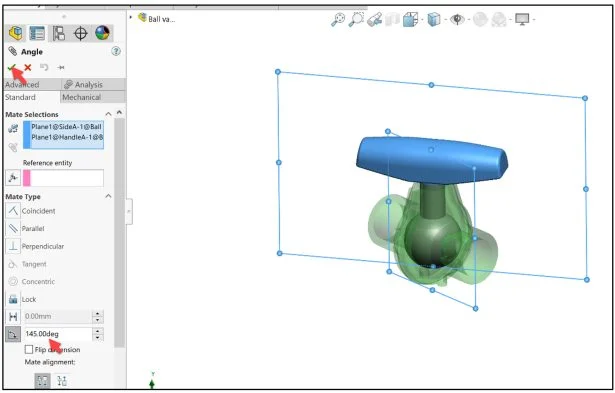
Enter 145 degrees.
Click OK.
Save the model to the My Work folder in the 3DEXPERIENCE vault. The default location on a non-network system, is C: 3DEXPERIENCEMy Work. Note: When you upload a file to the platform, the file is both copied to the My Work folder on your computer and stored in your collaborative space on the 3DEXPERIENCE platform. A collaborative space is a storage area that manages version control for shared files.
Click Save.
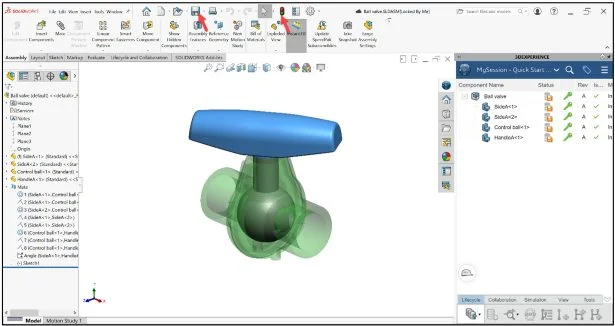
Save the Ball valve modification to the 3DEXPERIENCE platform.
Save with Options and Create Revision B
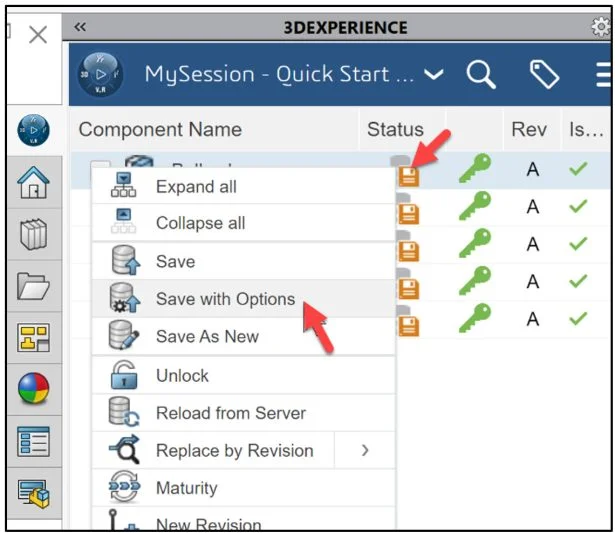
Right-click the Status icon in the MySession panel.
Click Save with Options from the drop-down menu.
The Save to 3DEXPERIENCE dialog box is displayed.
Click the Lets you create a new revision box as illustrated. The present Revision is A. Create a new Revision B. Revision B will be saved and uploaded to the platform and the Simulation study.
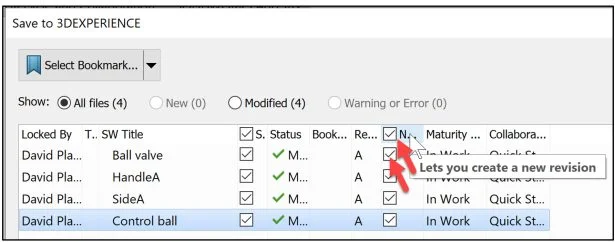
Click Save from the Save to 3DEXPERIENCE dialog box.

The model is directly loaded into your Collaborative space and Bookmarked on the 3DEXPERIENCE platform. You are back in your SOLIDWORKS session.
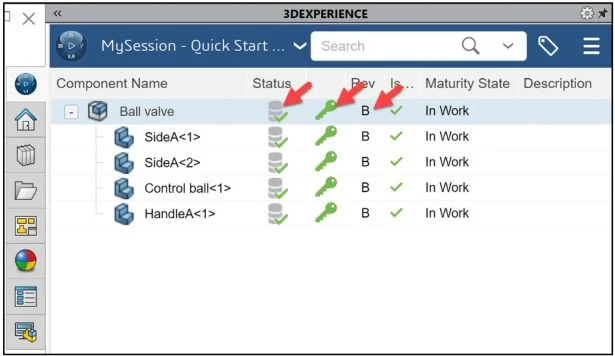
View the new Revision (B).
Lock the assembly and reference components. This prevents anyone else in making a change to it.
Select Ball valve in the MySession panel.
Return to the Simulation study.
Click the 3DEXPERIENCE icon in the WindowsTask Pane as illustrated.

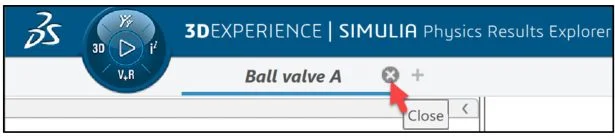
Notice the naming in the Simulation study Ball valve A. This is the default revision.
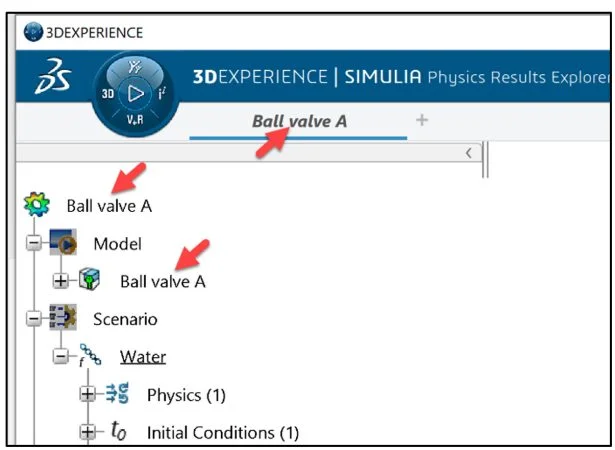
One of the benefits of the platform is that your model revisions and your Simulation study revisions are independent from each other. This means you have the freedom to select what model revisions are used in the Simulation study.
Simulation Revision B
Create a new revision for the Simulation study.
Click the left side of the Compass as illustrated (Roles, Apps & Solution portfolio).
Drag the slider downward to view the Collaborative Lifecycle App.
Launch the Collaborative Lifecycle App.
Note: A Widget is an extension of the App that allows you to use it in a Dashboard. A Widget is displayed with an arrow in the upper right corner of the icon. An App is displayed with no arrow.
Click the study name: Ball valve A.
Click New Revision from the Lifecycle tab in the Action bar.
The New Revision dialog box is displayed. The New Revision command provides the ability to capture a particular derivation of an object during its lifecycle. A green arrow indicates that the revision and its content are the last revision of the object.
Click OK from the New Revision dialog box.
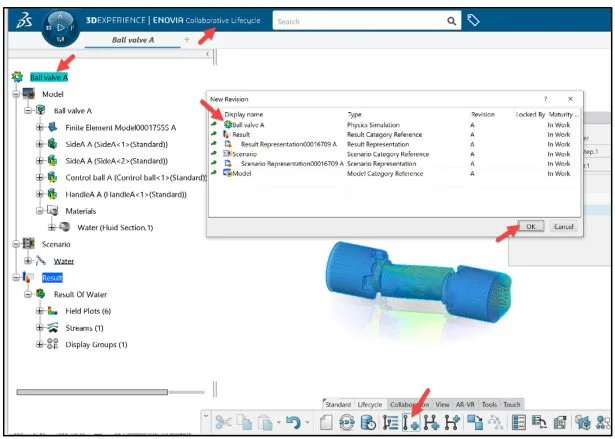
A new Simulation Revision B is created, but it references the model file (Ball valve A) Revision A.
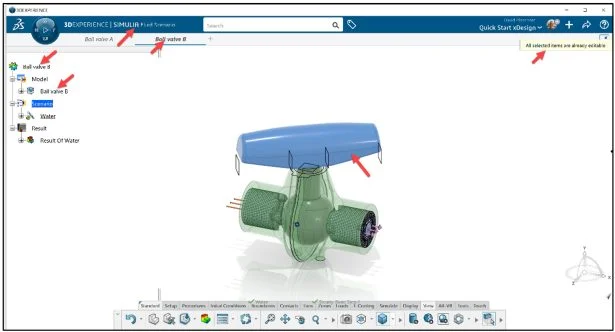
Link the Simulation study (Ball valve B) to the model file (Ball valve B).
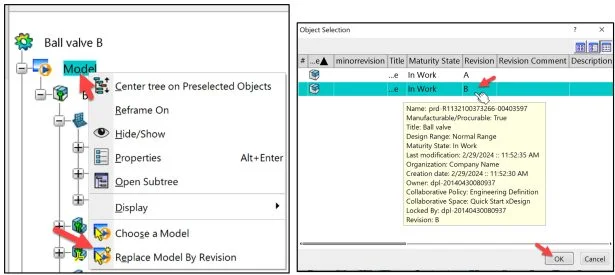
Right-click Model in the Simulation study as illustrated.
Click Replace Model By Revision from the drop-down menu. The Object Selection box is displayed.
Select Revision B as illustrated.
Click OK from the Object Selection dialog box.
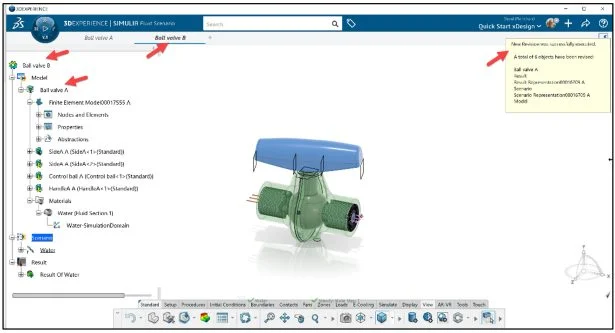
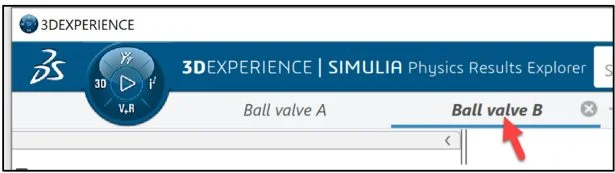
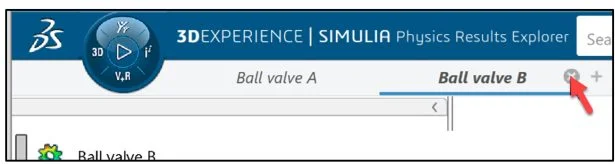
The Ball valve B study references the new tab Ball valve B. Note the change in the handle angle of Ball valve B in the Graphics area.
Save the Simulation Study. Click the Share icon as illustrated.
Click Save.
Update Mesh and Simulate
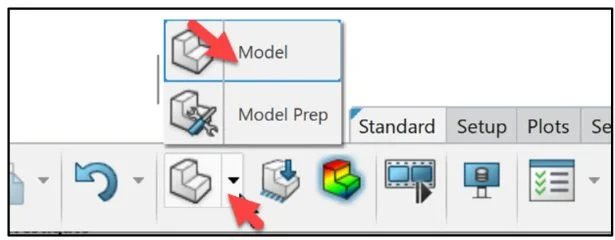
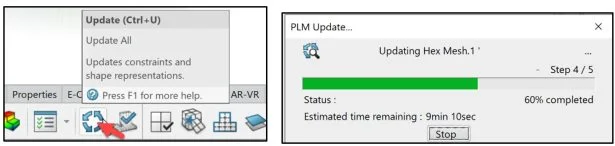
Update the mesh.
Click Model from the Standard tab in the Action bar.
Click Update from the Action bar.
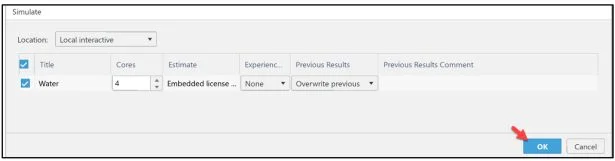
Click Simulate for the Assistant Commands box.
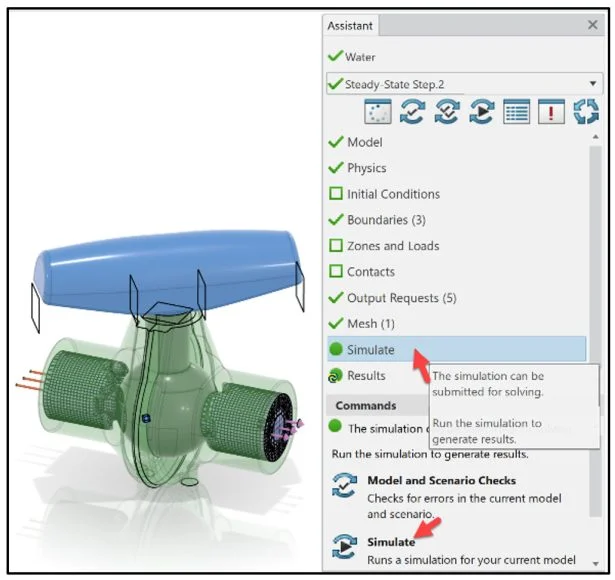
Click OK.
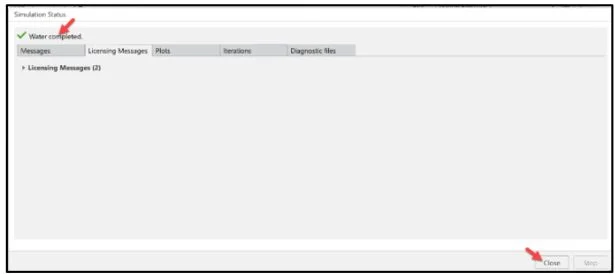
Click Close from the Simulation Status dialog box.
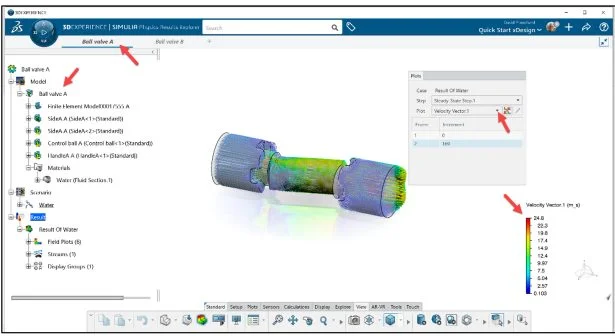
Velocity Vector Result
The Velocity Vector.1 contour plot is displayed. Note: The Control ball is set at 145 degrees versus 165 degrees from the Front Plane of the assembly. When set to 145 degrees, the max Velocity Vector.1 is 84.6 m_s.
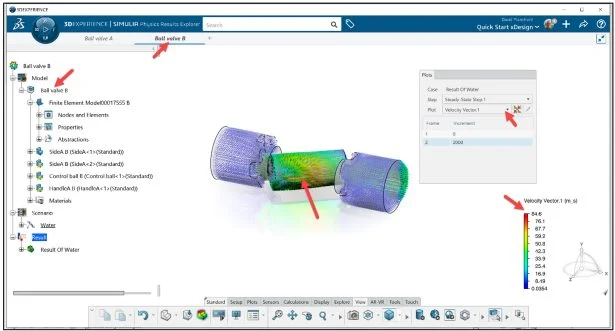
Click the Ball valve A tab. View the results.
When set to 165 degrees, the max Velocity Vector.1 is 24.8 m_s.
Save the Simulation study.
Click the Share icon as illustrated.
Click Save. By default, the model and Simulation study data are saved to your Collaborative space on the platform. For Simulation study data, there are two locations, either on your local machine or on the platform. By default, the Simulation study data is stored to your Collaborative space.
Click the Ball valve B tab.
Gauge Pressure Result
Display the Gauge Pressure.1 contour plot for Revision B.
Max Gauge Pressure.1 for Revision B is (5.67 × 10⁶N_m2).
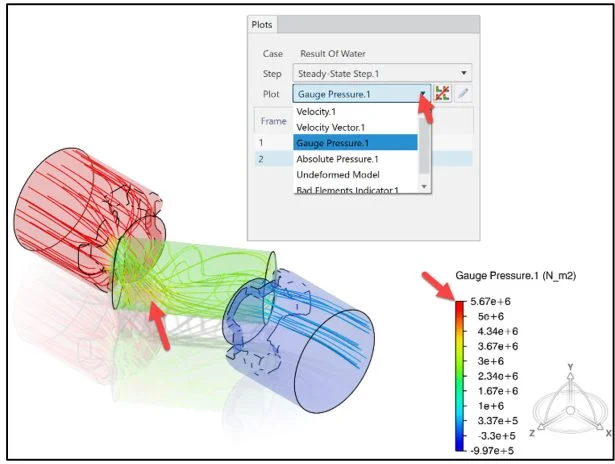
Max Gauge Pressure.1 for Revision A is (3.01 × 10⁵ N_m2).
Save the Simulation study.
Click the Share icon as illustrated.
Click Save.
Close Simulation Study B and Study A
Close the Simulation study.
Close tab Ball valve B.
Close tab Ball valve A.
Return to SOLIDWORKS and Save to This PC (local)
Return to your SOLIDWORKS session.
Click the SOLIDWORKS icon in the WindowsTask Pane as illustrated.
Save the Ball valve in SOLIDWORKS.
Click Save to This PC from the Menu bar. Note: Save to This PC saves the document to your local hard drive in the folder which it was last opened from.
Delete Simulation Study and Physical Products
Delete the Simulation study Ball valve (Physics Simulation and Finite Element) along with the assembly and reference components (Physical Products) in the 3DEXPERIENCE Platform.
Click the center of the compass in the MySession panel.
Drag the slider downward to view the 3DSpace widget.
Click the 3DSpace widget. Note: The 3DSpace widget is used to create a Collaborative space.
Log into the 3DEXPERIENCE platform.
Your 3DEXPERIENCE | 3DDashboard is displayed.
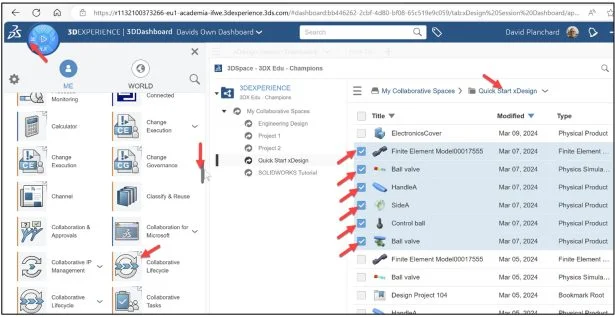
Double-click your Collaborative Space. In this example it is Quick Start xDesign.
Locate the Physics Simulation study (Ball valve).
Select the Finite Element Model, the Physics Simulation and the Physical Products of the Ball valve.
Click the left side of the compass as illustrated.
Drag the slider downward to view the Collaborative Lifecycle widget.
Launch the Collaborative Lifecycle widget.
View the selected items.
Click the drop-down arrow of the first item.
Click Delete from the drop-down menu.
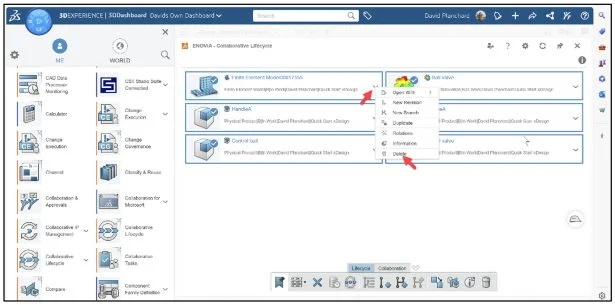
The Delete Objects dialog box is displayed.
Check the I understand that deleted objects can’t be recovered box.
Click Done.
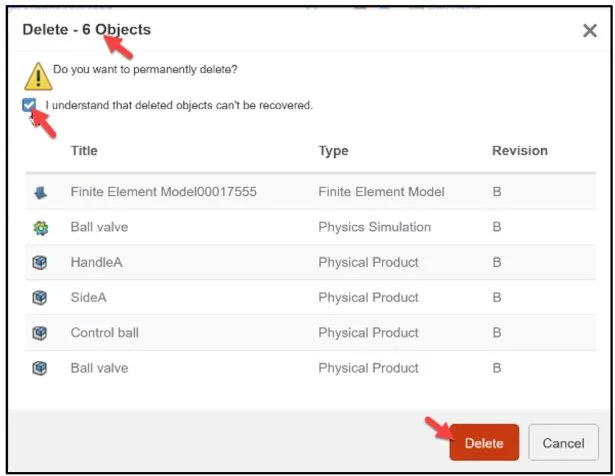
The items are deleted from the 3DEXPERIENCE platform.
We are finished with this lesson.
Community
Academic Community: After you create a 3DEXPERIENCE ID, Educators, can get more information on xDesign and SOLIDWORKS. Request to join the 3DEXPERIENCE Academic Community for free at go.3ds.com/academiccommunity.
Student Community: Students, join the student community for free at go.3ds.com/studentcommunity. Check out great posts on Mechanism Mondays, FEA Fridays, Solid Saturdays (animations), Formula Student and Formula SAE exercises.
SIMULIA Community: Students and Educations, join the SIMULIA community to learn the latest in simulation technology with the Abaqus solver, CST Studio Suite for Electro-magnetics, Antenna Magus and more.
SOLIDWORKS Community: Connect with the SOLIDWORKS community with our SOLIDWORKS User Forum, SOLIDWORKS User Groups, news and info,
SIMULIA Simulation Technology
Additional Lessons in 3DEXPERIENCE Simulation Structural Analysis:
Analysis Lesson 1: SOLIDWORKS and 3DEXPERIENCE Simulation for Diving Board
Analysis Lesson 2: SOLIDWORKS and 3DEXPERIENCE Simulation Linear Structural Validation Part 1
Analysis Lesson 3: SOLIDWORKS and 3DEXPERIENCE Simulation Linear Structural Validation Part 2
Analysis Lesson 4: SOLIDWORKS and 3DEXPERIENCE Simulation Linear Structural Validation for Assembly
Analysis Lesson 5: SOLIDWORKS and 3DEXPERIENCE Simulation Structural Model Creation
CFD Lesson 1: SOLIDWORKS and 3DEXPERIENCE Fluid Scenario Creation (Part1)
CFD Lesson 2: SOLIDWORKS and 3DEXPERIENCE Fluid Scenario Creation (Part 2)
From SOLIDWORKS Desktop to the 3DXPERIENCE Platform
Additional Lessons in this series on 3DEXPERIENCE Works:
3DEXPERIENCE Works Lesson 1: Getting Started with SOLIDWORKS and the Platform
3DEXPERIENCE Works Lesson 2: SOLIDWORKS and Save and Revision
3DEXPERIENCE Works Lesson 3: SOLIDWORKS and Bookmarks, Share and Delete
3DEXPERIENCE Works Lesson 4: SOLIDWORKS and Lifecycle Maturity States
3DEXPERIENCE Works Lesson 5: SOLIDWORKS, Collaborative Space and Bookmarks
3DEXPERIENCE Works Lesson 6: SOLIDWORKS with Search Tools
3DEXPERIENCE Works Lesson 7: SOLIDWORKS with 3DPlay
3DEXPERIENCE Works Lesson 8: SOLIDWORKS with 3DDrive
3DEXPERIENCE Works Lesson 9: SOLIDWORKS and 3DSWYM
3DEXPERIENCEWorks Lesson 10: SOLIDWORKS and 3DEXPERIENCE Simulation
Cloud Apps by SOLIDWORKS (100% Browser Based)
Additional Lessons in this series on SOLIDWORKS xDesign
SOLIDWORKS xDesign Lesson #1: Getting Started
SOLIDWORKS xDesign Lesson #2: Mouse Control and Collaborative Space
SOLIDWORKS xDesign Lesson #3: Sketch Planes
SOLIDWORKS xDesign Lesson #4: Create A Dashboard
SOLIDWORKS xDesign Lesson #5: Views and Orientations
SOLIDWORKS xDesign Lesson #6: Importing Files and Using Bookmarks
SOLIDWORKS xDesign Lesson #7: Assemblies
SOLIDWORKS xDesign Lesson #8: 4Bar Linkage and Kinematics
SOLIDWORKS xDesign Lesson #9: External References and Copy with Mates
SOLIDWORKS xDesign Lesson #10: Sketching, Constraints and Dimensions
SOLIDWORKS xDesign Lesson #11: Sketch Based and Applied Features
Design well, Marie