
After teaching 1000’s of students and writing about SOLIDWORKS for over 25 years, David Planchard, emeritus WPI, is exploring SOLIDWORKS desktop and the integrated 3DEXPERIENCE Platform. Through the 3DEXPERIENCE Works Lesson series, David helps educators understand the 3DEXPERIENCE Add-In with simple examples and industry practices. The Platform offers are available thru your Education Partner (VAR).
In my experience, students in Junior and Senior Design classes have a very hard time using any type of Product data management (PDM) software. PDM is not normally taught in schools, and most students do not realize how important it is. By the end of the semester, they start realizing the power of PDM in a design organization.
If a class or team does use a PDM software package, it changes semester to semester depending on volunteers, and what they have been exposed to in the past. Simply, no student wants to do PDM.
Product Lifecycle Management (PLM) cloud Apps connect directly to SOLIDWORKS through the Task Pane. The auto generated embedded model properties provide students awareness to implement sound engineering practices.
In this lesson, you will investigate the following options in the SOLIDWORKS MySession, Lifecycle tab: Save Active Window, Save Active Window As New, Reload from Server, Replace By Revision and Maturity.
Use the Collaborative Lifecycle App in the Action bar on a SOLIDWORKS assembly. Save the assembly to the 3DEXPERIENCE platform in a Bookmark. Create and use Bookmarks, not new Collaborative spaces to save different assemblies with common referenced components for multi teams and organizations. Bookmarks provides a file/folder structure similar to Windows Explorer.
Lock a component. Modify a component. Create a new revision. Save the latest changes to the platform.
Change Maturity state of a component, assembly and several components with different maturity status. Maturity states provide information about the content’s completion stage and its validity.
Change the Revision of the assembly. Note: Verify with your administrator/instructor that your credentials match the Collaborative space of the object you want to change the maturity of.
Before we start, there are a few items that you need to know.
In this lesson, create a Collaborative space on the 3DEXPERIENCE platform or use your default Collaborative space named “Common Space”.
3DEXPERIENCE Launcher needs to be installed. 3DEXPERIENCE Works Lesson 1: Getting Started with SOLIDWORKS and the Platform. Note: This lesson is not for SOLIDWORKS Connected “3DEXPERIENCE SOLIDWORKS”.
The 3DEXPERIENCE platform is browser driven. Your existing cookies and cache determine what you will see on your computer desktop or during a SOLIDWORKS login. A full installation of SOLIDWORKS 2019 SP0 or later is required.
What is the difference between traditional Product Data Management (PDM) and 3DEXPERIENCE Product Lifecycle Management (PLM)?
Traditional PDM is a system that centralizes product-related data and processes. Engineers use PDM software to track revisions, manage change orders, generate Bills of Materials (BOMs), and more. PDM software helps student teams and companies to bring the designs to finial release; reducing redundancy work, increasing product development, and collaboration.
3DEXPERIENCE PLM is a cloud-based platform App in a Collaborative space which enables teams and organizations to control and track large amounts of data from part and assembly files to simulation and CAD/CAM files. Further, PLM addresses the countless files necessary for effective project communications, such as spreadsheets, PDFs, and emails, to name a few, all need to be managed to optimize collaboration and keep product designs on course. PLM is part of the 3DEXPERIENCE Works portfolio.
Start a SOLIDWORKS session from your desktop.
Double-click the SOLIDWORKS icon.
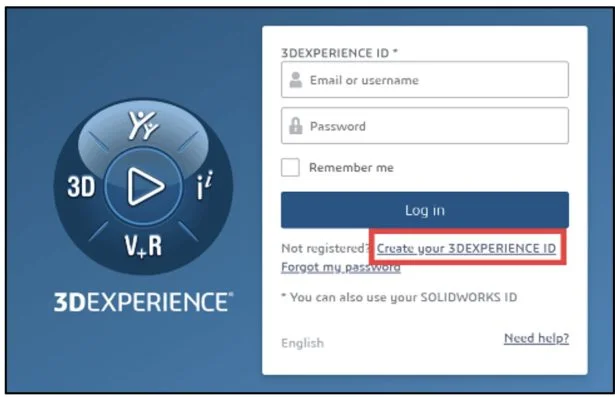
3DEXPERIENCE Login
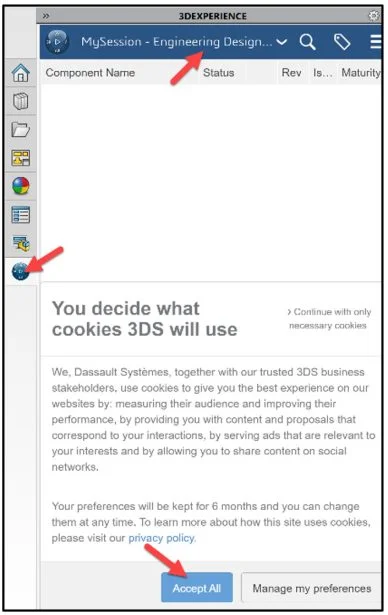
View the illustration below. Depending on your system setup, cookies, and cache, your display will be different. Login to the 3DEXPERIENCE platform.
Enter your 3DEXPERIENCE ID.
The SOLIDWORKS – Welcome dialog box is displayed.
You are logged into the 3DEXPERIENCE platform.
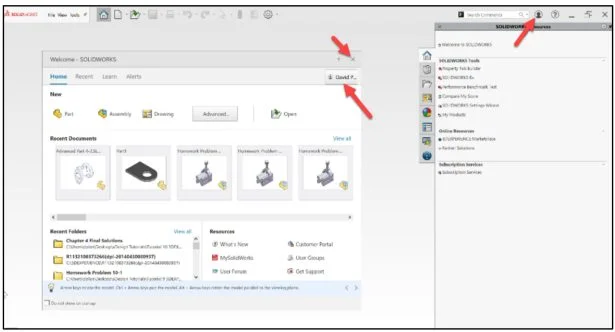
Close the Welcome dialog box.
Click the 3DEXPERIENCE icon in the Task Pane. The MySession panel is displayed. This displays the two-way communication between SOLIDWORKS running on your machine and the 3DEXPERIENCE platform running in the cloud. If needed, Click Accept All.
Collaborative space is defined by an administrator (instructor or IT personnel) or the user, if the user has access rights. The default Collaborative space for a student is named, Common Space.
I’m using a created Collaborative space named Engineering Design.
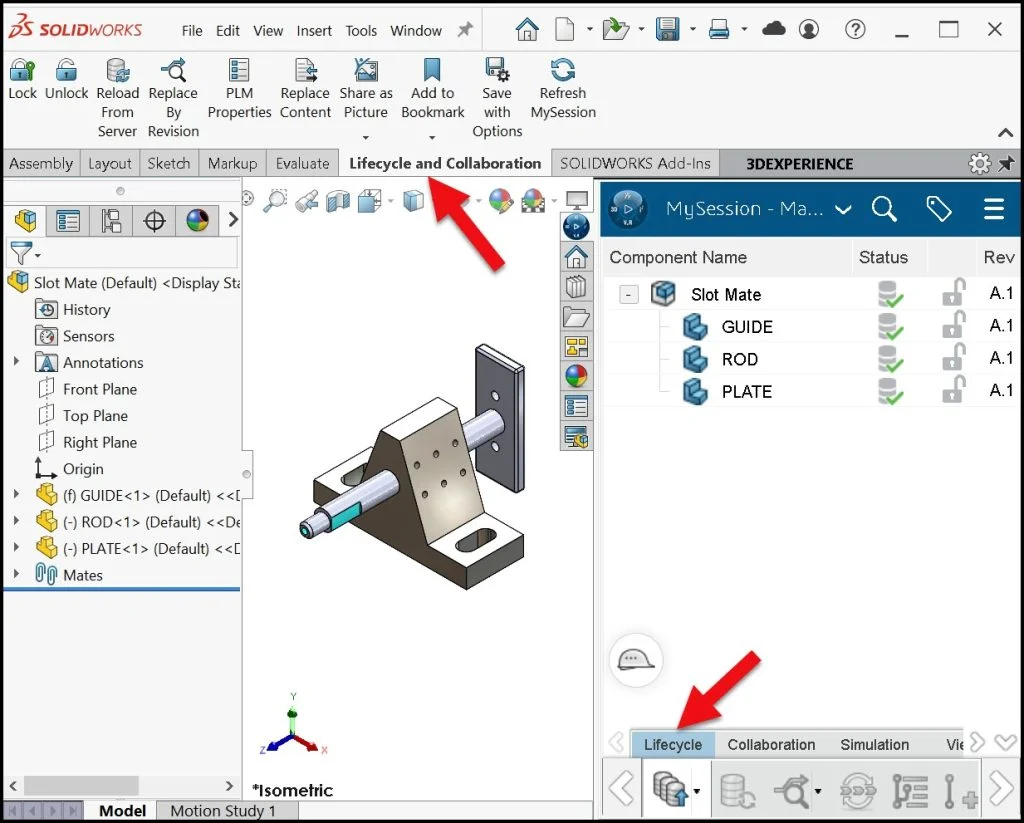
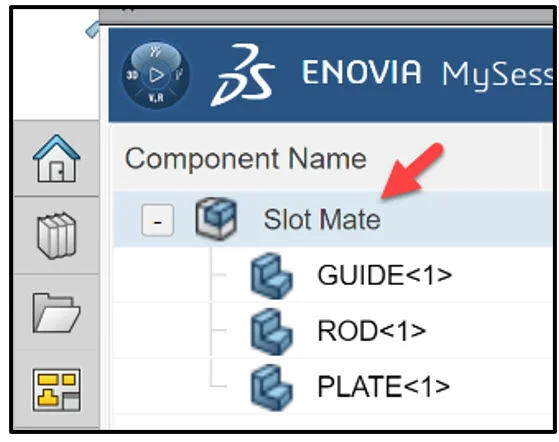
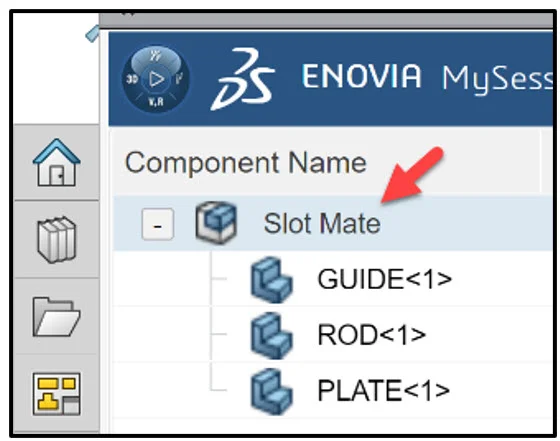
SOLIDWORKS Slot Mate Assembly
Download the SOLIDWORKS Slot Mate assembly to follow along with this lesson.
Open the SOLIDWORKS Slot Mate assembly that has not been previously uploaded or saved to the 3DEXPERIENCE platform.
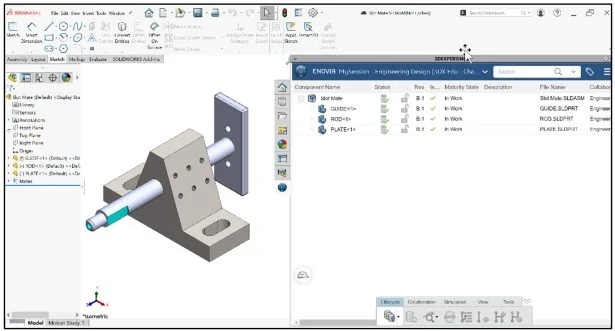
Expand the Task Pane bar. The MySession panel displays a tree view of the active file and a list of commands that can be accessed through the Action bar and Context menu. The MySession panel displays the two-way communication between SOLIDWORKS running on your machine and the 3DEXPERIENCE platform running in the cloud.
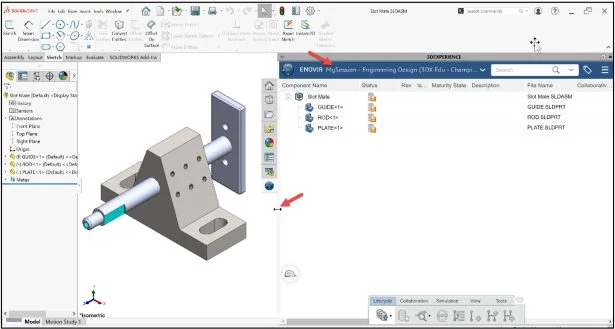
The MySession panel also displays the Component Name, Status (Displays an icon that represents the status of a given revision, saved or not saved to the platform), Locked status (Locked or Unlocked), Rev (Revision #), Is Last Revision (Yes/No), Maturity State (Lifecycle state of the family, for example: Private, In Work, Frozen, Released, Obsolete), Description, File Name (Displays the PLM external ID of the object for reference objects and the PLM external ID of the connection for instances) and Type (Physical Product or Drawing).
At this time, they are blank. Remember, you opened a SOLIDWORKS assembly that has not been previously uploaded or saved to the platform.
The Action bar provides the ability to upload files to the 3DEXPERIENCE platform. There are other tools that can be accessed. The Lifecycle tab is selected by default.
In this lesson, my Collaborative space on the platform is Engineering Design. Note: Within a Collaborative space, your access determines what you can do depending on whether the Collaborative space is public, protected, or private.
Upload and save the files to the 3DEXPERIENCE platform.One of the best simple practices for SOLIDWORKS data is to create Bookmarks upon the initial save to the 3DEXPERIENCE platform. Choosing the “Save Active Window” provides the user the choice of existing Bookmark folders or to create a new Bookmark to contain the file references.
Save Active Window
Expand the Lifecycle tab. Click Save Active Window.

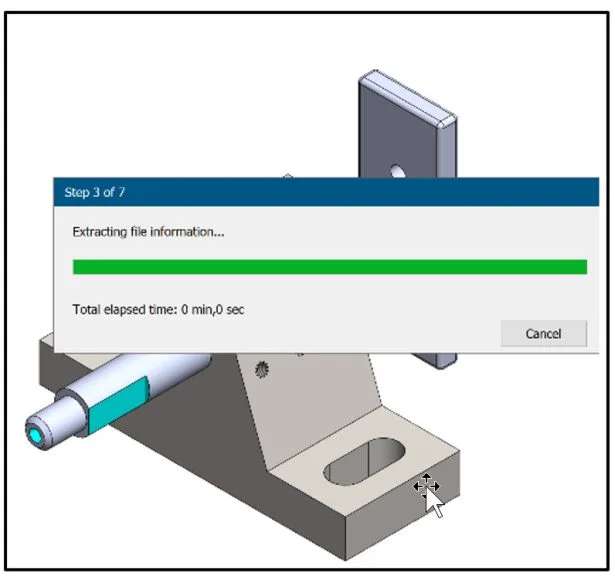
The file is temporarily being saved to a local cache area. The platform is checking the model.
The Save to 3DEXPERIENCE dialog box and PLM attributes are displayed. The attributes include: Bookmark, Revision, Maturity State, Collaborative Space, and Reservation Owner.
Select Bookmark
Save the model. Use your existing Collaborative space. Create a new Bookmark. Use Bookmarks, not Collaborative spaces to save different assemblies with common referenced components. Bookmarks provide a folder/file structure similar to Windows.
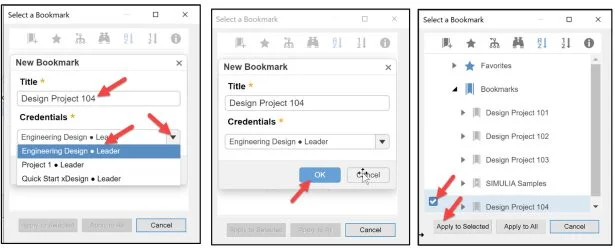
Click the Select Bookmark down arrow. Click Select Bookmark. The Select a Bookmark dialog box is displayed. Select the Bookmarks box as illustrated.Click the New Bookmark icon. Note: The below illustration displays my other created Bookmarks.
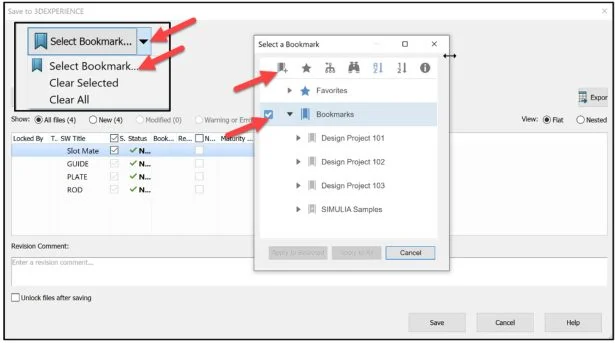
Enter Design Project 104 for New Bookmark Title. Select your Collaborative space. Note: The below illustration displays three of my Bookmarks.
Click OK.Select
Design Project 104.
Click Apply to Selected.
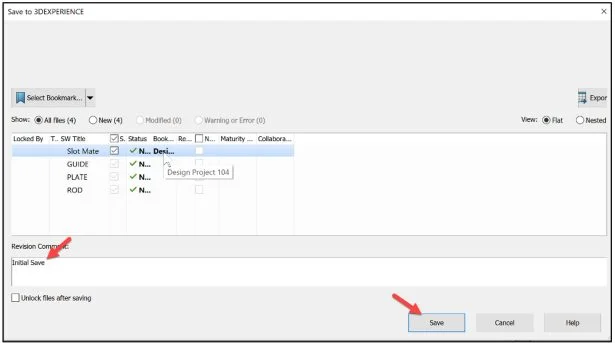
Enter Revision Comment. Save to the 3DEXPERIENCE platform.
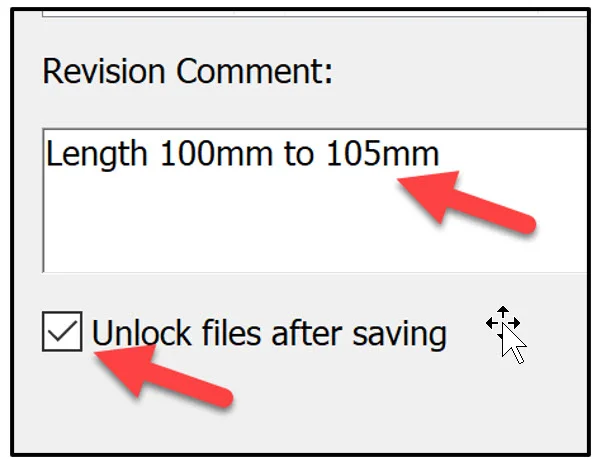
Enter comment in the Revision Comment box.
Click Save.
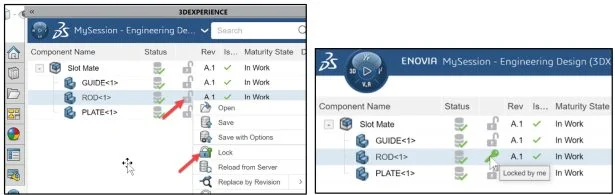
The files are directly loaded into your Collaborative space and Bookmarked on the 3DEXPERIENCE platform.
You are returned to your SOLIDWORKS session.
View the updated MySession panel.
Maturity State In Work
The Maturity State is “In Work”. This is the default Lifecycle state after you saved the model to the 3DEXPERIENCE platform.

Modify the length of the ROD from 100mm to 105mm. Lock the component. This prevents anyone in your Collaborative space from making a modification to the component while you are working on it.
Click ROD in the MySession panel.
Hover over the Lock Status. At this time, the Lock Status is “Not Locked”.
Right-click the Not Locked icon.
Click Lock from the drop-down menu. View the Lock Status “Locked by me”.
Open ROD from the FeatureManager.
Right-click ROD from the FeatureManager.
Click Open Part in the Context box.
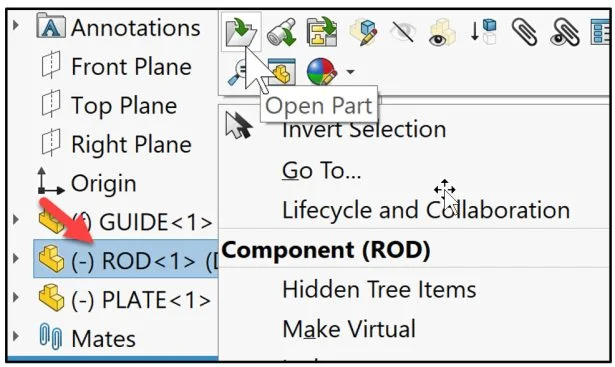
The ROD is displayed in the Graphics window.
Double-click Base Extrude.
Click the 100mm length. The modify dialog box is displayed.
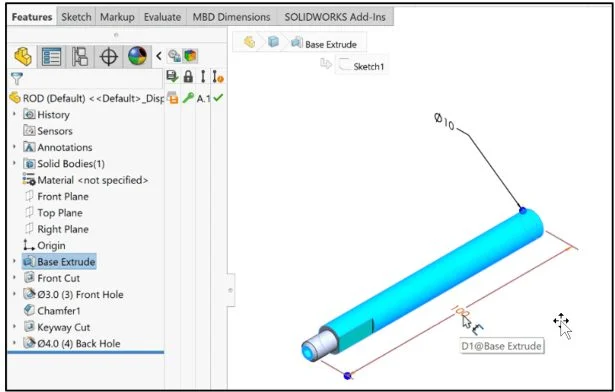
Enter 105mm.
Return to the assembly.
Save and Close the ROD part.
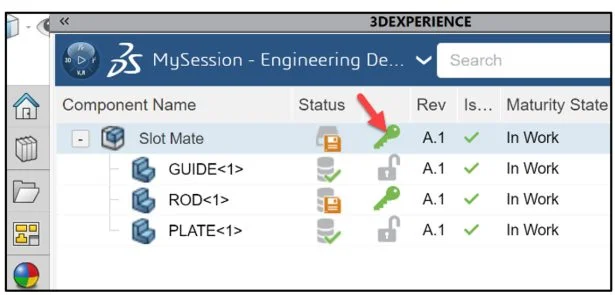
View the results in the MySession panel. The orange save Status icon displayed for the Slot Mate informs you that the local file on your computer is not saved in the platform. The orange save Status icon displayed for the ROD informs you that the local file is locked and modified, but the modifications are not yet propagated to the platform.

Update the Slot Mate assembly with the ROD change to the platform.
Lock the Slot Mate assembly.
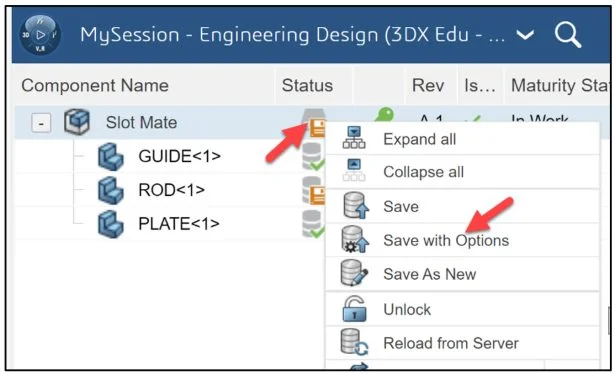
Right-click the orange Status icon of the Slot Mate assembly.
Click Save with Options.
The Save to 3DEXPERIENCE dialog box is displayed. The Slot Mate assembly and ROD are locked by the user. The Collaborative space in this lesson is Engineering Design. The Maturity Status is “In Work”. The first default Revision is A.1.
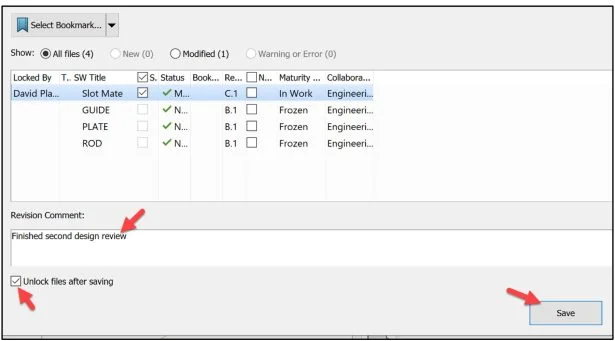
New Revision
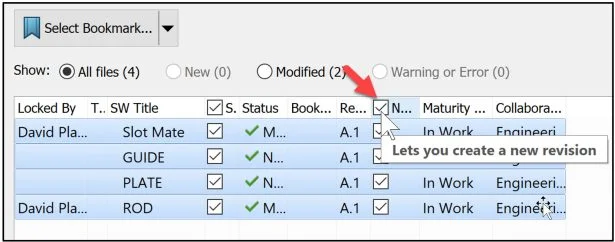
Create a new Revision.
Click the Lets you create a new revision box.
Enter Revision Comment.
Check the Unlock files after saving box.
Save the assembly and new revision to the platform.
Click Save from the 3DEXPERIENCE dialog box.
View the updated MySession panel. The assembly and reference components are saved to the platform with a new revision. They are all unlocked. Anyone in your Collaborative space has access to the assembly.
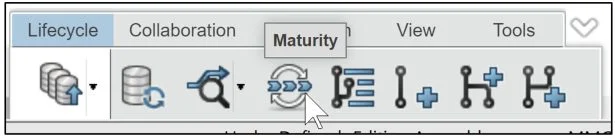
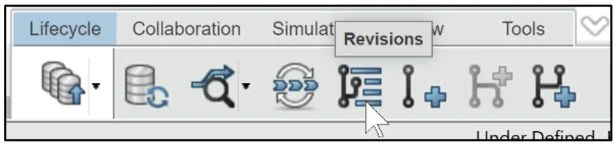
Lifecycle Tab
Investigate the Lifecycle tab in the Action bar.
Click Slot Mate from the MySession panel. The Lifecycle tools are highlighted.
Review the options.
Save Active Window and the Save Active Window As New.
Save Active Window: Uploads the files to the 3DEXPERIENCE platform.One of the best simple practices for SOLIDWORKS data is to create bookmarks upon the initial save to the 3DEXPERIENCE platform. Choosing the “Save Active Window” provides the user the choice of existing bookmark folders or to create a new bookmark to contain the file references.
Save Active Window as New: Saves a copy of existing files with new names to the 3DEXPERIENCE platform. Not available for the first time.

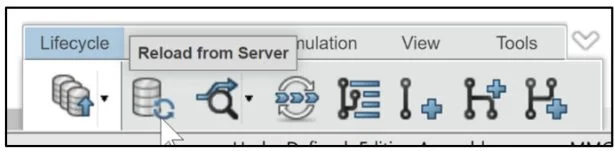
Reload from Server. Updates the selected revision in a SOLIDWORKS session with the latest version that exists on the 3DEXPERIENCE platform.
There are three sub-options: Reload selected file only (do not reload references), Reload references only (do not reload the selected file), Reload file and references, (reload the selected file and all its references).
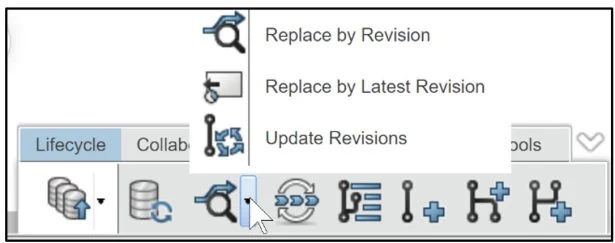
Replace By Revision. Opens the Replace by Revision dialog box to replace the revision that is opened in the SOLIDWORKS session. There are two sub-options: Update Revisions (Opens the Replace by Revision dialog box to replace the revision that is opened in session), Replace by Latest Revision (Updates the revision for the selected object with the latest revision).
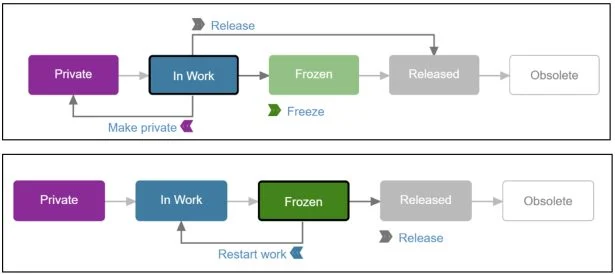
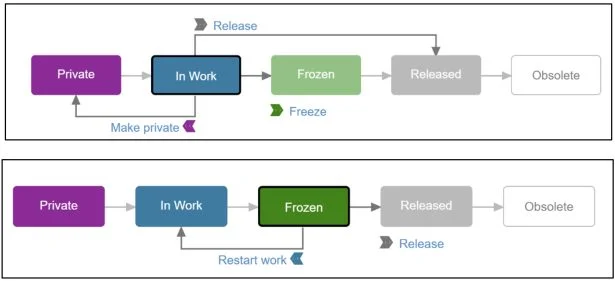
Maturity. Defines the Maturity state of a component as it evolves throughout its lifecycle: Private (documents are only accessible to the owner and are not shared in the Collaborative space), In Work (documents are initially saved to the In Work state and are accessible in the Collaborative space), Frozen (documents are typically set Frozen while in review to prevent change), Released (documents are typically set to Released when in production. Released documents cannot be modified), Obsolete (documents are typically set to Obsolete when no longer used).
Below are two Maturity graphs. Each box shows a Maturity state. The lines with arrows from one Maturity state to another show which Maturity states the content can move to, from that Maturity state. A right-pointing arrow means the content can be promoted to that Maturity state. A left-pointing arrow means the content can be demoted to that Maturity state. The arrows between Maturity states are called transitions.
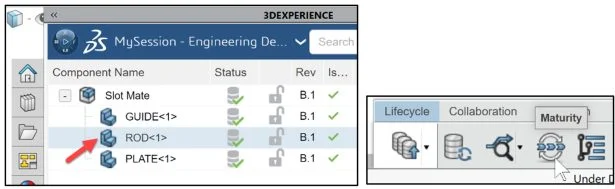
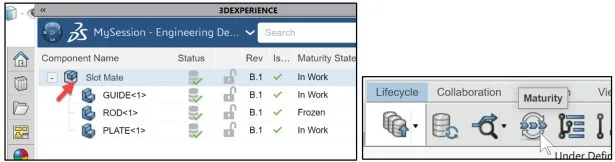
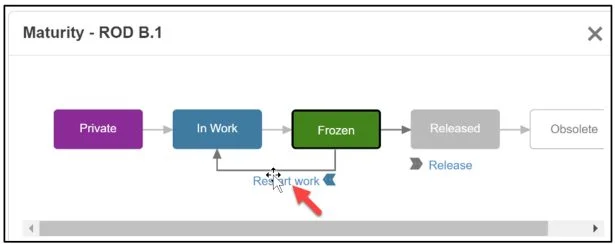
Change the Maturity state of the ROD component.
Click ROD from the MySession panel.
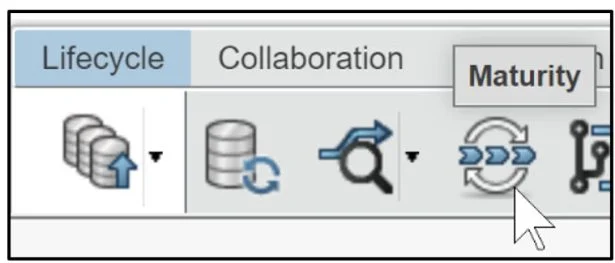
Click Maturity from the Lifecycle tab in the Action bar.
The Maturity – ROD B.1 dialog box is displayed. View the Maturity graph.
The highlighted box designates the present Maturity state.
Hover over Freeze as illustrated. View the arrow movement from “In Work” to “Freeze”.
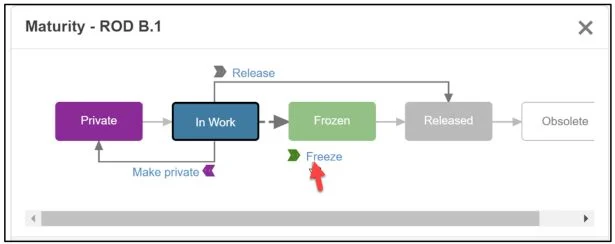
Click Freeze to put the ROD component in the Frozen state. This will prevent anyone in your Collaborative space from making a design change to the ROD component. The Frozen status provides the ability to perform a design review, so no one can make changes to the model.
The MySession panel is updated. The ROD component is displayed in a Frozen State.
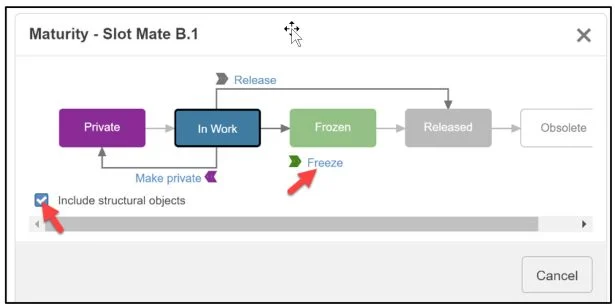
Change the maturity of the Slot Mate assembly.
Select Slot Mate from the MySession panel.
Click Maturity from the Lifecycle tab in the Action bar.
The Maturity – Slot Mate B.1 dialog box is displayed. View the Maturity graph. The highlighted box designates the present Maturity state.
Hover over Freeze as illustrated. View the arrow movement from “In Work” to “Freeze”.
Click Include structural objects. This option changes the Maturity state of the children along with the parent.
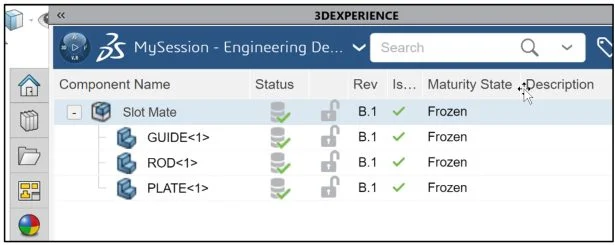
Click Freeze.
View the updated MySession panel. The assembly and all reference components are Frozen.
Modify the Maturity State “In Work” of the ROD component.
Select ROD from the MySession panel.
Click Maturity from the Lifecycle tab. The Maturity dialog box is displayed. View the Maturity graph.
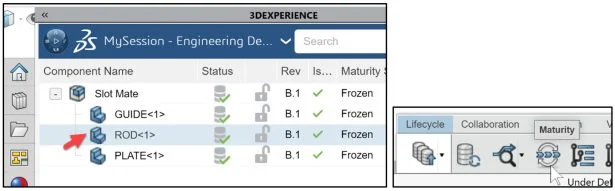
Click Restart work.
View the updated MySession panel.
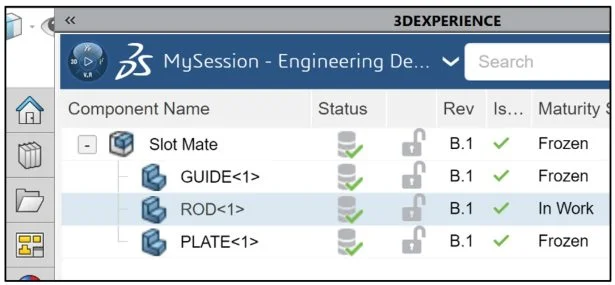
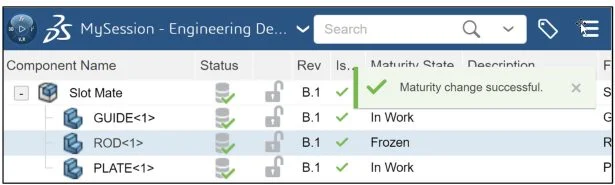
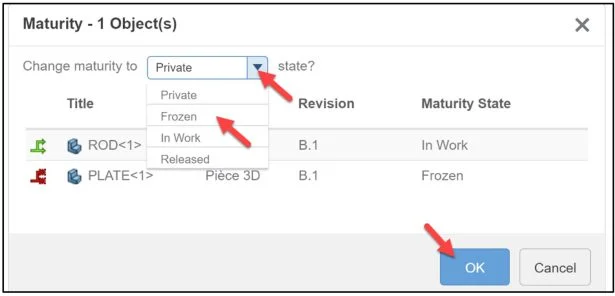
View the Maturity state of two components ROD (In Work) and PLATE (Frozen).
Select ROD from the MySession panel.
Hold the Ctrl key down.
Select PLATE.
Release the Ctrl key.

Click Maturity from the Lifecycle tab.
The Maturity – 1 Object(s) dialog box is displayed.
View your options. Note: For each object, an icon indicates if the transition can be applied to the object: Applicable Transition, Not Applicable Transition.
Change the ROD Maturity status to Frozen.
Select Frozen from the drop-down menu as illustrated.
Click OK.
View the results. Close the Report dialog box.
Click Close.

Note: To exclude an object and not apply the maturity transition to it, double-click the corresponding Applicable Transition icon. The icon changes to (Not Applied Transition) and the object’s maturity state is not modified when the Maturity transition is applied.
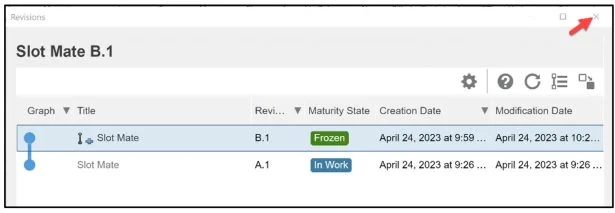
Revisions. Displays the revisions, branches, and duplicates of an object.
Select Slot Mate from the MySession panel.
Click Revisions from the Lifecycle tab in the Action bar. The Revisions dialog box is displayed. Note: You can have different revisions at different Maturity States.
Click Close.
New Revision. Creates a new revision of the selected object, you can also select the content of a different object.

Select Slot Mate from the MySession panel.
Click New Revision from the Lifecycle tab in the Action bar. View the New Revision dialog box.
Create a new revision. Accept the default revision (C.1).
Enter Revision Comment.
Click Revise.
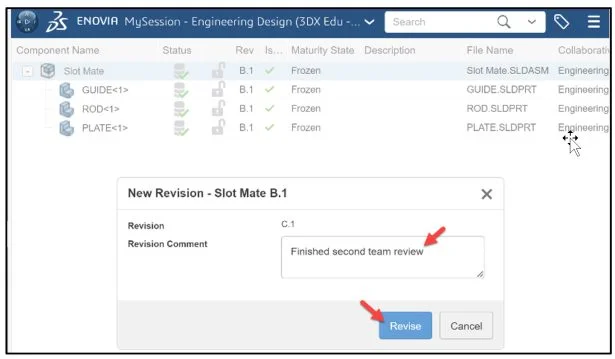
View the updated MySession panel. You created a new revision. The Collaborative Lifecycle App locked the assembly. No changes can be made by anyone in your Collaborative space. Save the assembly to the platform. The Maturity State displays “In Work”.
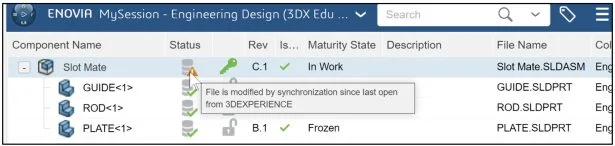
Save with Options
Right-click the Slot Mate Status icon.
Click Save with Options.
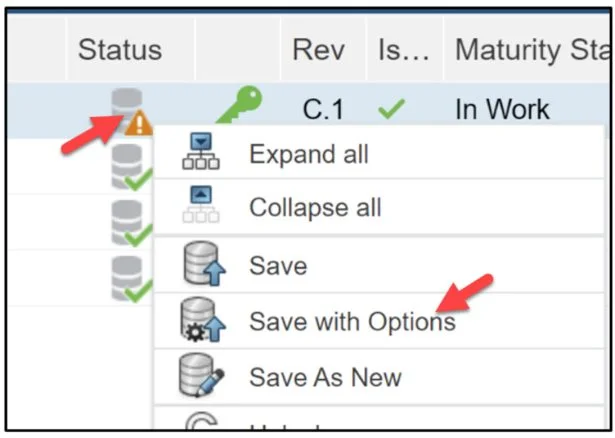
The Save to 3DEXPERIENCE dialog box is displayed. View the update.
Add a Revision Comment.
Check the Unlock files after saving box.
Click Save from the Save to 3DEXPERIENCE dialog box.
View the updated MySession panel.
There are two additional options to review.
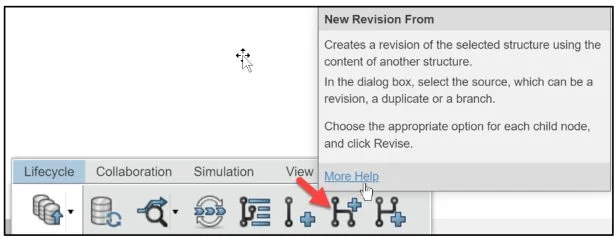
New Revision From: Create a revision of the selected structure using the content of another structure. In the dialog box, select the source, which can be a revision, a duplicate or a branch. Choose the appropriate option for each child node, and click Revise.
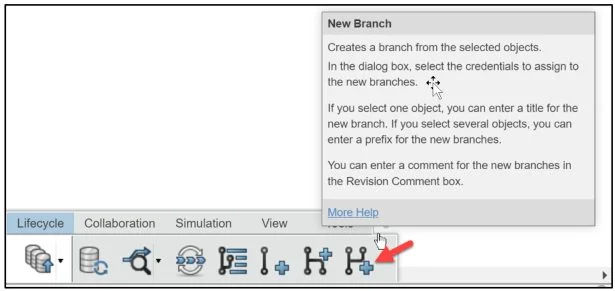
New Branch. Creates a new branch from the selected object. In the dialog box, select the credentials to assign to the new branches. If you select one object, you can enter a title for the new branch. If you select several objects, you can enter a prefix for the new branches. You can enter a comment for the new branches in the Revision Comment box.
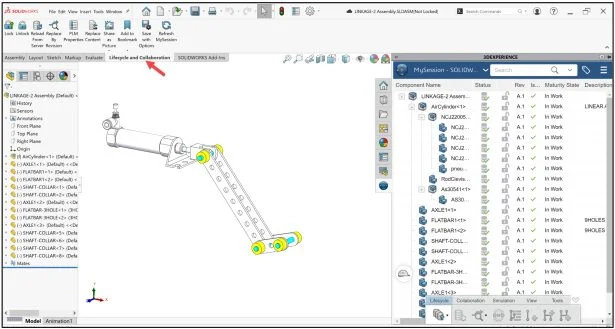
This entire lesson was within the SOLIDWORKS environment connected to the 3DEXPERIENCE platform.
We live in a dynamic environment. Today I upgraded SOLIDWORKS 2023. To my amazement, the Lifecycle and Collaboration tab is now displayed by default in the CommandManager.
We are finished with this lesson. In the next lesion we will explore 3DEXPERIENCE Works Lesson 6: SOLIDWORKS, Collaborative Space and Bookmarks.
Academic Community: After you create a 3DEXPERIENCE ID, Educators, can get more information on SOLIDWORKS and the 3DEXPERIENCE Platform. Request to join the 3DEXPERIENCE Academic Community for free at go.3ds.com/academiccommunity.
Student Community: Students, join the student community for free at go.3ds.com/studentcommunity. Check out great posts on Mechanism Mondays, FEA Fridays, Solid Saturdays (animations), Formula Student and Formula SAE exercises.
In case you missed a lesson, here are past posts.
3DEXPERIENCE Works Lesson 1: Getting Started with SOLIDWORKS and the Platform
3DEXPERIENCE Works Lesson 2: SOLIDWORKS Save and Revision
3DEXPERIENCE Works Lesson 3: SOLIDWORKS and Bookmarks, Share and Delete
Design well, Marie