
After teaching 1000’s of students and writing about SOLIDWORKS for over 25 years, David Planchard, emeritus WPI, is exploring SOLIDWORKS desktop and the integrated 3DEXPERIENCE Platform. Through the 3DEXPERIENCE Works Lesson series, David helps educators understand the 3DEXPERIENCE Add-In with simple examples and industry practices. The Platform offers are available thru your Education Partner (VAR).
In my experience, students lose files, overwrite files, use poor naming conventions (Example: Bracket new – newer – last design) and sometimes do not work with their latest revision.
Students need to understand how to save files, where to save files, and create revisions, especially when using assemblies with common reference component names.
The entire lesson is within the SOLIDWORKS environment connected to the 3DEXPERIENCE platform. Open SOLIDWORKS directly from your machine. Open a SOLIDWORKS part, not previously uploaded or saved to the 3DEXPERIENCE platform. View the 3DEXPERIENCE Add-In on your SOLIDWORKS desktop.
Review and address numerous Save options: Save to this PC, Save to 3DEXPERIENCE, Save Active Window, Save with Options, etc. View several Product Lifecycle Management (PLM) attributes of the part.
Lock the part. Modify the SOLIDWORKS part. Save the modified SOLIDWORKS part to the 3DEXPERIENCE platform. Create a New Revision, Unlock the part and view the maturity state of the part. Save the model to your Collaborative space in the MySession panel.
View the auto generated embedded model properties. Use these properties for enhanced search options.
Collaborative space is defined by an administrator (instructor or IT personnel) or the user, if the user has access rights. The default Collaborative space for a student is named, Common Space. Create and use Bookmarks, not new Collaborative spaces, to save different assemblies with common referenced components for your classes, teams and organizations. Bookmarks provide a file/folder structure similar to Windows Explorer.
Note: A part is used in this lesson to simply demonstrate the power of Collaborative space, Bookmarks and revisions with product lifecycle management attributes. In the next lesson, you will explore an assembly.
Before we start, there are a few items that you need to know.
In this lesson, use your default Collaborative space named “Common Space” on the 3DEXPERIENCE platform. An internet connection is required.
3DEXPERIENCE Launcher needs to be installed. 3DEXPERIENCE Works Lesson 1: Getting Started with SOLIDWORKS and the Platform. Note: This lesson is not for SOLIDWORKS Connected “3DEXPERIENCE SOLIDWORKS”.
The 3DEXPERIENCE platform is browser driven. Your existing cookies and cache determine what you will see on your computer desktop or during a SOLIDWORKS login. A full installation of SOLIDWORKS 2019 SP0 or later is required.
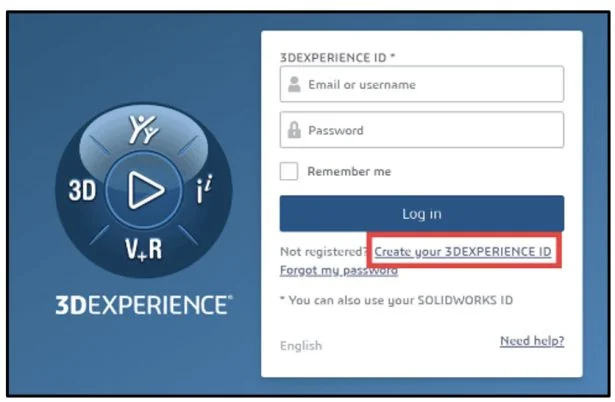
Login to the 3DEXPERIENCE Platform
Start a SOLIDWORKS session from your desktop.
Double-click the SOLIDWORKS icon.

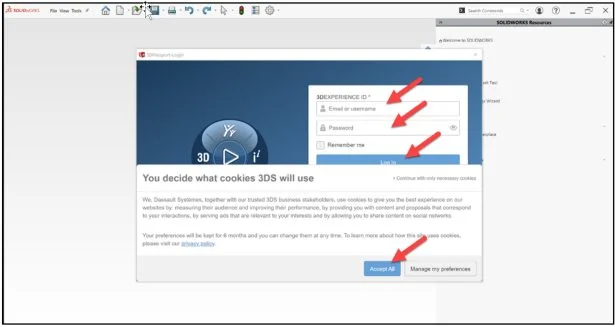
View the illustration below. Depending on your system setup, cookies, and cache, it will be different.
Input the requested information.
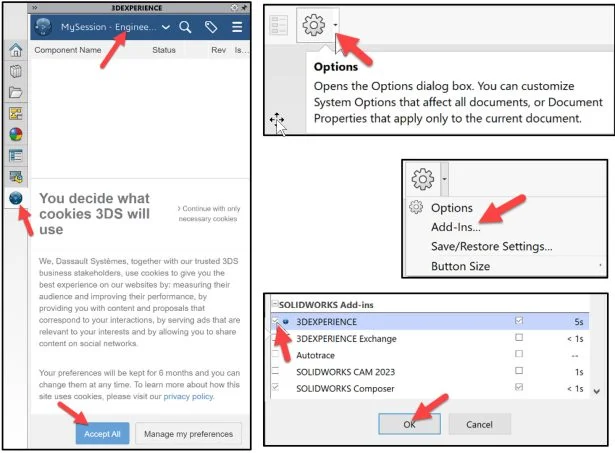
Click Accept All.
The Welcome – SOLIDWORKS dialog box is displayed.
You are logged into the 3DEXPERIENCE platform.
Close the Welcome dialog box.
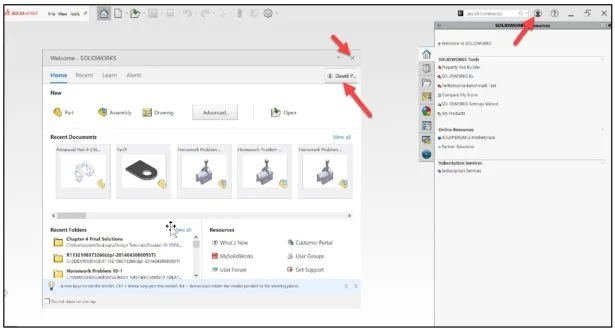
Display the MySession Panel
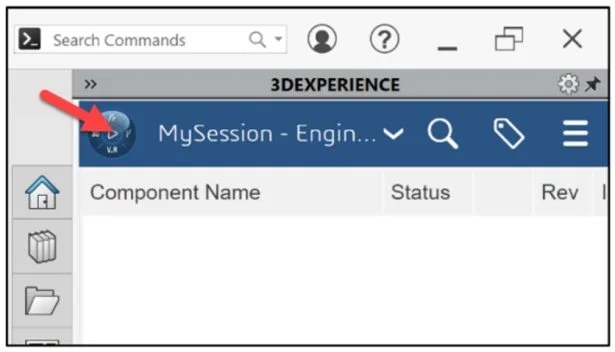
Click the 3DEXPERIENCE icon in the Task Pane. The MySession panel is displayed. This displays the two-way communication between SOLIDWORKS running on your machine and the 3DEXPERIENCE platform running in the cloud. Experience a single modeling environment.
The default Collaborative space for a student is named, Common Space. I’m using a created Collaborative space named Engineering Design.
Note: If you do not see the 3DEXPERIENCE icon, click the Options drop-down arrow, click Add-Ins, check the 3DEXPERIENCE box, click OK, from the SOLIDWORKS Main menu.
Click Accept All.
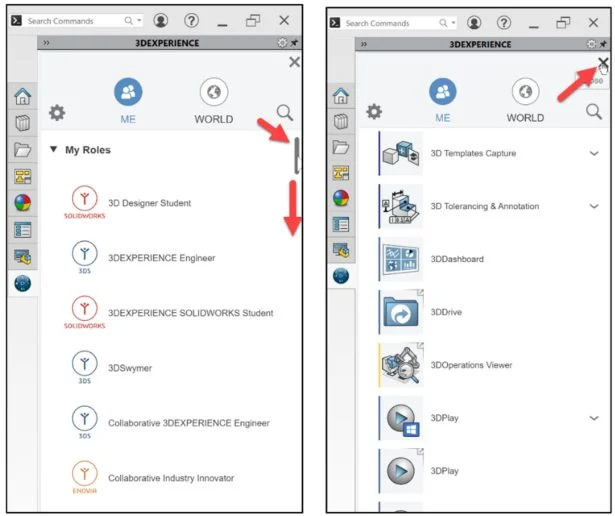
View your available Roles, Cockpits, My Favorite Apps, and Apps.
Click the center of the Compass.
Drag the slide-down bar downward to view your available Roles, Cockpits, My Favorite Apps, and Apps. The display will vary depending on your license and Role.
Return to the Compass in the MySession panel.
Click Close.
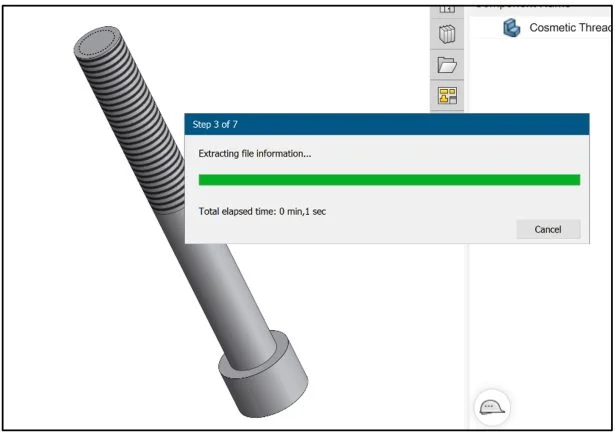
Download the SOLIDWORKS Cosmetic Thread 7-6 part to follow along with this lesson.
Open Cosmetic Thread 7-6.sldprt in SOLIDWORKS
Open the SOLIDWORKS part that has not been previously uploaded or saved to the 3DEXPERIENCE platform.
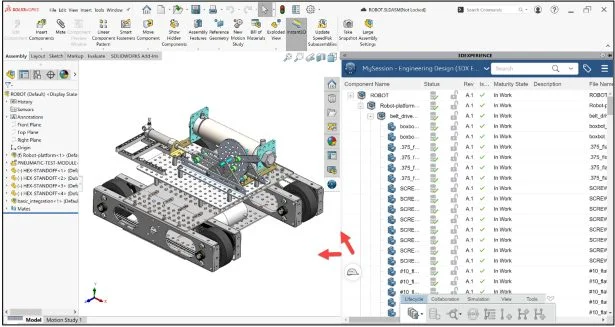
Expand the Task Pane. The MySession panel displays a tree view of the active file and a list of commands that can be accessed through the Action bar and context menu.
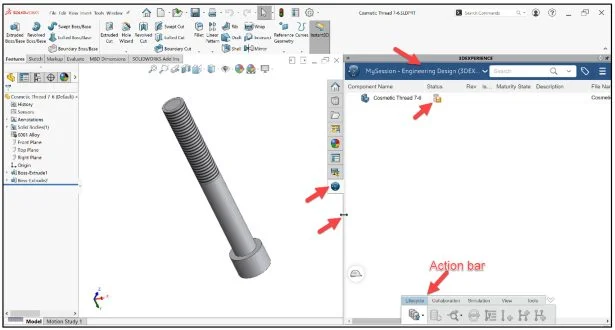
The MySession panel displays the Component Name, Status (Displays an icon that represents the status of a given revision, saved or not saved to the platform), Locked status (Locked or Unlocked), Rev (Revision #), Is Last Revision (Yes/No), Maturity State (Lifecycle state of the family, for example: Private, In Work, Frozen, Released, Obsolete), Description, File Name (Displays the PLM external ID of the object for reference objects and the PLM external ID of the connection for instances) and Type (Physical Product or Drawing).
At this time, they are blank. Remember, you opened a SOLIDWORKS part that has not been previously uploaded or saved to the platform.
The Action bar provides the ability to upload files to the 3DEXPERIENCE platform. There are other tools that can be accessed. The Lifecycle tab is selected by default.
New Save Options
There are many new save options in SOLIDWORKS when using the 3DEXPERIENCE platform. Let’s explore a few.
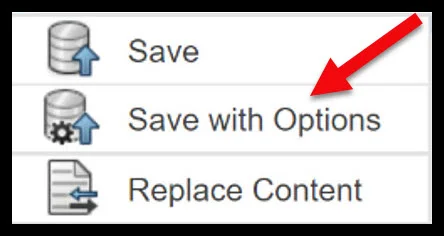
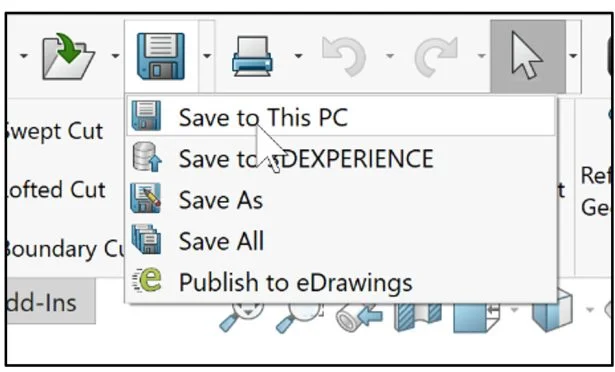
Right-click the orange Save icon in the MySession panel. There are two save options to the 3DEXPERIENCE platform.
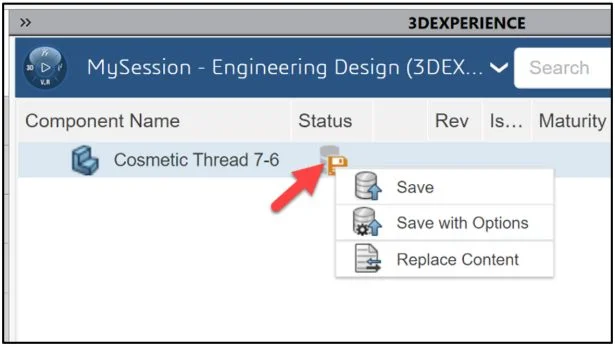
Save: Opens the Save dialog box to save a file to a Collaborative space (Common space for a student) on the 3DEXPERIENCE platform. This command does not provide the ability to select a Bookmark location. It is highly recommended to save files in a Bookmark. Think of a Bookmark Workspace as a directory which can contain Bookmark folders. Bookmark folders are used to further categorize bookmarks like a folder tree structure (Windows Explorer).
Use Bookmarks to delete entire groups of data or just a single file. For assemblies within the bookmark folder, there is an option to delete the entire structure of the assembly and all reference components. Another option to delete files (Physical Products) from the platform is to use the Collaborative Lifecycle App.
Save with Options: One of the best simple practices for SOLIDWORKS data is to create bookmarks upon the initial save to the 3DEXPERIENCE platform. Choosing “Save With Options” provides you the choice of existing Bookmark folders or to create a new Bookmark to contain the file references.
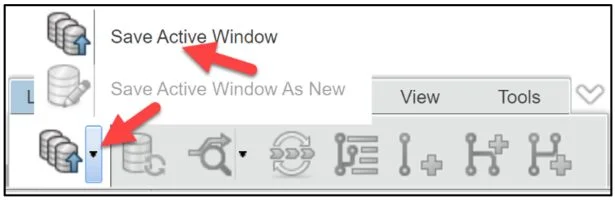
Expand Lifecycle (PLM operations to files using the 3DEXPERIENCE platform in the Action bar). There are two Save options displayed to the 3DEXPERIENCE platform.

Save Active Window: Uploads the files to the 3DEXPERIENCE platform. One of the best simple practices for SOLIDWORKS data is to create bookmarks upon the initial save to the 3DEXPERIENCE platform. Choosing the “Save Active Window” provides the user the choice of existing bookmark folders or to create a new bookmark to contain the file references.
Save Active Window as New: Saves a copy of existing files with new names to the 3DEXPERIENCE platform. Not available for the first time.
Click File from the SOLIDWORKS Main menu. View the save options.
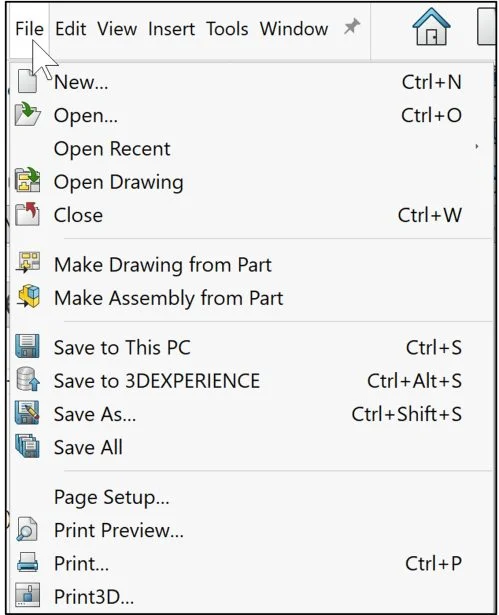
Save to This PC: Saves the document to your local hard drive in the folder which was last opened from.
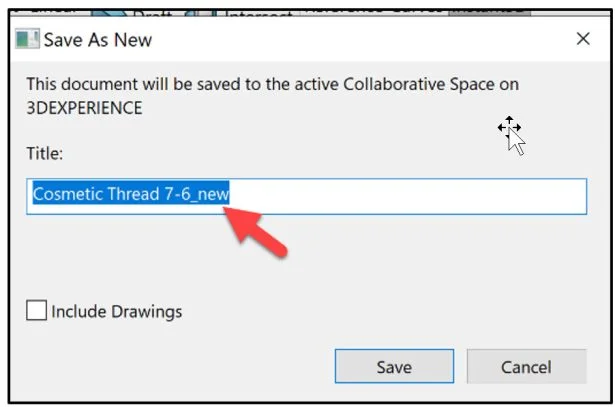
Save to 3DEXPERIENCE: Opens the Save as New dialog box to save the file to a Collaborative space on the 3DEXPERIENCE platform. This command does not provide the ability to select a Bookmark location.
Save As: Saves the document to a new file name that becomes the active document without saving the original document.
Save All: Saves all the open files that have been modified since they were last saved.
View the 3DEXPERIENCE files that were saved on your computer.
Click the 3DEXPERIENCE files on This PC icon in the Task Pane. View the saved files in the 3DEXPERIENCE platform and their Collaborative space locations. Below is an example of the files on my SOLIDWORKS desktop.

Save the model, Cosmetic Thread 7-6 to your local hard drive.
Click Save to This PC from the SOLIDWORKS Menu bar.
Save the model to the 3DEXPERIENCE platform. Use the Save Active Window command in the Action bar.
Click Save Active Window from the Lifecycle tab in the Action bar.
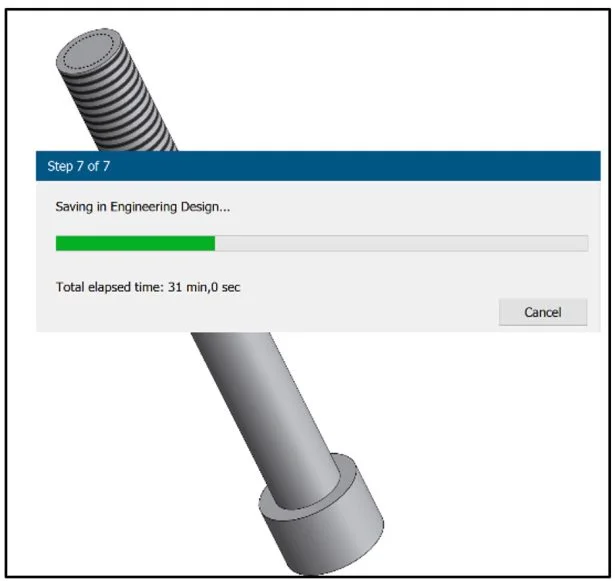
The file is temporarily being saved to a local cache area. The platform is checking the model. Note: for an assembly, the platform is checking for out of date components, modified components from the last save to the platform, different revisions, missing components, etc.
The Save to 3DEXPERIENCE dialog box and PLM attributes are displayed. The PLM attributes include: Bookmark, Revision, Maturity State, Collaborative Space, and Reservation Owner.
Save the model. Use your existing Collaborative space.
Create a new Bookmark
One of the best simple practices for SOLIDWORKS data is to create Bookmarks upon the initial save to the 3DEXPERIENCE platform.
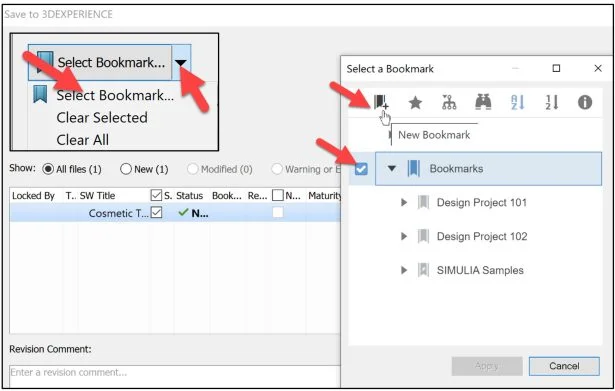
Click the Select Bookmark down arrow.
Click Select Bookmark (Workspace). The Select a Bookmark dialog box is displayed.
Select the Bookmarks box as illustrated.
Click the New Bookmark icon. The below illustration displays my Bookmarks.
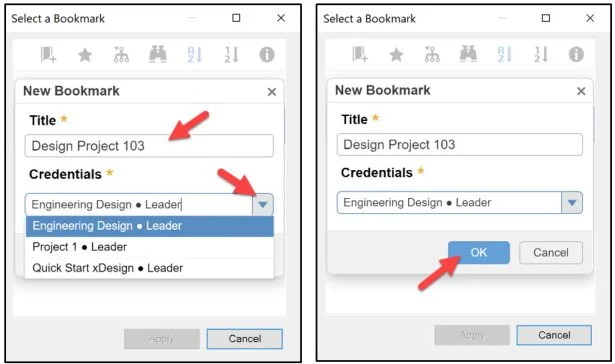
Enter Design Project 103 for New Bookmark Title.
Select your Collaborative space. The below illustration displays a few of my created Collaborative spaces.
Click OK.
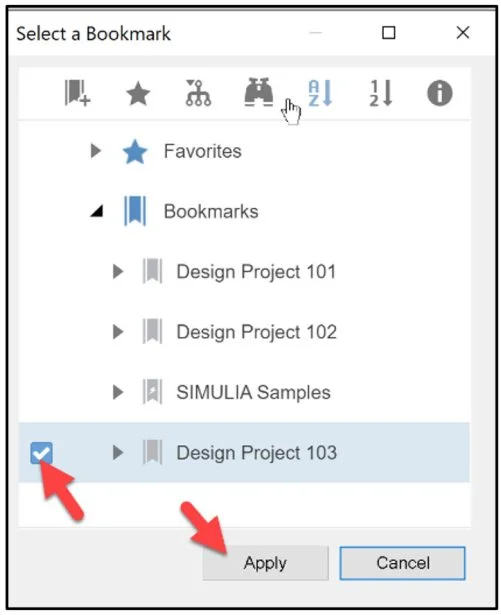
Bookmark Design Project 103 is created.
Select Design Project 103.
Click Apply.
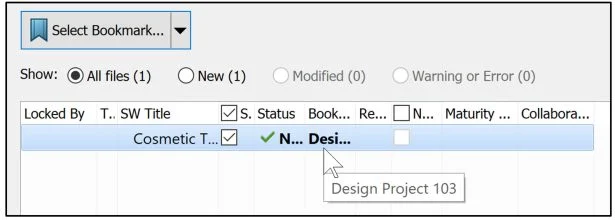
Hover over the Bookmarks column.
Design Project 103 is displayed.
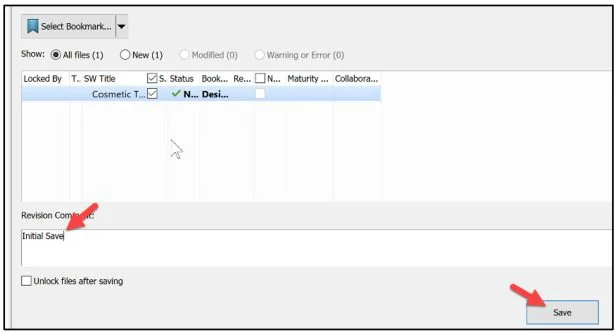
Enter Revision Comment.
Enter Initial Save.
Click Save. The model is saved to your Collaborative space and Bookmarked on the 3DEXPERIENCE platform.
You are returned back to your SOLIDWORKS session.
Embedded Model Properties
Expand the Task Pane area. View the auto generated embedded model properties. Use these properties for enhanced search options.

View the columns in the MySession panel: Component Name (Cosmetic Thread 7-6), Status (Saved to the platform), Locked Status (Unlocked), Rev (A.1), Is Last Revision (Yes), Maturity State (In Work), File Name (Cosmetic Thread 7-6), Collaborative space (Engineering Design), Name (prd-R1132100037266), Type (Physical Product), Convert status (Yes). Note: A Physical Product is a configuration of a part or assembly that can be manufactured. When you save a .sldprt or .sldasm file to a Collaborative space, each configuration becomes a Physical Product with a name that you can find in searches.

Explore the Status column. View Properties.
Right-click Status from the MySession panel.
Click Properties. View the auto generated embedded model properties.
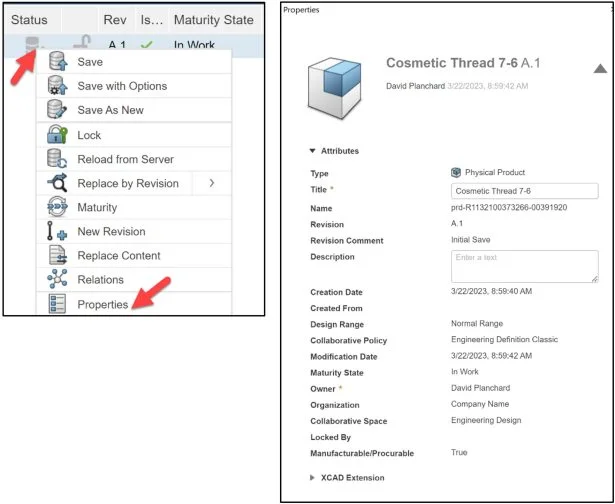
Close the dialog box. Return to the MySession panel.
Click Close.
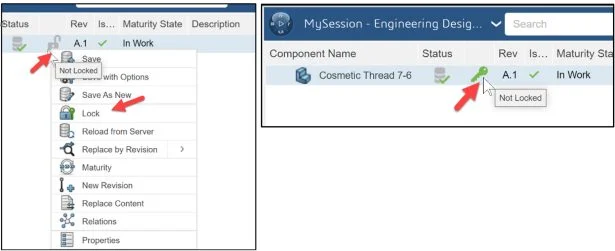
Right-click the Not Locked icon in the MySession panel. View your options.
Click Lock. The lock process displays a green key icon. You have full read write access. It also prevents any other team member to make changes to the file. This will reduce duplicated work and ensure that you and your team are working on the most updated file/files.
Modify the Cosmetic Thread length of the model.
Right-click Cosmetic Thread from the FeatureManager.
Click Edit Feature from the Pop-up menu. The Cosmetic Thread PropertyManager is displayed.
Enter 1.500in for Depth.
Click OK.
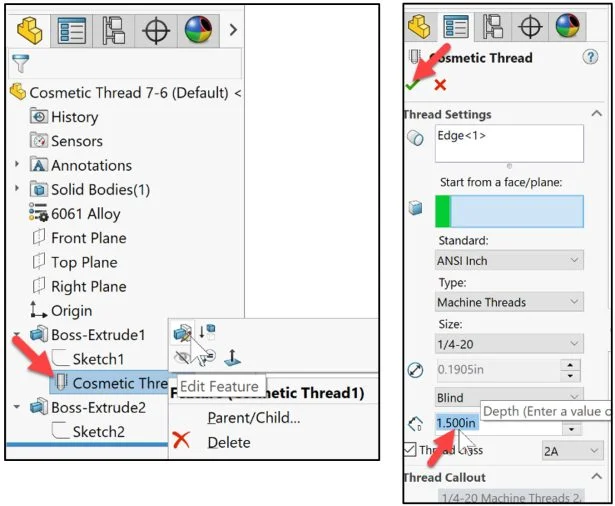
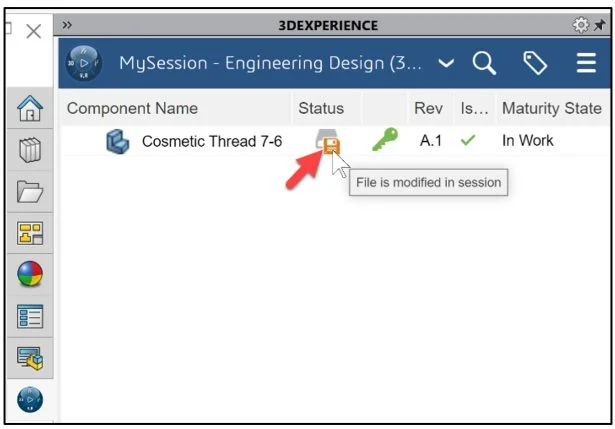
The Status icon in the MySession panel informs you that the file was modified. The local copy (on your desktop) is different than the saved copy on the platform.
Save and update the model to the 3DEXPERIENCE platform in your Bookmark.
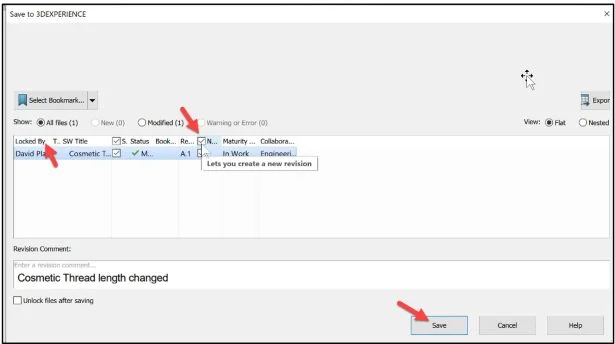
Create a New Revision
Click Save Active Window from the Lifecycle tab in the Action bar.
The Save to 3DEXPERIENCE dialog box is displayed.
Check the New Revision box. Note: Locked By, displays the first and last name of the person that has locked the corresponding family on the 3DEXPERIENCE platform.
Enter a Revision comment.
Return to your SOLIDWORKS session.
Click Save.
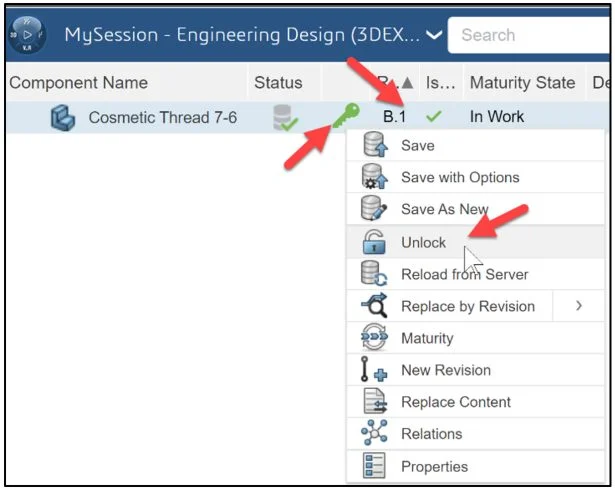
View Revision – B.1. Unlock the model. This provides model access to people on your team or other groups with the latest changes.
Right-click the green key icon.
Click Unlock.
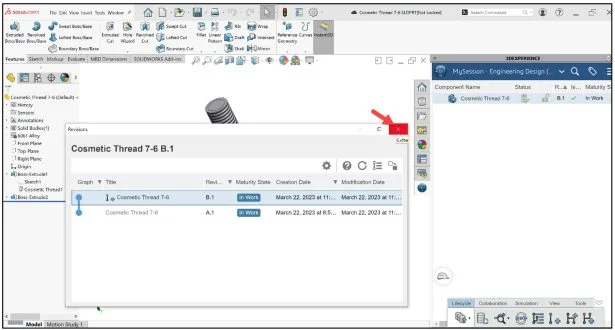
Check the Revision history of the model.
Click Cosmetic Thread 7-6 in MySession.
Click Revisions under the Lifecycle tab in the Action bar.
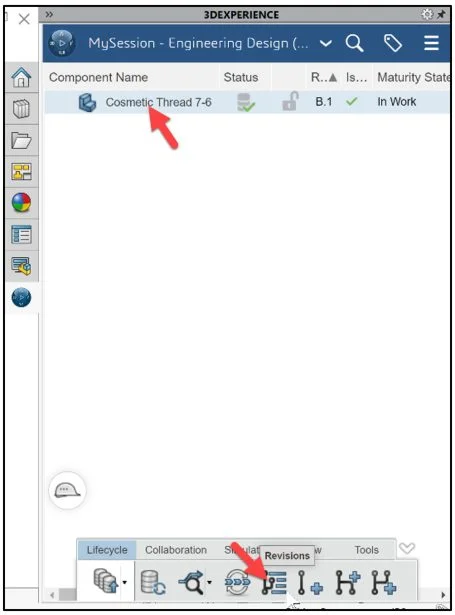
View the Revisions dialog box. The box displays the history revision information on the document. Revision A.1 and B.1 are displayed. Maturity State: In Work. Creation and Modification Dates are displayed. Close the Revisions dialog box.
Click Close.
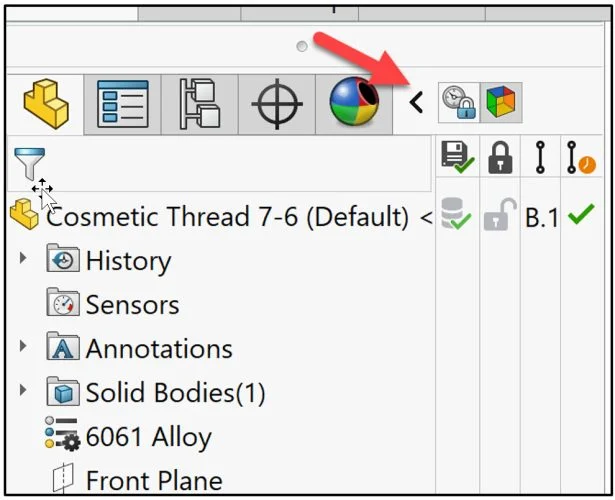
Lifecycle Info in the Feature Manager
View Lifecycle information directly in the FeatureManager design tree.
Expand the FeatureManager as illustrated. View the provided information.
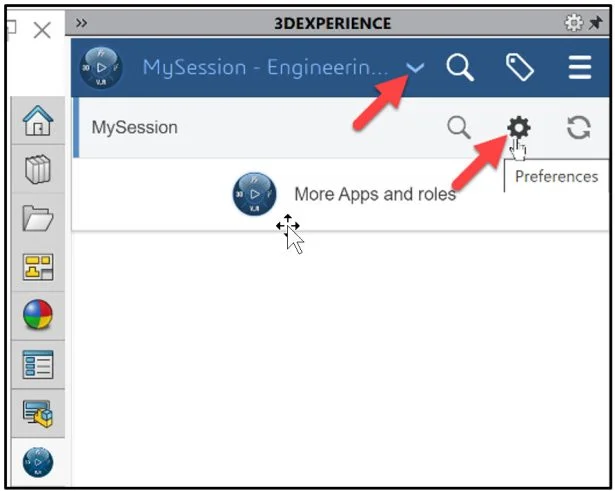
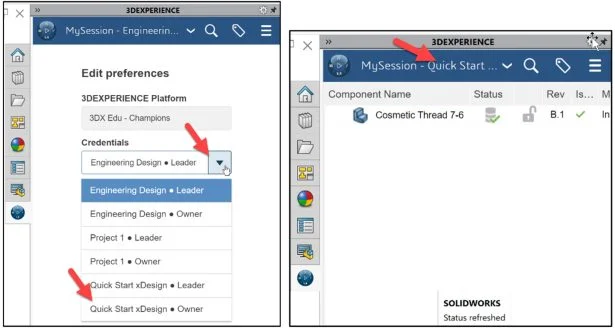
Preferences in MySession
View Preferences in the MySession panel for the model. Edit Preferences. Note: If you have multiple Credentials and Collaborative spaces, you can modify and save the model to a new space. In this lesson, just view the procedure.
Click the drop-down arrow from MySession.
Click the Preferences gear icon.
The Edit preferences dialog box is displayed. View your options.
Click the drop-down arrow from Credentials.
Select Quick Start xDesign Owner.
Click Save. The MySession panel is updated to the new Quick Start xDesign Collaborative space.
Close the part.
This entire lesson was within the SOLIDWORKS environment connected to the 3DEXPERIENCE platform.
We are finished with the lesson. In the next lesson, we will explore Bookmarks for a SOLIDWORKS assembly and how to share and delete documents.
Academic Community: After you create a 3DEXPERIENCE ID, Educators, can get more information on SOLIDWORKS and the 3DEXPERIENCE Platform. Request to join the 3DEXPERIENCE Academic Community for free at go.3ds.com/academiccommunity.
Student Community: Students, join the student community for free at go.3ds.com/studentcommunity. Check out great posts on Mechanism Mondays, FEA Fridays, Solid Saturdays (animations), Formula Student and Formula SAE exercises.
Stay tuned for David’s next 3DEXPERIENCE Works Lesson #3: SOLIDWORKS and Bookmarks, Share and Delete.
The first lesson in this series is: 3DEXPERIENCE Works Lesson #1: Getting Started with SOLIDWORKS and the Platform.
Design well. Marie