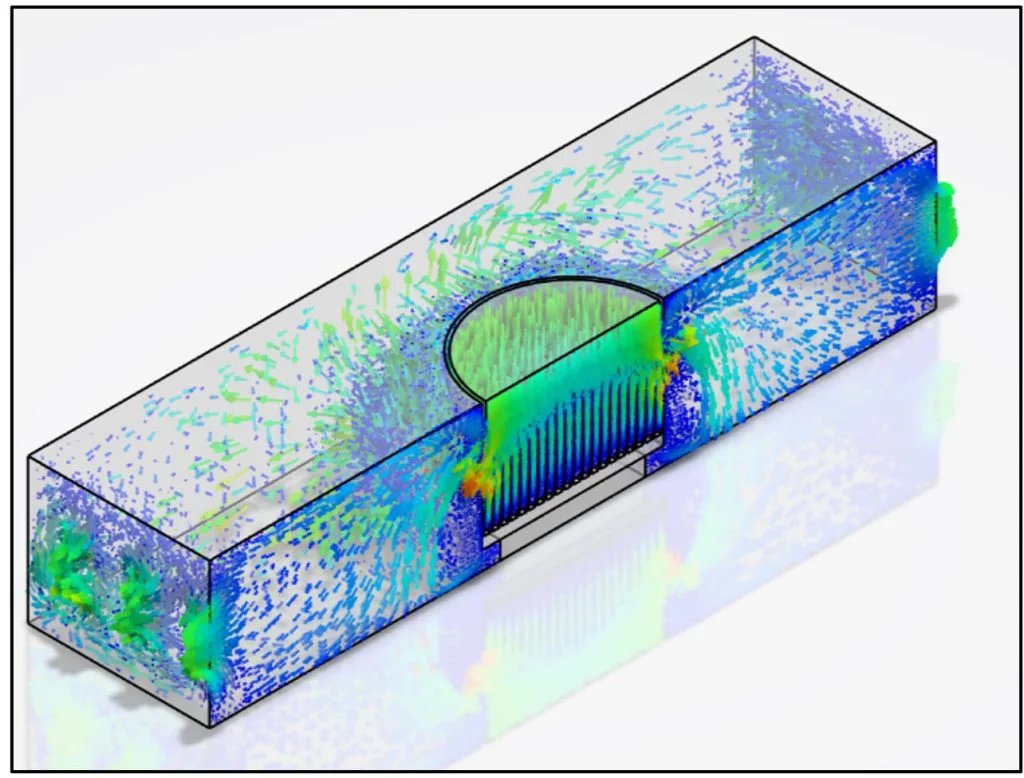
After teaching 1000’s of students and writing about SOLIDWORKS for over 25 years, David Planchard, emeritus WPI, is exploring SOLIDWORKS desktop and the integrated 3DEXPERIENCE Platform. Through the 3DEXPERIENCE Works Lesson series, David helps educators understand the 3DEXPERIENCE Engineer, Fluid Scenario Creation App (CFD) with simple examples and industry practices. The Platform offers are available thru your Education Partner (VAR).
In this lesson, analyze a simplified electronic enclosure. Evaluate the first iteration of the electronic enclosure to remove heat which is generated by a CPU chip attached to a heat sink on a thin surface. A fan is installed to help dissipate the heat from the enclosure through vented side panels.
Open the part in SOLIDWORKS. Save the part in your Collaborative space using an existing Bookmark. Return to your SOLIDWORKS desktop. Lock the part. Apply the Fluid Scenario Creation App. Create the FE Model or FEM.
Define the internal turbulent Fluid Domain of the electronic enclosure. Specify the region for fluid flow. Indicate the openings of the fluid domain. Specify air as the material for the fluid section. This represents the air flow from a fan through the Heat sink.
Create a Solid Section for the Heat sink and CPU chip. Apply 6061Aluminum alloy as the material for the Heat sink. Apply silicon as the material for the chip.
Create a customize Hex-Dominant Mesh for the Enclosure. There are always tradeoffs in creating a mesh (capability, time, and accuracy). Currently, the Educational version of Fluid Scenario Creation has a maximum allowable node count of 1million nodes with up to 4 physical cores.
Use the Sweep 3D Mesh method for the Heat sink and chip. Define two Physics conditions. Create the first physics condition for the fluid and include thermal effects. Use the Realizable k-ε turbulence model for a more realistic simulation of air flow through the Heat sink. Create the second physics condition for the solid and include only thermal effects.
Create a steady-state step that represents steady air flow during the simulation.
Define the boundary conditions of the CPU chip inlet and outlet. Use a fan boundary condition to simulate the effects of adding an intake fan to the simulation. Use a pressure outlet to describe the static pressure at the opening where fluid flows out of the enclosure.
Run the Simulation study. Use the Physics Results Explorer App. Note: The Simulation should take approximately 35 minutes using 4 CPU cores. Display and review the Gauge Pressure.1, Velocity Vector.1 and Temperature contour plot. Examine the temperature at different points throughout the chip, Heat sink and enclosure using a XY Plot from Path.

Before we start, there are a few items that you need to know.
In this lesson, use your default Collaborative space. An internet connection is required. A 3DEXPERIENCE ID is required.
The Flow Simulation lesson provides a foundation to users who are new to using simulation to solve real-world engineering and design problems. You should have a basic understanding of flow, pressure, velocity and the Computational Fluid Dynamics (CFD) method.
Launch the 3DEXPERIENCE Platform and Start SOLIDWORKS
3DEXPERIENCE Launcher needs to be installed. 3DEXPERIENCE Works Lesson 1: Getting Started with SOLIDWORKS.
The 3DEXPERIENCE platform is browser driven. Your existing cookies and cache determine what you will see on your computer desktop or during a SOLIDWORKS login. A full installation of SOLIDWORKS 2019 SP0 or later is required.
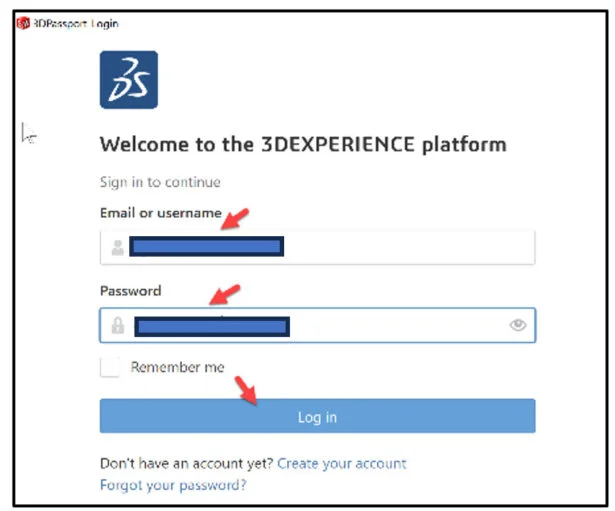
Start a SOLIDWORKS session from your desktop.
Double-click the SOLIDWORKS icon.

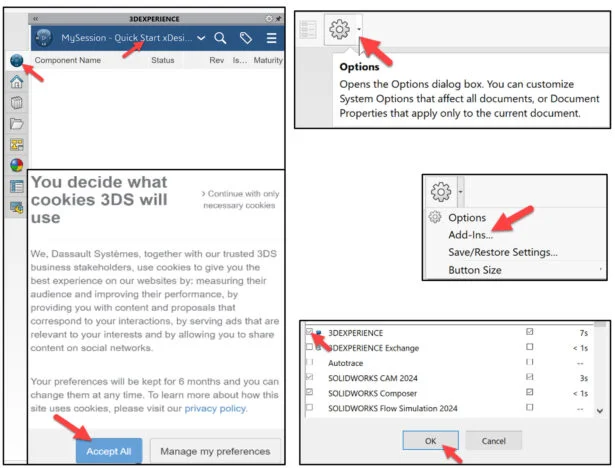
View the illustration below. Depending on your system setup, cookies, and cache, it will be different. Read the provided information.
Input the requested data.
Click Accept All.
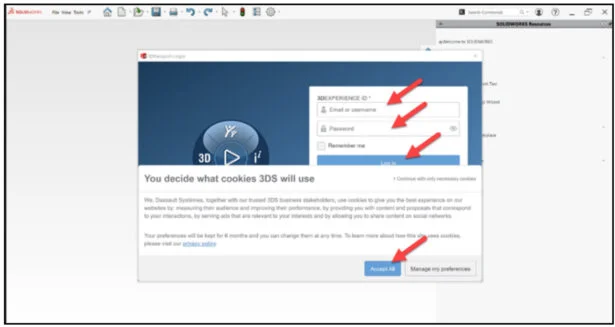
The Welcome – SOLIDWORKS dialog box is displayed.
You are logged into the 3DEXPERIENCE platform.
Close the Welcome dialog box.
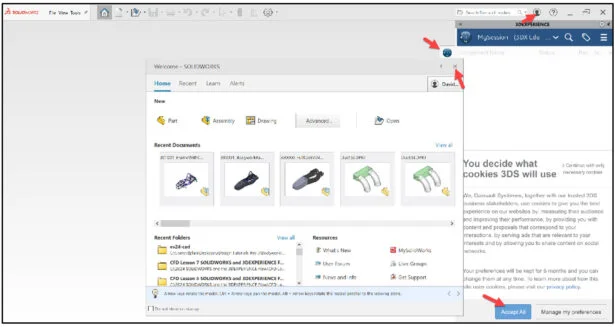
Click the 3DEXPERIENCE icon in the Task Pane. The MySession panel is displayed. This displays the two-way communication between SOLIDWORKS running on your desktop and the 3DEXPERIENCE platform running in the cloud.
In this lesson, I’m using a Collaborative space named Quick Start xDesign.
Note: If you do not see the 3DEXPERIENCE icon, click the Options drop-down arrow, click Add-Ins, check the 3DEXPERIENCE box, click OK, from the SOLIDWORKS Main menu.
Click Accept All if needed
Download the SOLIDWORKS Enclosure Assembly and Save
Download the SOLIDWORKS Enclosure assembly and MS Excel fan file to follow along with this lesson.
Open the Enclosure assembly that has not been previously uploaded or saved to the 3DEXPERIENCE platform.
Expand the Task Pane bar. The MySession panel displays the Components Name, Status (Displays an icon that represents the status of a given revision, save or not saved to the platform), Locked status (Locked or Unlocked), Rev (Revision #), Is Last Revision (Yes/No), Maturity State (Lifecycle state of the family, for example: Private, In Work, Frozen, Released, Obsolete), Description, File Name (Displays the PLM external ID of the object for reference objects and the PLM external ID of the connection for instances) and Type (Physical Product or Drawing).
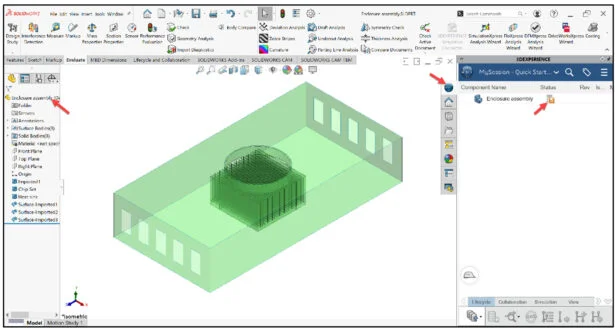
At this time, they are blank. The orange save Status icon for the Enclosure assembly informs you that the local file on your computer have not been saved to the platform. Save the Enclosure assembly to the 3DEXPERIENCE platform.
Click Save Active Window from the Lifecycle tab in the Action bar. Note: You can also right-click Enclosure assembly in MySession, and click Save with Options.

The file is temporarily being saved to a local cache area. The platform is checking for out of date component, modified component from the last save to the platform, different revisions, missing component, etc.
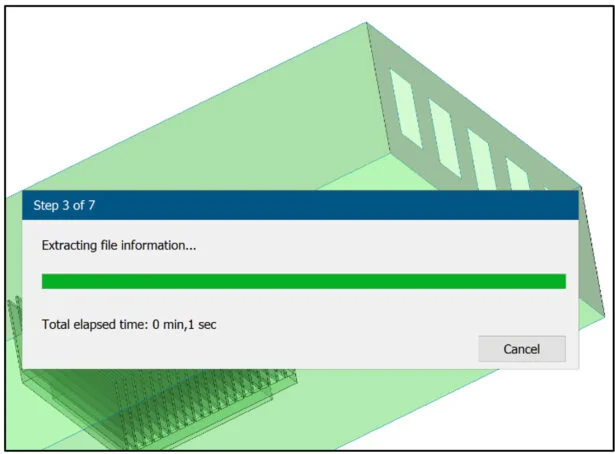
The Save to 3DEXPERIENCE dialog box is displayed. Product lifecycle management (PLM) attributes are displayed. The PLM attributes include: Bookmark locations, Selected Collaborative space, Owner, Title, Saved Status (3DEXPERIENCE), Revision, Maturity Lifecycle State and Collaborative Space name.
Save the part. Use your existing Collaborative space. Use an existing Bookmark. Note: If needed review 3DEXPERIENCE Works Lesson 3: SOLIDWORKS Bookmarks, Share and Delete. Use Bookmarks (links) to delete entire groups of data or just a single file. For assemblies within the Bookmark folder, there is an option to delete the entire structure of the assembly and all reference components.
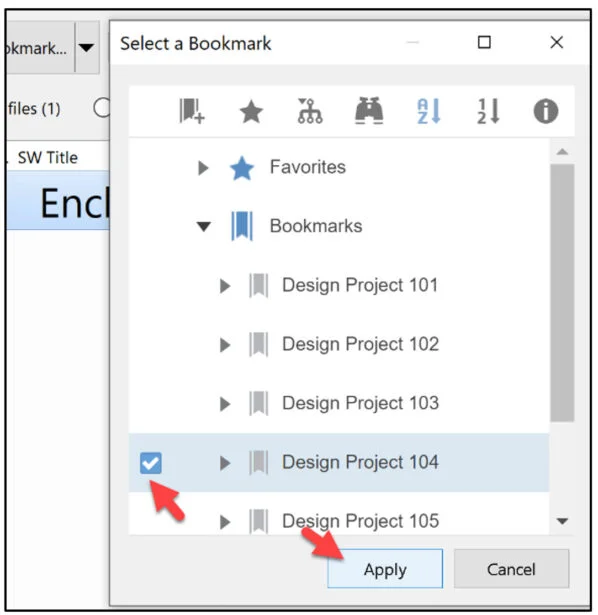
Click the Select Bookmark down arrow.
Click Select Bookmark. The Select a Bookmark dialog box is displayed.
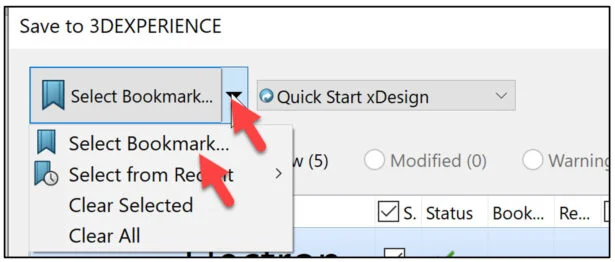
In the below example, I selected Design Project 104 as my bookmark.
Click Apply from the Select a Bookmark dialog box.
Click Save from the Save to 3DEXPERIENCE dialog box.

The Enclosure assembly (Physical product) is directly loaded into your Collaborative space and Bookmarked on the 3DEXPERIENCE platform. You are returned back into your SOLIDWORKS desktop session.
View the Status column in the updated MySession panel. The Status icon displays a green check mark. This means that the current file on your SOLIDWORKS desktop is updated and saved to the platform. The default Revision is A. The Maturity State is “In Work”. This is the default Lifecycle state after you saved the model to the 3DEXPERIENCE platform.
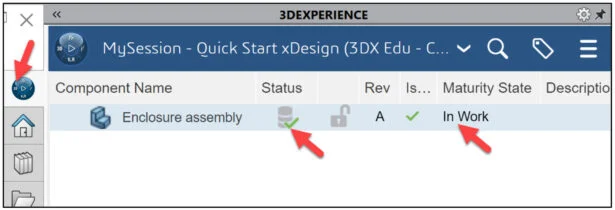
Lock the Enclosure assembly in the MySession panel. This prevents anyone in making a change to them. The Lock icon is displayed.
Right-click Enclosure assembly.
Click Lock. The Enclosure assembly is locked.
Select Enclosure assembly in the MySession panel.
Launch Fluid Scenario Creation App
Click the center of the Compass. Use the Fluid Scenario Creation App. Think of this App as the SOLIDWORKS Flow Simulation Add-in inside of SOLIDWORKS. Most of the 3DEXPERIENCE Apps run in your web browser. 3DEXPERIENCE Simulation Apps perform a small installation on your windows machine. Both types of Apps are linked to your PLM data on the platform.

Drag the slider downward to view the Fluid Scenario Creation App.
Launch the Fluid Scenario Creation App. If this is your first time using a 3DEXPERIENCE Simulation App, or an update is available, download the needed App information on your computer. It is recommend to restart your SOLIDWORKS session.
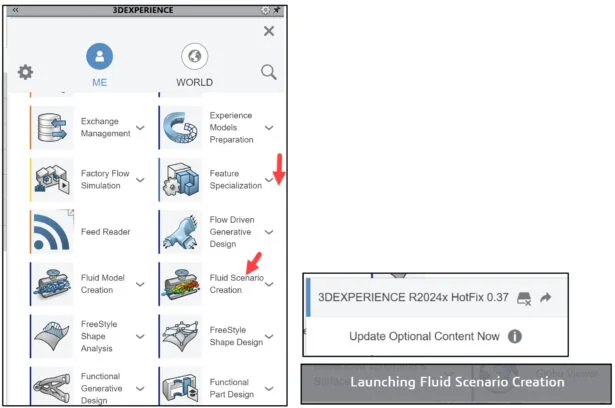
This can take 10 – 15 seconds.
The 3DEXPERIENCE | SIMULIA Fluid Scenario Creation App is displayed.
Create the Fluid Model
The Simulation Initialization dialog box is displayed.
Enter Enclosure_Chip for Simulation title.
Select Create fluid model for Fluid model type.
Enter FEM_ChipHT for Fluid model name.
Accept the defaults. Analysis type: Steady-state and 2000 for Maximum iterations.
Click OK from the Simulation Initialization dialog box.
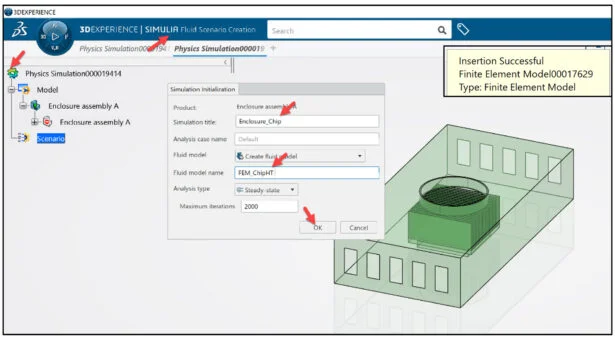
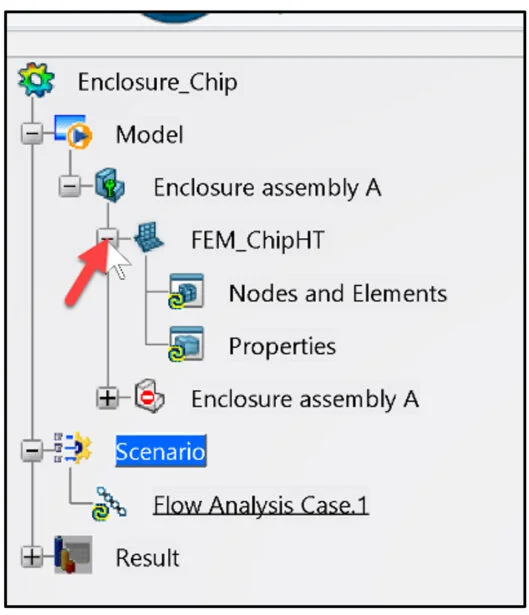
The Fluid Scenario Creation App creates the following features and displays them in the tree:
- The simulation object that is linked to the physical product. A notification indicates the successful creation of the simulation object.
- A finite element representation for the fluid model named FEM_ChipHT.
Note: Finite element models are alternative representation of geometries that contain meshes. A finite element model can also be called a FE Model or FEM.
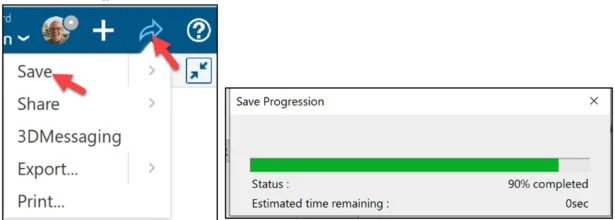
Save the Simulation study.
Click the Share icon as illustrated.
Click Save.
Define Fluid Domain
Display the Assistant dialog box. The Assistant dialog box is a helpful tool which guides the user through the Fluid Simulation process. The Assistant dialog box should be followed from top to bottom. Note: The Assistant is available in most SIMULIA native Apps. It is similar to other panels in native Apps; you can move, resize, and dock.
Right-click in the Graphics area.
Click Assistant. The Assistant dialog box is displayed.
Click Model from the Assistant dialog box.
Click Fluid Domain from the Commands box. Note: You can also click Fluid Domain from the Setup tab in the Action bar to work outside of the Assistant dialog box.

The Fluid Domain dialog box is displayed. A fluid domain is a finite volume consisting of one or more fluid regions. The fluid regions (which you bound using parts, exterior geometries and openings) are the volumes in which the fluid flows.
Enter Enclosure_1 for Name.
Select Extract from part boundaries from the Definition drop-down menu.
Click the Select Part icon for Parts (At least one required).
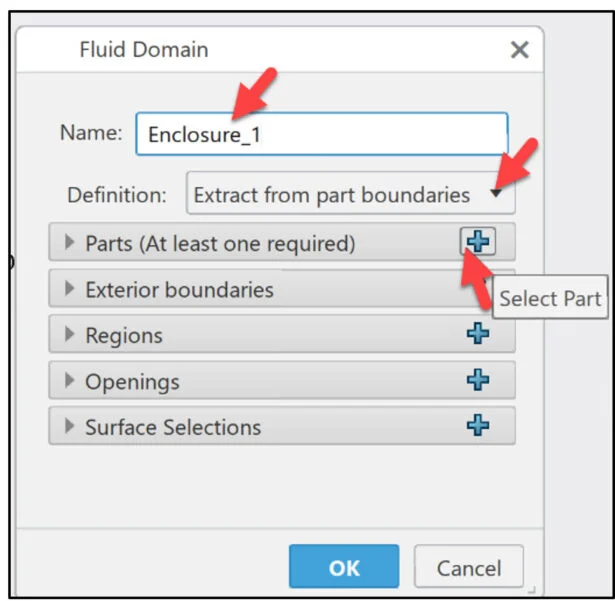
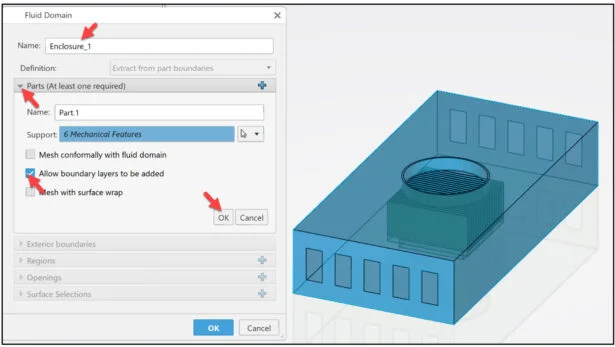
Click and drag (left to right) a rectangle around the entire model to select the heat sink, chip, and enclosure.
The Support field indicates that six mechanical features are selected.
Check the Allow boundary layers to be added box. This option enables the creation of boundary layers along the part boundary.
Click OK from the Parts (At least one required) box.
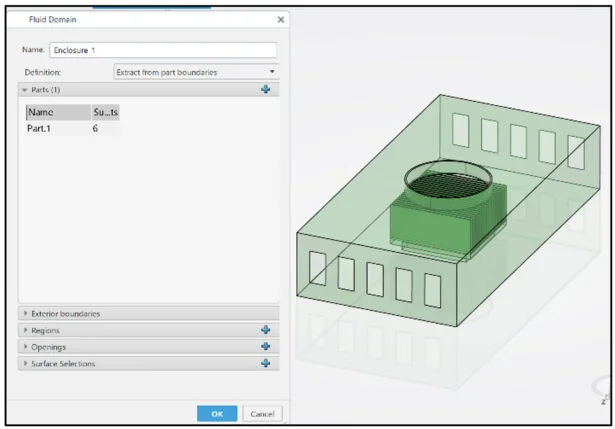
Specify the regions where the fluid flows.
Expand the Regions category.
Click the Plus icon.
Use the Face Section icon filter.
Select the inside bottom surface, next to the chip as illustrated.
A glyph of a blue cube with a stem is displayed on that surface. If required, check the Flip direction box to immerse the cubical portion of the glyph in the fluid volume.
Click OK from the Regions box.

Indicate the openings of the fluid domain. There are 11 openings to define, all of them on the CPU surface enclosure. One opening is the round vent above the Heat sink, and the other 10 openings are the small rectangular vents on the ends of the enclosure.
Create Openings
Create Opening.1
Click the Plus icon from the Openings box.
Click the Edge Selection icon filter.
Click the two inner edges of the round vent as illustrated. 2 Edges are displayed in the Support box.A circular disc glyph displays the location of Opening.1.
Click OK from the Openings box.
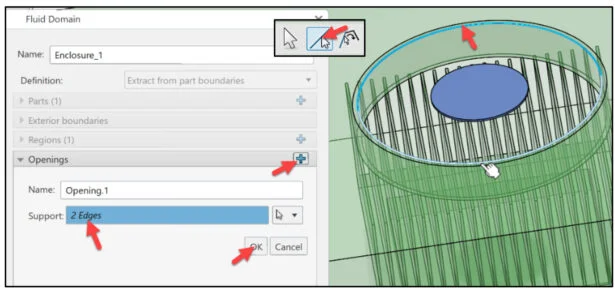
Create Opening.2. Define a rectangular vent opening by selecting each of the four edges of the small rectangular vent.
Click the Plus icon from the Openings box.
Click the Edge Selection icon filter.
Click the all 4 edges of the first rectangular vent.
4 Edges are displayed in the Support box. A circular disc glyph displays the location of Opening.2.
Click OK from the Openings box. Opening.2 is created.
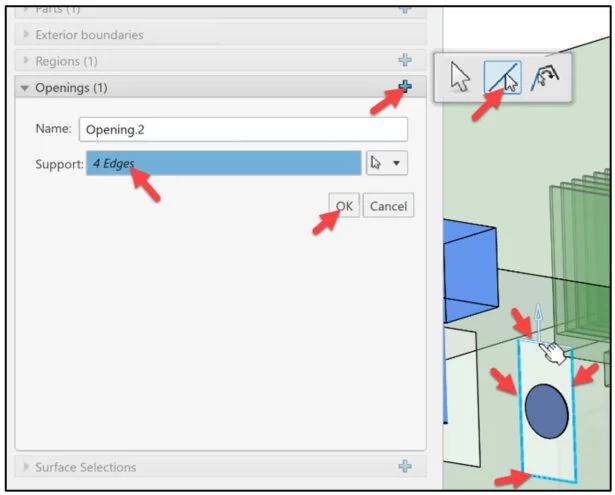
Define the nine other rectangular openings in the same manner as above.
Click OK from the Fluid Domain.
View the results in the study tree.
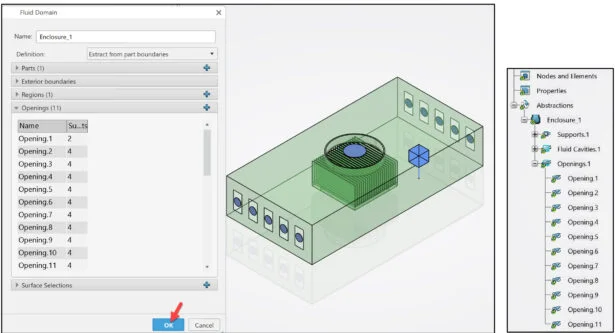
Define Fluid Material
Specify air as the material for the fluid section. This represents the air flow from the fan through the Heat sink.
Utilize the fluid section to define the material properties and behaviors of the fluid domain in the flow simulation.
Click Fluid Section from the Properties tab in the Action bar.

The Fluid Section dialog box is displayed.
Select the glyph as the support for the fluid section. The fluid region is highlighted.
Click the eyeglass symbol to open the Material Palette dialog box.
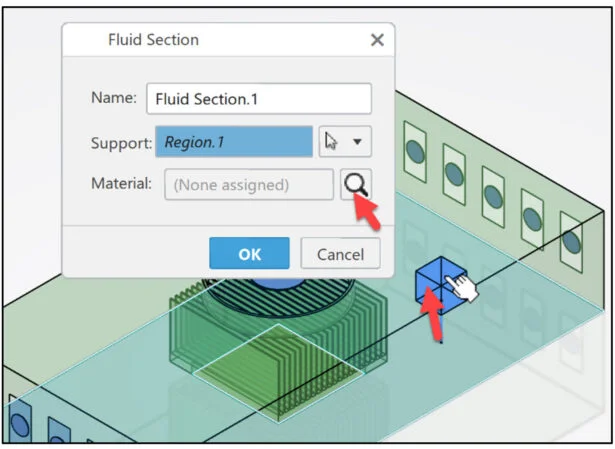
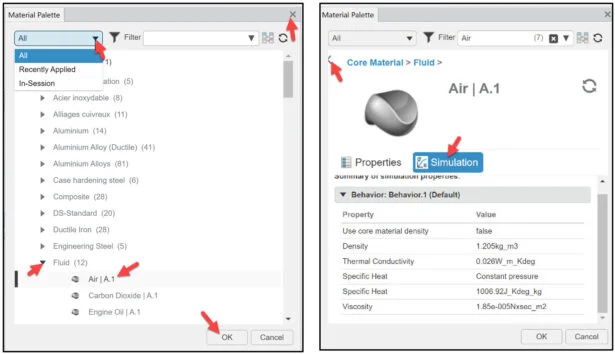
The Material Palette dialog box is displayed.
Select All.
Expand the Fluid folder.
Select Air | A.1 under Fluid.
View the Simulation properties.
Click the Simulation tab.
Return to the Material Palette.
Click OK from the Material Palette dialog box if needed.
Close the Material Palette dialog box.
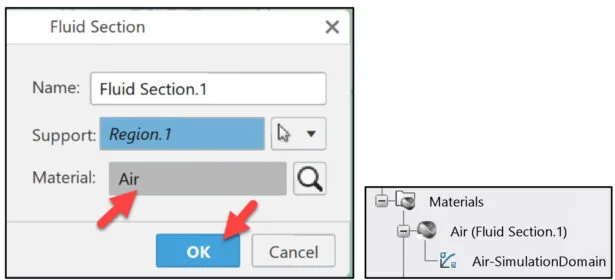
Click OK from the Fluid Section dialog box. Material Air is added in the study tree.
Create Solid Sections
Create a Solid Section for the Heat sink and Chip. Apply 6061Aluminum alloy as the material for the Heat sink. Apply silicon as the material for the Chip. Note: Both the Heat sink and Chip are imported geometry.
A solid section is used to apply properties to a region where the material is continuous through the thickness of the part.
Click Solid Section from the Properties tab in the Action bar.

The Solid Section dialog box is displayed.
Click Heat sink as illustrated from the study tree. The Heat sink is highlighted in the Graphics area and Support box.
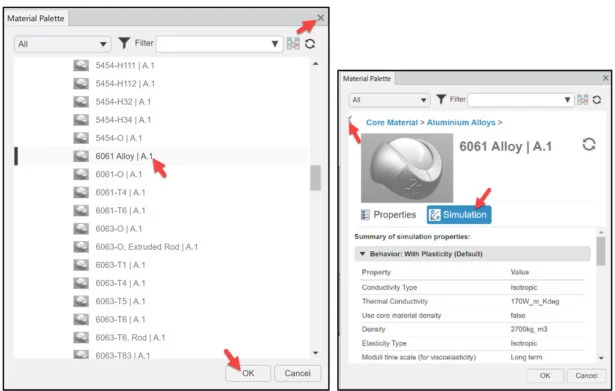
Click the eyeglass symbol to open the Material Palette dialog box.
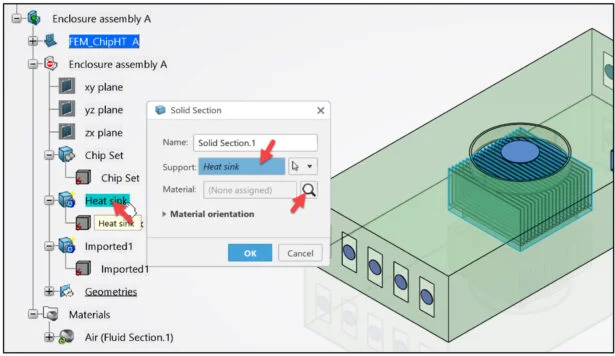
The Material Palette dialog box is displayed.
Select All.
Expand the Aluminum Alloys folder.
Select 6061 Alloy | A.1.
View the Simulation properties.
Click the Simulation tab.
Return to the Material Palette.
Click OK from the Material Palette dialog box if needed.
Close the Material Palette dialog box.
Click OK from the Solid Section dialog box.
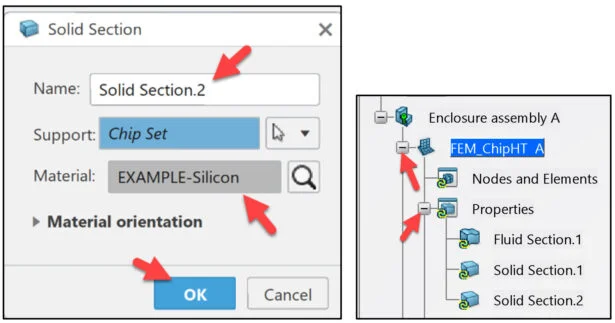
View the results in the study tree.
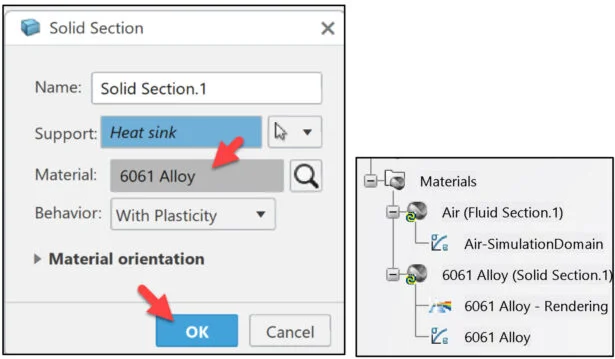
Create a Solid Section for the Chip Set. Perform the same procedure as the Heat sink but select Chip Set from the Study tree.
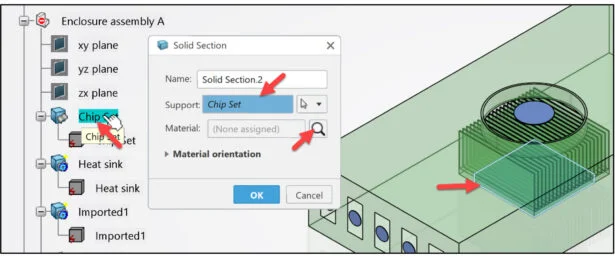
Click the eyeglass symbol to open the Material Palette dialog box.
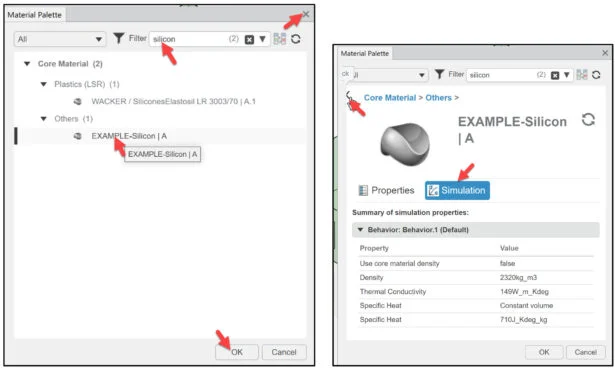
The Material Palette dialog box is displayed.
Enter Silicon in the Search box.
Select EXAMPLE-Silicon | A.
View the Simulation properties.
Click the Simulation tab.
Return to the Material Palette.
Click OK from the Material Palette dialog box if needed.
Close the Material Palette dialog box.
Click OK from the Solid Section dialog box.
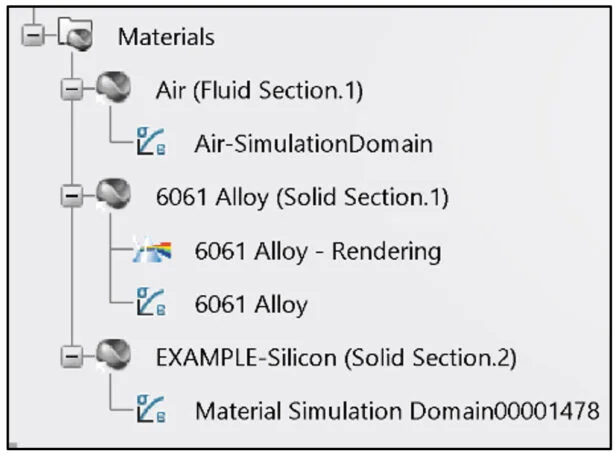
View the Materials folder.
Define the Mesh
Mesh the Enclosure. Create a customize Hex-Dominant mesh.
There are always tradeoffs in creating a mesh (capability, time, and accuracy). Currently, the Educational version has a maximum allowable node count of 1million nodes with up to 4 physical cores are supported.

Click Hex-Dominant Mesh from the Mesh tab in the Action bar.
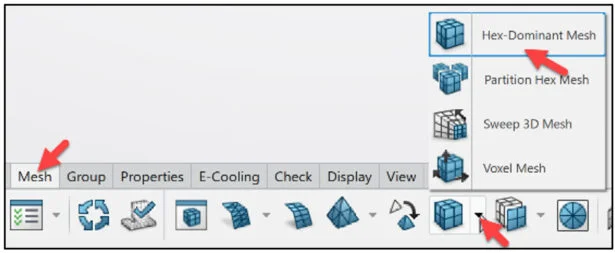
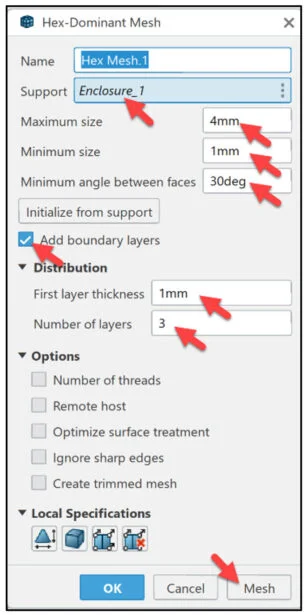
The Hex-Dominant Mesh dialog box is displayed.
Enclosure_1 is select for Support.
Enter 4mm for Maximum size.
Enter 1mm for Minimum size.
Enter 30deg for Minimum angle.
Check the Add boundary layers box.
Enter 1mm for First layer thickness.
Enter 3 for Number of Layers.
Click the Mesh button.
Click OK from Hex-Dominant Mesh dialog box.
Hex Mesh.1 is displayed in the study tree.
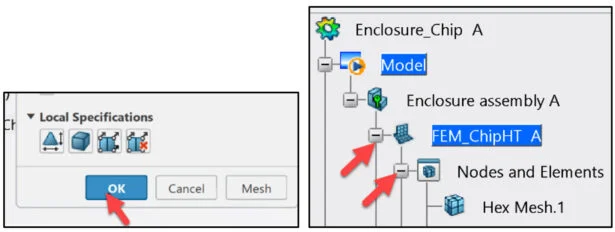
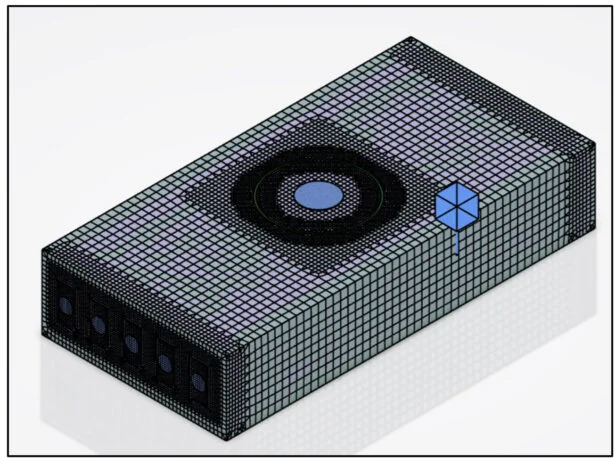
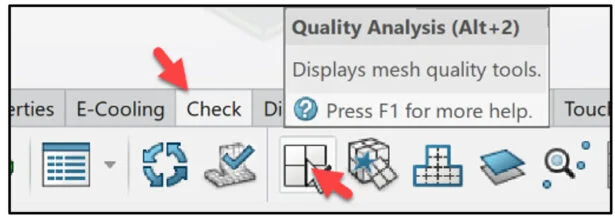
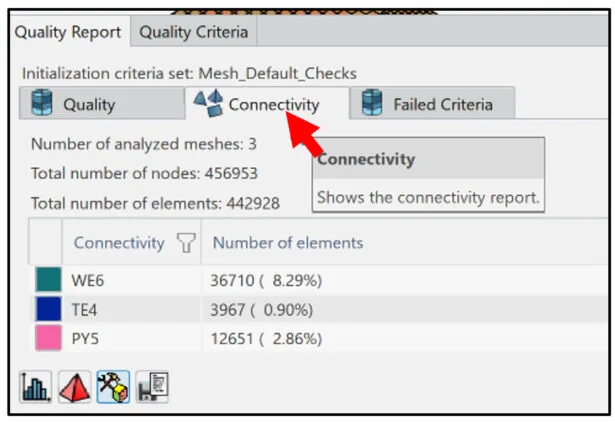
Check the Quality of the mesh and the number of nodes and elements.
Click Quality Analysis from the Check tab in the Action bar.
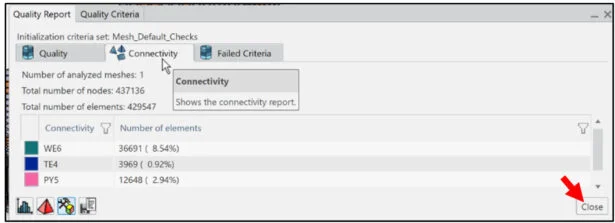
View the number of nodes and elements.
Click the Connectivity tab.
Click Close from the dialog box.
Mesh the Heat sink. Use the Sweep 3D Mesh. The Sweep 3D mesher uses a surface mesh as the starting point to mesh a volume.
Click Sweep 3D Mesh from the Mesh tab in the Action bar.
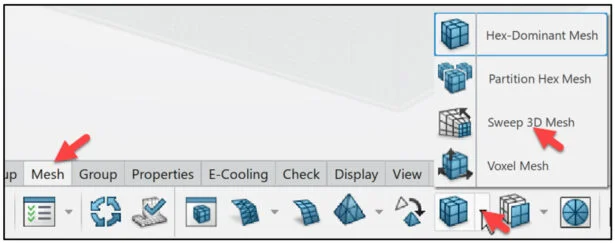
The Sweep 3D Mesh dialog box is displayed.
Select the Heat sink from the study tree. Heat sink is displayed in the Support box.
Enter 1mm for Mesh size.
Enter 6 for Number of layers. Accept the defaults.
Click the Mesh button.
Click OK from the Sweep 3D Mesh dialog box.
Sweep 3D Mesh.1 is displayed in the study tree.
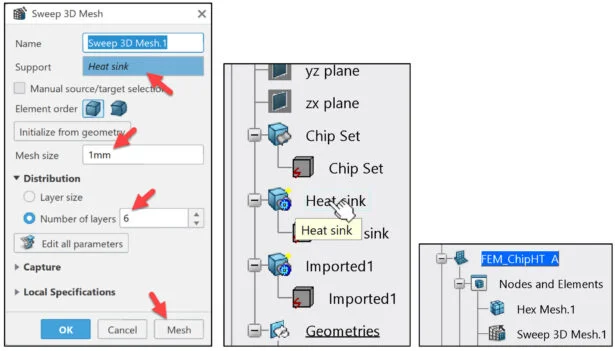
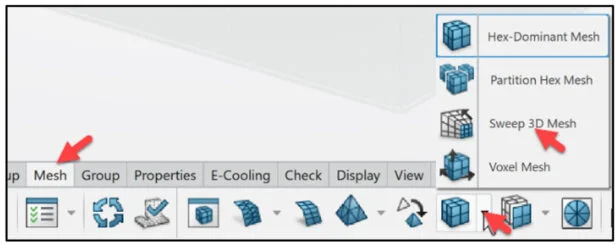
Mesh the chip. Use the Sweep 3D Mesh.
Click Sweep 3D Mesh from the Mesh tab in the Action bar.
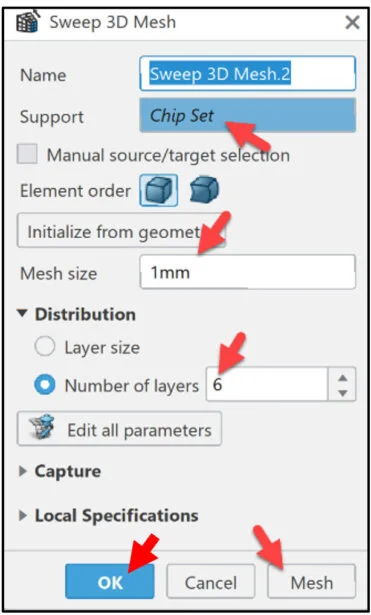
Select Chip set from the study tree. Chip set is displayed in the Support box.
Enter 1mm for Mesh size.
Enter 6 for Number of layers. Accept the defaults.
Click the Mesh button.
Click OK from the Sweep 3D Mesh dialog box.
Check the Quality of the mesh and the number of nodes and elements.
Define two Physics conditions applied to the model. Create the first physics condition for the fluid and include thermal effects. Use the turbulence model for a more realistic simulation of air flow through the Heat sink. Create the second physics condition for the solid and include only thermal effects.
Define Physics Behavior
Define the fluid physics. Click Physics from the Assistant dialog box.
Click Physics Behavior from the Commands box.
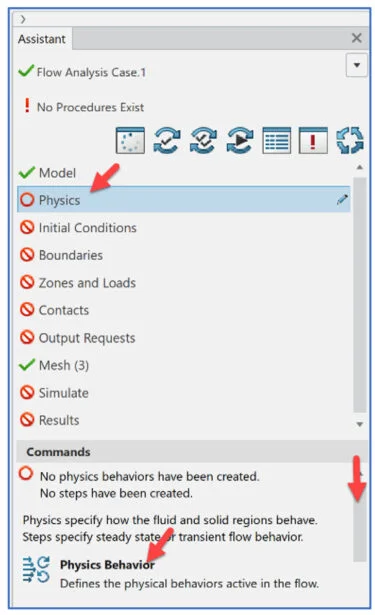
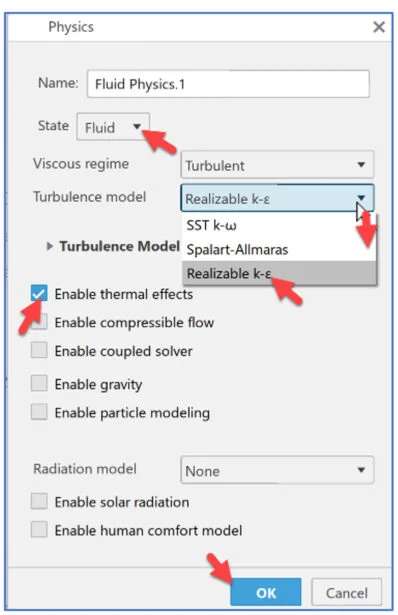
The Physics dialog box is displayed.
Select Fluid for State.
Select Realizable k-ε from the Turbulence model drop-down menu. This model is appropriate for internal fluid flow scenarios. Note: Realizable k-ε turbulence model is one of the common models used in CFD to simulate mean flow characteristics for turbulent flow conditions.
Select Enable thermal effects.
Click OK from the Physics dialog box.
Define the solid physics.
Click Physics from the Assistant dialog box.
Click Physics Behavior from the Commands box.
Select Enable thermal effects.
Accept the default conditions.
Click OK from the Physics dialog box.
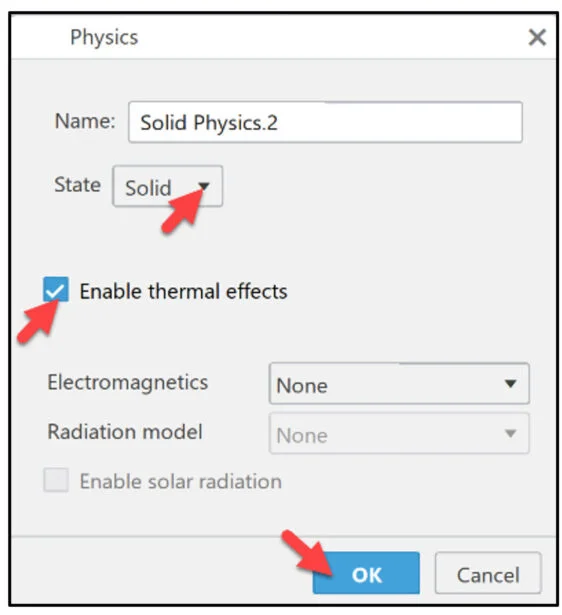
The thermal effects for the solid physics are enabled.
Create a steady-state step that represents steady air flow during the simulation. Steady-state flow is the condition where the fluid properties at any single point in the system do not change over time.
Click Physics from the Assistant dialog box.
Click Edit Current Step from the Commands box.
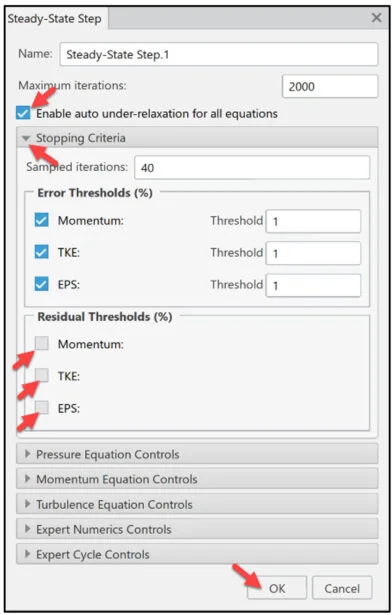
The Steady-State Step dialog box is displayed.
Select the Enable auto under-relaxation for all equations box. This option gradually converges the turbulence equations to the error thresholds that you specify in the Stopping Criteria section.
Expand the Stopping Criteria section.
Clear all check boxes under Residual Thresholds (%). In this example, you clear the errors thresholds criteria to support faster convergence. Applying only residual thresholds is also a common method for ensuring accurate results at the convergence point.
Click OK from the Steady-State Step dialog box.
Define Conditions for Heat sink and chip
First specify thermal contact to enable conjugate heat transfer between the fluid and the two solid sections. The tolerance type and tolerance parameters represent the contact between the solid sections of the chip and the air flow.
Second, define the thermal condition for the Heat sink and chip.
Define the thermal contact.
Right-click Feature Manager in the Graphics area.
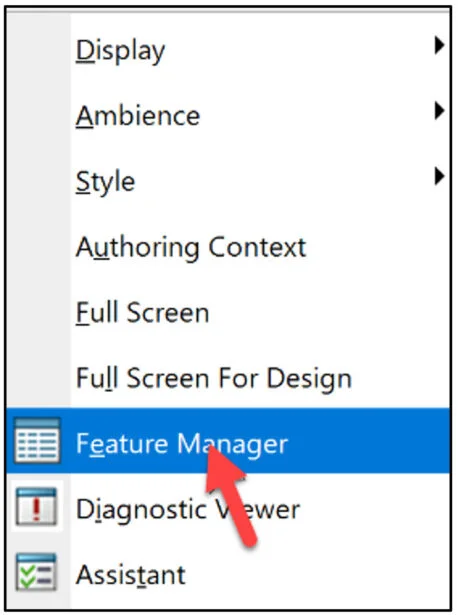
The Feature Manager dialog box is displayed.
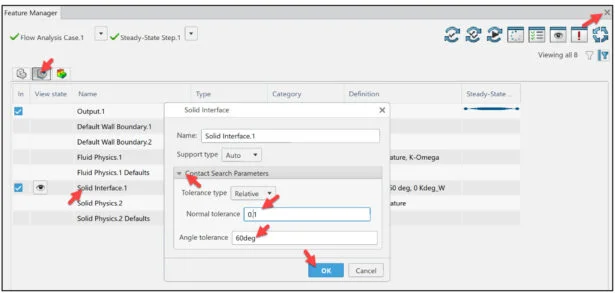
Click the Scenario tab.
Double-click the Solid Interface.1 row as illustrated. The Solid Interface dialog box is displayed. Solid interface enables the interaction between the fluid and the solid bodies.
Expand the Contact Search Parameters drop-down menu.
Enter 0.1 for Normal tolerance.
Enter 60deg for Angle tolerance.
Click OK from the Solid Interface dialog box.
Close the Feature Manager dialog box.
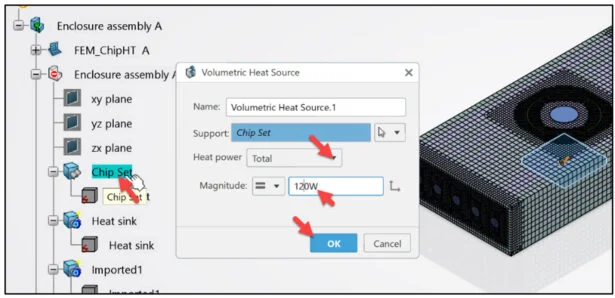
Define the heat source.
Click Zones and Loads from the Assistant dialog box.
Click Volumetric Heat Source from the Commands box.
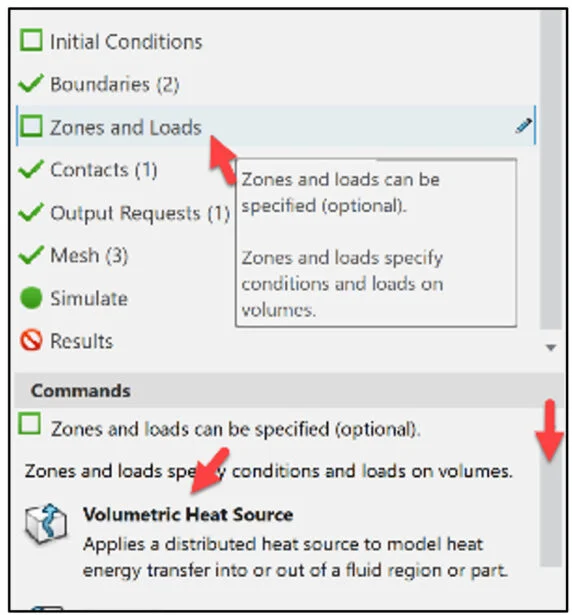
The Volumetric Heat Source dialog box is displayed. A volumetric heat source applies a distributed heat flux that models energy transfer into or out of a fluid or solid region.
Select Chip set as support from the study tree as illustrated.
Select Total for Heat power.
Enter 120W for Magnitude.
Click OK from the Volumetric Heat Source dialog box.
Define the boundary conditions of the CPU chip inlet and outlet.
Use a fan boundary condition to simulate the effects of adding an intake or exhaust fan to the simulation. The fan boundary condition represents the source of the air flow which cools the CPU chip.
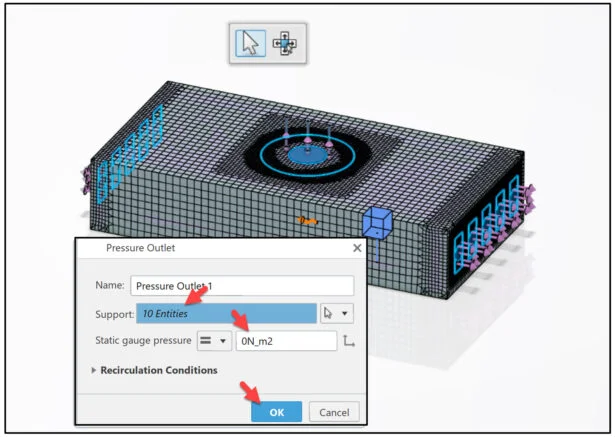
Use a pressure outlet at each of the 10 rectangular vents to describe the static pressure and represents where the air flow exists from the enclosure.
Click Boundaries from the Assistant dialog box.
Click Fan Boundary from the Commands box.
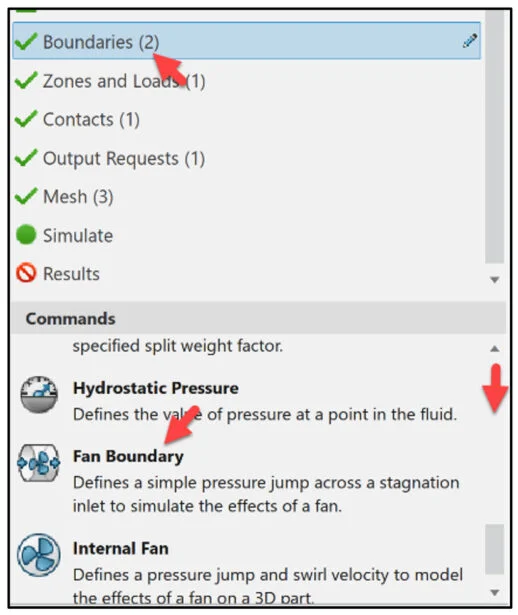
The Fan Boundary dialog box is displayed.
Select the circular glyph of the round opening above the Heat sink as the geometry support.
Import Fan Geometry
Select Fan curve as the Pressure jump.
Right-click inside of the table as illustrated.
Click Import from the Pop-up menu. Use the provided spreadsheet to populate the pressure values for the fan boundary. Note: Fan data was obtained from Dassault Systèmes, User Assistance, Simulation, 3DEXPERIENCE Simulations Examples, Fluids section.
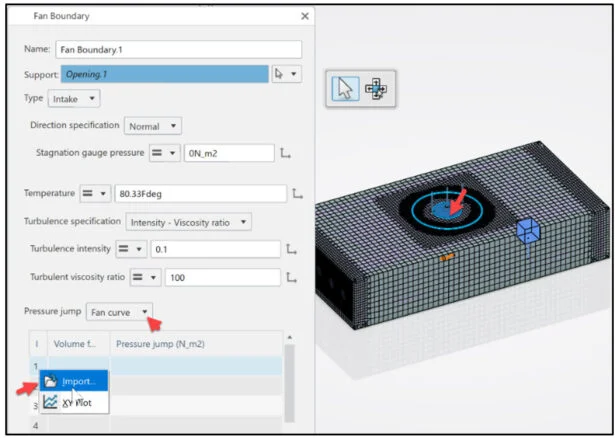
Double click the Microsoft Excel spread sheet with the sample fan data.

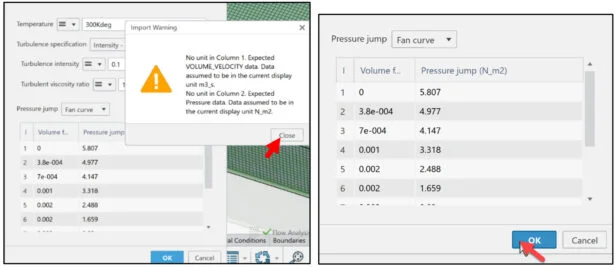
View the result.
Click Close on the Import Warning dialog box.
Click OK to close the Fan Boundary dialog box.
Apply a pressure outlet at each of the 10 rectangular vents. This represents static pressure at the locations where the air flow exits the enclosure.
Click Boundaries from the Assistant dialog box.
Click Pressure Outlet from the Commands box. The Pressure Outlet dialog box is displayed.
Select the circular glyphs of the five small opening on each side of the enclosure.
Click OK from the Pressure Outlet dialog box.
Simulate the Assembly
Click Simulate from the Assistant dialog box.
Click Model and Scenario Checks from the Commands box. The App checks if the model is ready for simulation and highlights any issues with the meshes or conditions on the model.
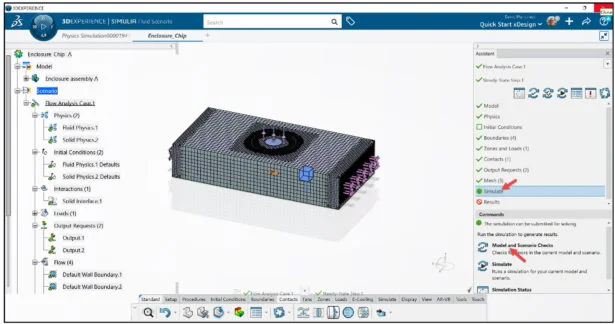
There are no issues with the meshes or conditions on the model.
Click Close.

Click Simulate from the Assistant dialog box.
Click Simulate from the Commands box.
The Simulate dialog box is displayed. Accept the defaults.
Click OK.

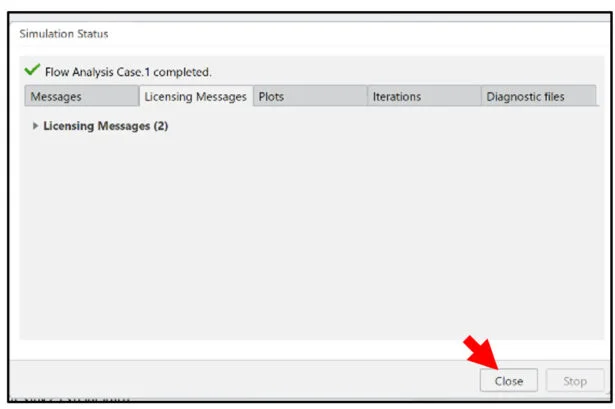
The Simulation should take approximately 35 minutes using 4 CPU cores.
Click Close from the Simulation Status dialog box.
View Results
The default Gauge Pressure.1 contour plot is displayed. View the results.
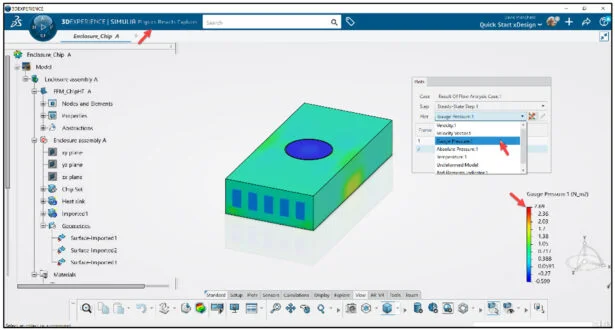
View the Temperature.1 contour plot.
Select Temperature.1 from the drop-down menu in the Plots dialog box.
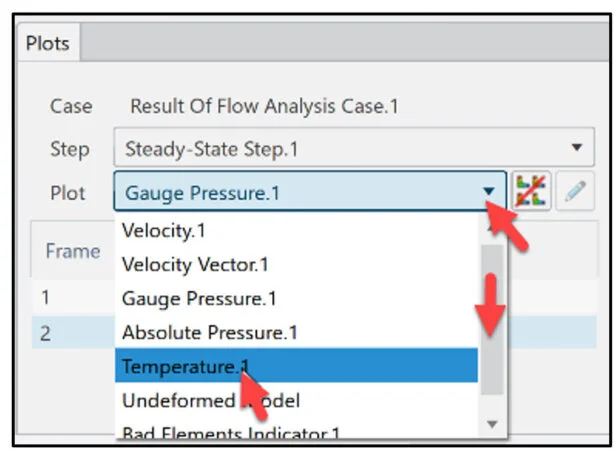
The mouse cursor automatically acts as a probe.
Click a point on the model as illustrated. View the temperature at that point. A Pop-up menu is displayed. Note: to deselect the displayed point, click in the Graphics area.
Create a plot sectioning cut.
Click Plot sectioning from the Pop-up menu.
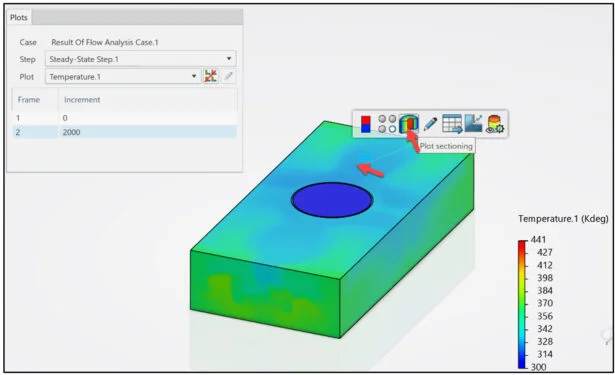
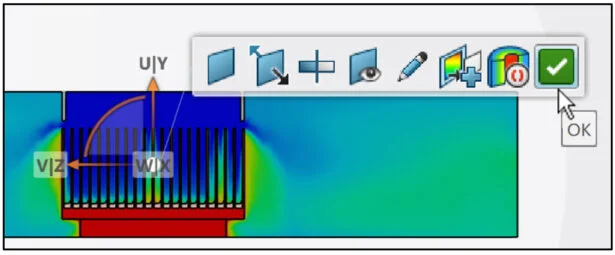
Display a Right view.
Click Set cut normal as X axis from the Pop-up menu. View the results.

Click OK from the Pop-up menu.
Remember, this is the first iteration of the electronic enclosure to remove heat which is generated by a CPU chip attached to a heat sink on a thin surface. A fan was installed to help dissipate the heat from the enclosure through vented side panels. Various modifications can be employed to create other iterations to remove the heat.
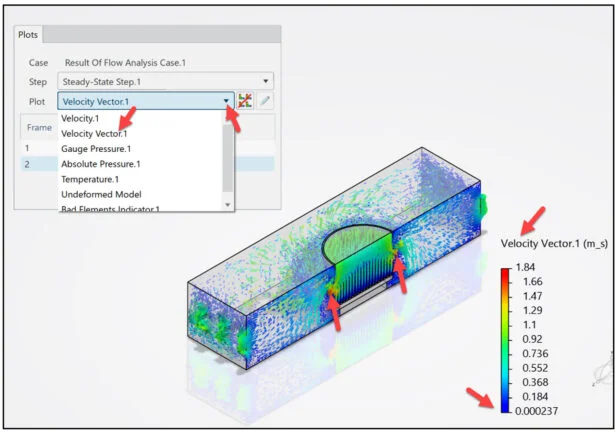
Display an Isometric view.
Display the Velocity Vector.1 contour plot.
View the results.
Review the temperature at different points throughout the chip, the heat sink, and the enclosure.
Click XY Plot from Path in the Action bar under the Plots tab.

The XY Plot from Path is displayed.
Enter Temperature-Plot for Name.
Click the Create Path icon. The Path dialog box is displayed.
Select Points for Type. Click the Add row icon.
Enter the first three coordinates. Repeat the process for the other two rows of coordinates.
Click OK from the Path dialog box. The Path points were obtained from Dassault Systèmes, User Assistance, Simulation, 3DEXPERIENCE Simulations Examples, Fluids section.
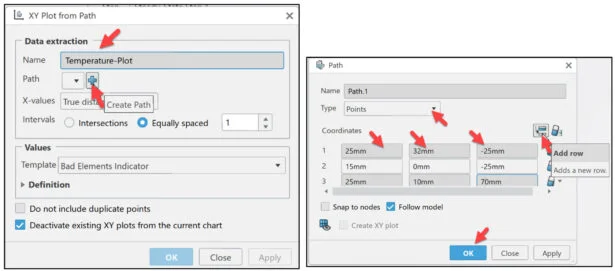
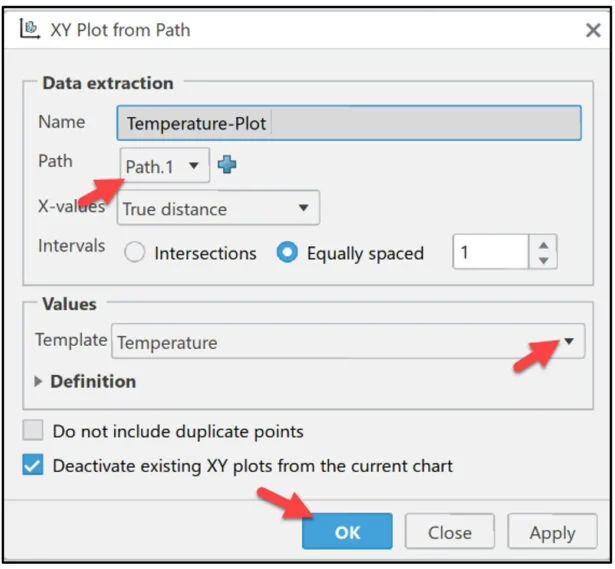
Path.1 is displayed in the Path section.
Select Temperature from the drop-down menu for Template.
Click OK from the XY Plot from Path dialog box.
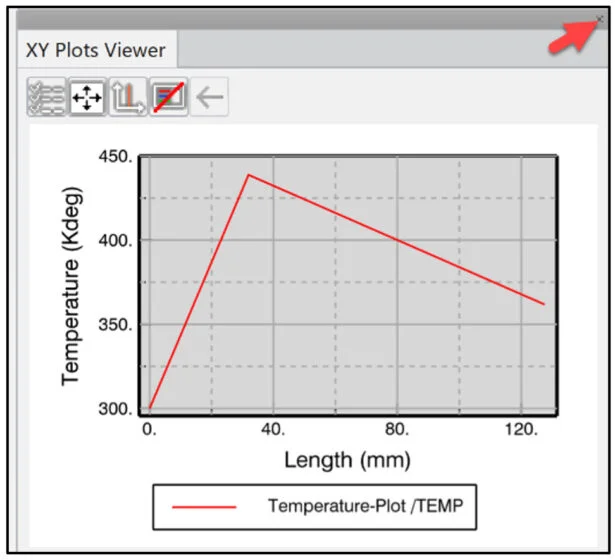
The X-Y plot shows the change in air temperature throughout the path that you created.
The air temperature is 300 K at the inlet of the enclosure, 441 K near the surface of the heat source, and 355 K at the outlet. The increase in the outlet temperature of the air indicates that the heat is moved away from the heat source.
Close the box.
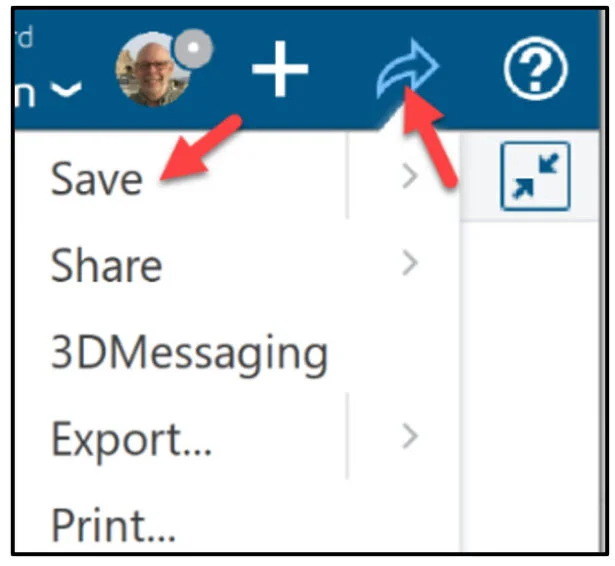
Save the Physics Simulation study (Model, Scenario and Result).
Click the Share icon as illustrated. Click Save.
Close the Simulation study.
Click Close on the Enclosure_Chip tab.

The lesson is finished.
Community
Academic Community: After you create a 3DEXPERIENCE ID, Educators, can get more information on xDesign and SOLIDWORKS. Request to join the 3DEXPERIENCE Academic Community for free at go.3ds.com/academiccommunity.
Student Community: Students, join the student community for free at go.3ds.com/studentcommunity. Check out great posts on Mechanism Mondays, FEA Fridays, Solid Saturdays (animations), Formula Student and Formula SAE exercises.
SIMULIA Community: Students and Educations, join the SIMULIA community to learn the latest in simulation technology with the Abaqus solver, CST Studio Suite for Electro-magnetics, Antenna Magus and more.
SOLIDWORKS Community: Connect with the SOLIDWORKS community with our SOLIDWORKS User Forum, SOLIDWORKS User Groups, news and info,
SIMULIA Simulation Technology
Additional Lessons in 3DEXPERIENCE Simulation Structural Analysis:
Analysis Lesson 1: SOLIDWORKS and 3DEXPERIENCE Simulation for Diving Board
Analysis Lesson 2: SOLIDWORKS and 3DEXPERIENCE Simulation Linear Structural Validation Part 1
Analysis Lesson 3: SOLIDWORKS and 3DEXPERIENCE Simulation Linear Structural Validation Part 2
Analysis Lesson 4: SOLIDWORKS and 3DEXPERIENCE Simulation Linear Structural Validation for Assembly
Analysis Lesson 5: SOLIDWORKS and 3DEXPERIENCE Simulation Structural Model Creation
CFD Lesson 1: SOLIDWORKS and 3DEXPERIENCE Fluid Scenario Creation (Part1)
CFD Lesson 2: SOLIDWORKS and 3DEXPERIENCE Fluid Scenario Creation (Part 2)
CFD Lesson 3: SOLIDWORKS and 3DEXPERIENCE Fluid Scenario Creator (Part 3)
CFD Lesson 4: SOLIDWORKS Duct and 3DEXPERIENCE Fluid Scenario Creator (Part 1)
CFD Lesson 5:SOLIDWORKS Duct and 3DEXPERIENCE Fluid Scenario Creator (Part 2)
CFD Lesson 6:SOLIDWORKS Race Car and 3DEXPERIENCE Fluid Scenario Creator
From SOLIDWORKS Desktop to the 3DXPERIENCE Platform
Additional Lessons in this series on 3DEXPERIENCE Works:
3DEXPERIENCE Works Lesson 1: Getting Started with SOLIDWORKS and the Platform
3DEXPERIENCE Works Lesson 2: SOLIDWORKS and Save and Revision
3DEXPERIENCE Works Lesson 3: SOLIDWORKS and Bookmarks, Share and Delete
3DEXPERIENCE Works Lesson 4: SOLIDWORKS and Lifecycle Maturity States
3DEXPERIENCE Works Lesson 5: SOLIDWORKS, Collaborative Space and Bookmarks
3DEXPERIENCE Works Lesson 6: SOLIDWORKS with Search Tools
3DEXPERIENCE Works Lesson 7: SOLIDWORKS with 3DPlay
3DEXPERIENCE Works Lesson 8: SOLIDWORKS with 3DDrive
3DEXPERIENCE Works Lesson 9: SOLIDWORKS and 3DSWYM
3DEXPERIENCEWorks Lesson 10: SOLIDWORKS and 3DEXPERIENCE Simulation
Cloud Apps by SOLIDWORKS (100% Browser Based)
Additional Lessons in this series on SOLIDWORKS xDesign
SOLIDWORKS xDesign Lesson #1: Getting Started
SOLIDWORKS xDesign Lesson #2: Mouse Control and Collaborative Space
SOLIDWORKS xDesign Lesson #3: Sketch Planes
SOLIDWORKS xDesign Lesson #4: Create A Dashboard
SOLIDWORKS xDesign Lesson #5: Views and Orientations
SOLIDWORKS xDesign Lesson #6: Importing Files and Using Bookmarks
SOLIDWORKS xDesign Lesson #7: Assemblies
SOLIDWORKS xDesign Lesson #8: 4Bar Linkage and Kinematics
SOLIDWORKS xDesign Lesson #9: External References and Copy with Mates
SOLIDWORKS xDesign Lesson #10: Sketching, Constraints and Dimensions
SOLIDWORKS xDesign Lesson #11: Sketch Based and Applied Features
Design well. Marie
