
To begin, I have provided you with the handle part of the roller and the DXF files used for creating the wheel stamp design here
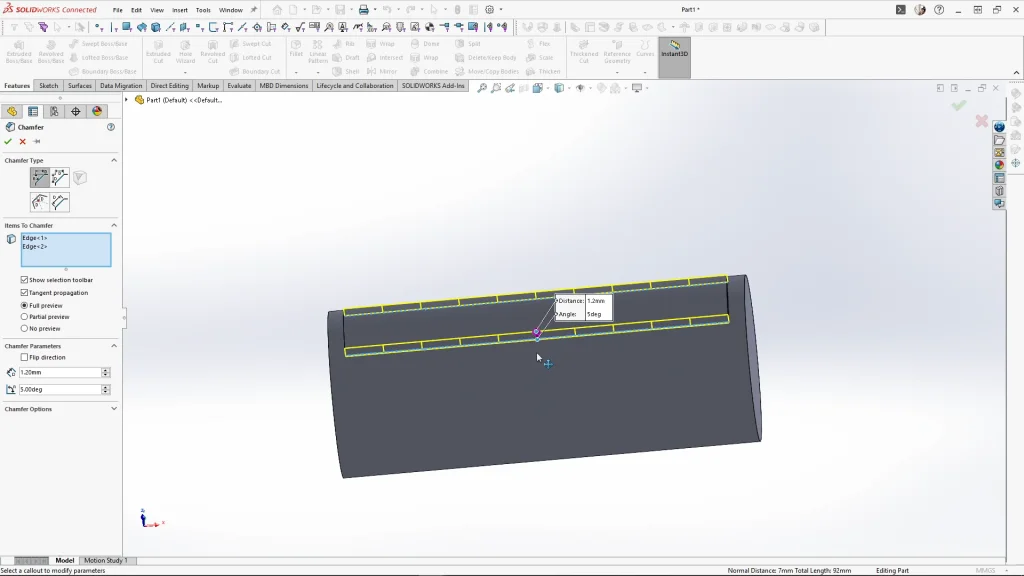
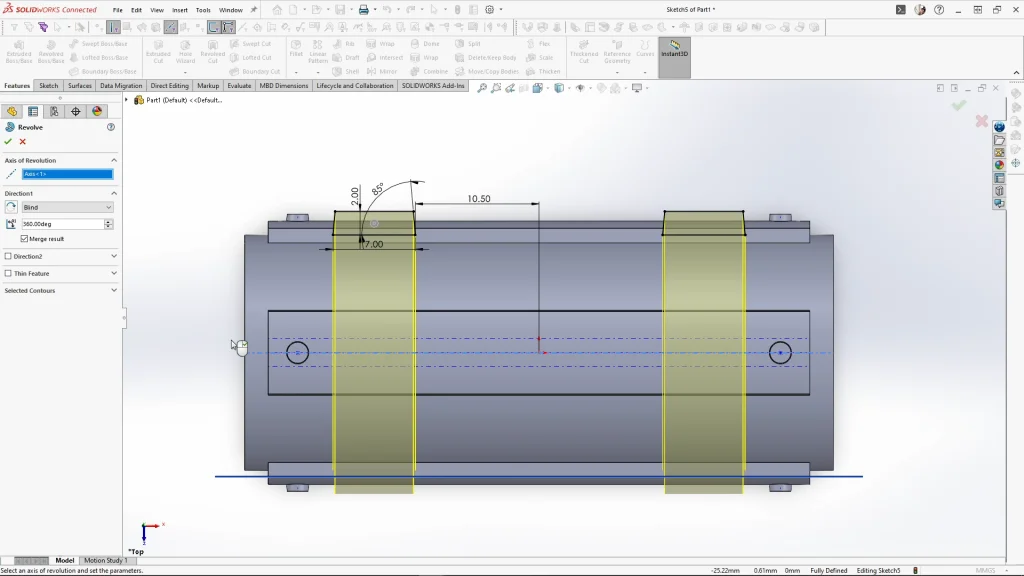
Starting with the wheel part for the roller, I extruded a 20mm circle, midplane by 50mm. Sketching onto the front plane, I sketched a center rectangle from the axis at 7 by 46mm. Extruding this I changed the from drop down to extrude from surface, selecting the cylinder face, I extruded it blind by 1.2mm merging the result. I added a draft angle to the top and bottom edge of the extrusion by 1.2mm at 5 degrees. Having this angle helps the roller to not pull up the dough when it is rolled over. Next, I added a new plane off the front plane to sketch some railway spikes onto the sleeper. I extruded them by 1.2mm with a 5mm draft angle, merged.
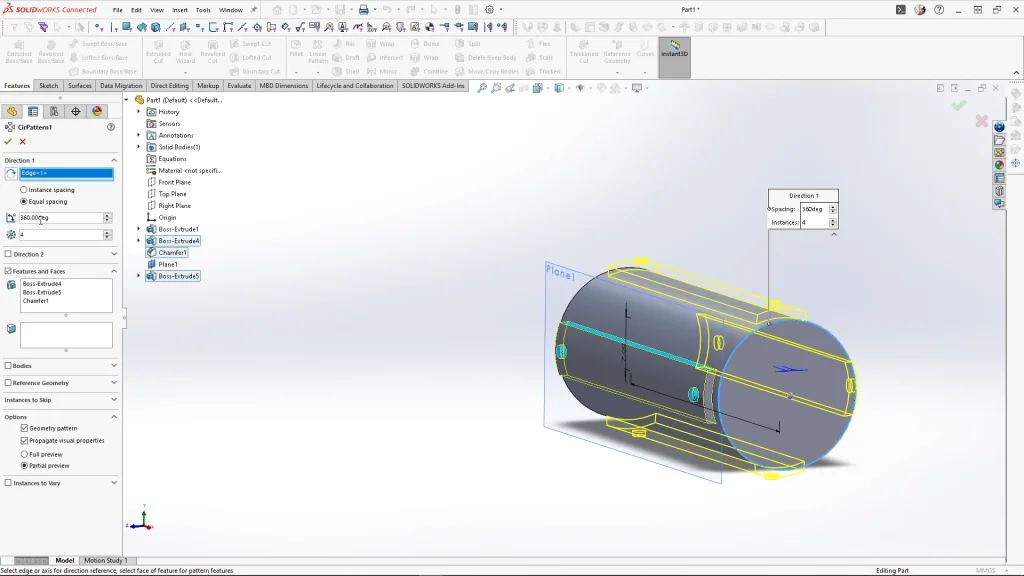
From here, I used the circular pattern feature and selected the two boss extrusions and the chamfer feature for the features to pattern, then the circular edge for the direction to pattern, for this I patterned 4 instances with equal spacing.
For the tracks, I sketched and isosceles trapezium and mirrored it over. These could then be revolved using the rollers temporary axis. When rolled into the dough these would create the correct spaced tracks for the carriages to roll down.
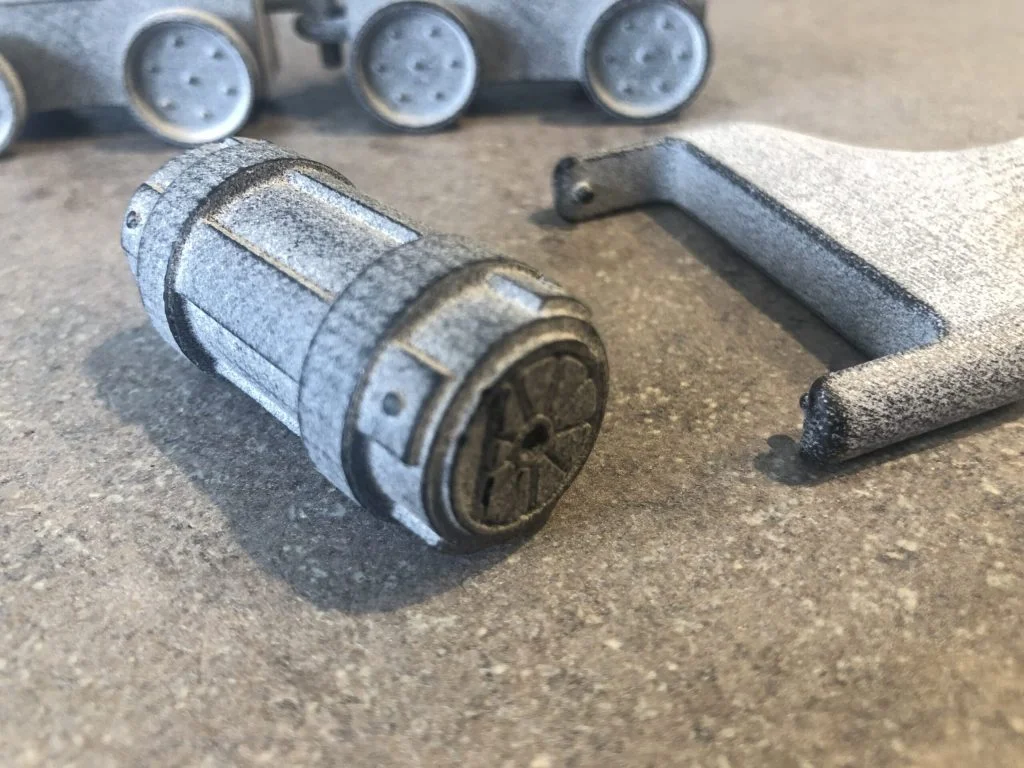
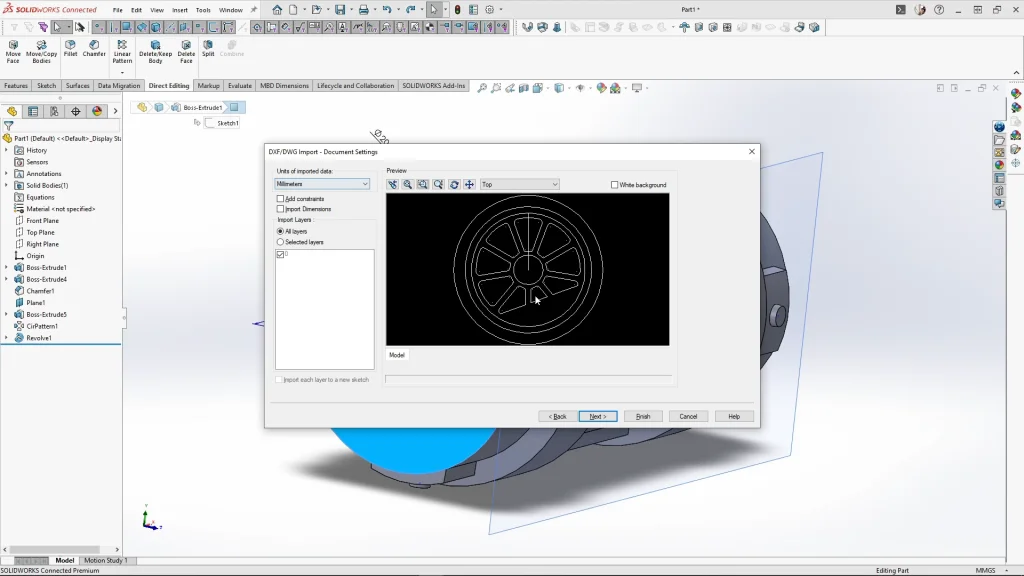
Moving onto the wheel stamp ends of the roller, I started by selecting the left side end face of the roller, insert and DXF. Here I imported the Wheel DXF 1 file. Under the DXF import settings, I unchecked the import as reference box, and next. Double checking my units were in millimeters, I could see the DXF sketch preview box and select finish to bring in my DXF as a sketch.
When the sketch came in, I fixed the whole sketch to fully define it. I then cut extrude by 1.2mm with a 5-degree draft angle to help the stamp release easier.
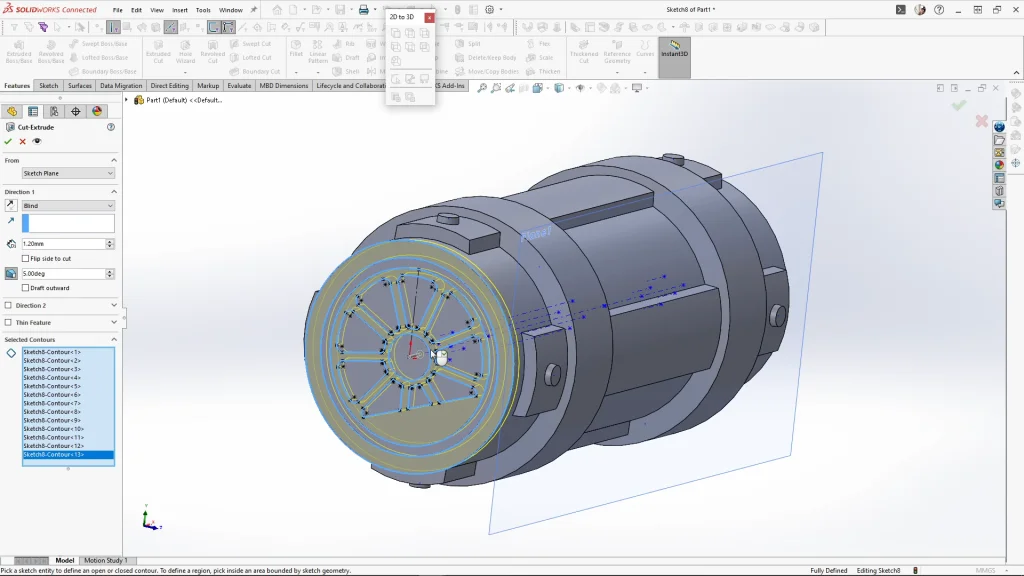
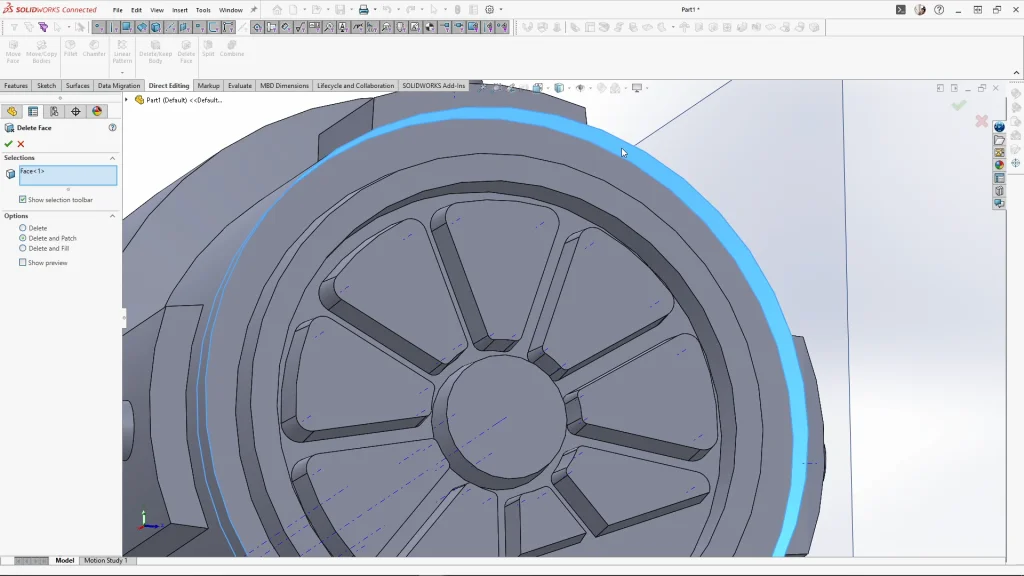
Once applied you’ll see below I was left with an outer wall left from the draft angle cut. To remove this, I used the direct editing tab and delete face. Under options I used delete and patch selected. Selecting the face and delete it removes and patches the part.
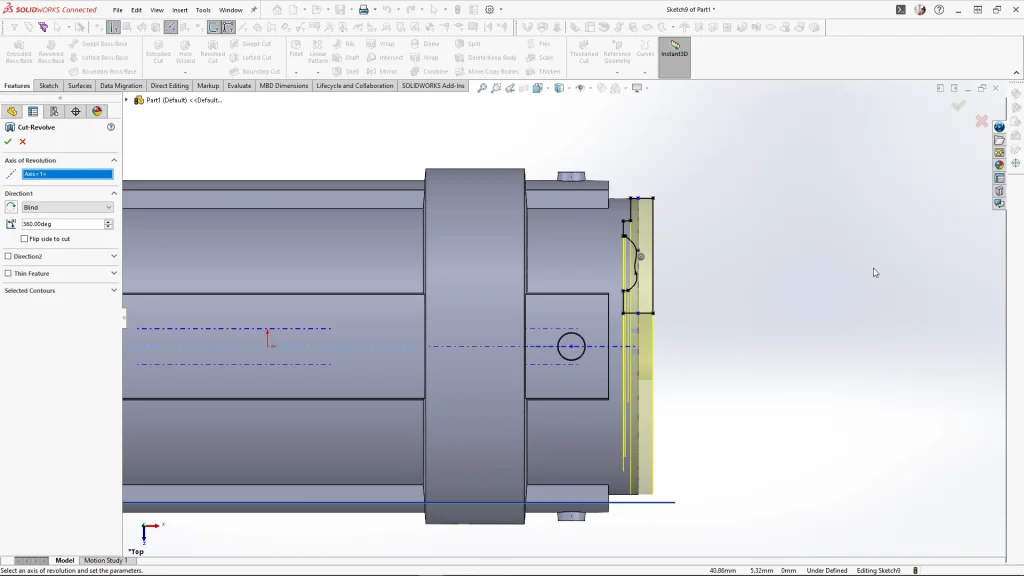
For the opposite side of the roller, Instead of cutting the sketch, I used revolve cut. Selecting the top plane and insert, DXF, I imported the second wheel DXF file. Repeating the same import settings, the sketch came in, and was moved and fixed into place. I then revolve cut the sketch from the rollers center axis.
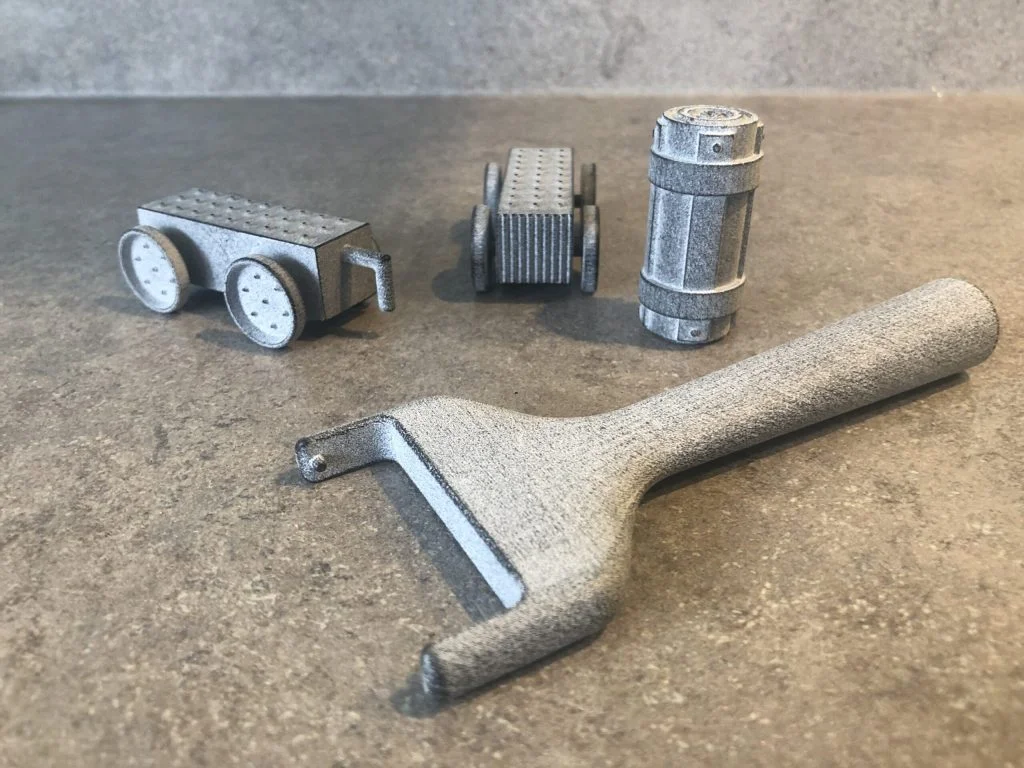
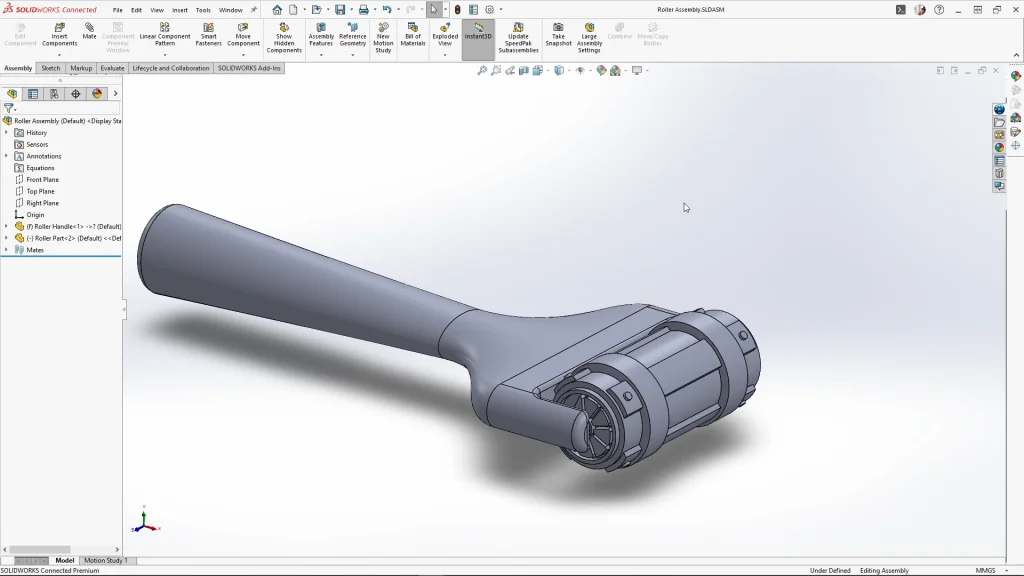
For the roller to sit onto the handle I needed to add some holes to both ends of the roller wheel. With the roller wheel done, I saved it and brought the part into the handle’s assembly and mated it into place using a concentric mate and a width mate to center the roller wheel within the handle.
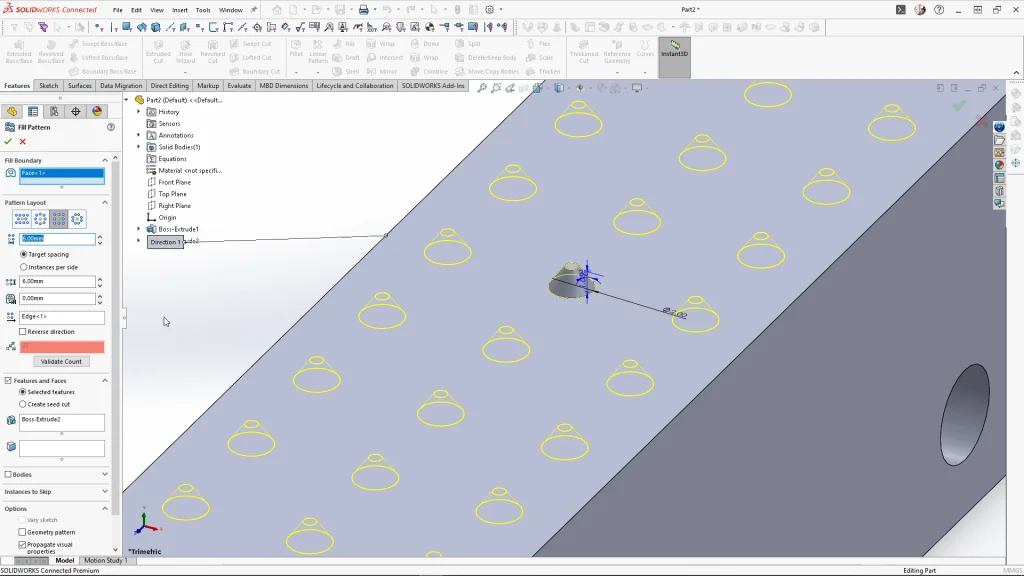
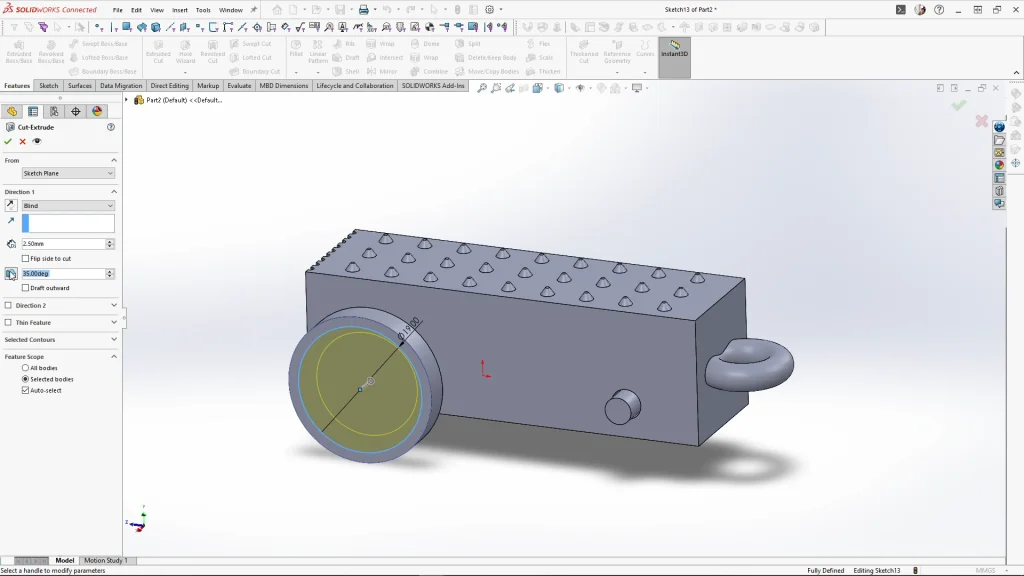
For the carriages, I started with the front carriage. I sketched the carriage base, which included two 4.5mm circles which would be used for the wheels axle to go through. Then I extruded this midplane by 18mm. To help keep the dough on the top of the carriages I created a bumped texture. This just creates more surface area for the dough. To create this I started with a 2mm circle sketch center to the top face and extruded it by 1mm with a 35 degree draft angle. With the new feature selected, I used the fill pattern and selected the top face for the fill boundary. I spaced the instances apart from 6mm each way and changed the pattern layout type to square. And applied it.
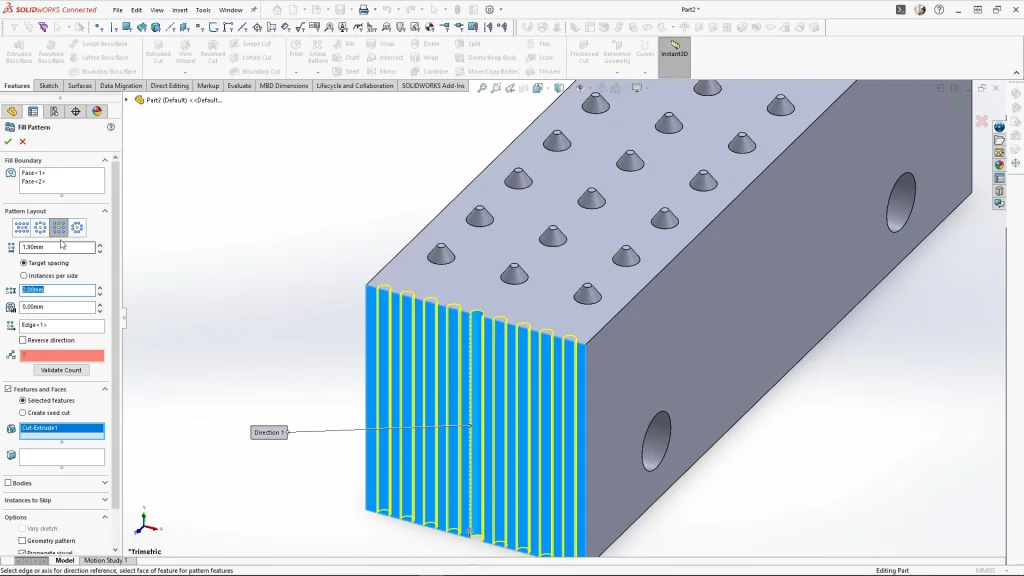
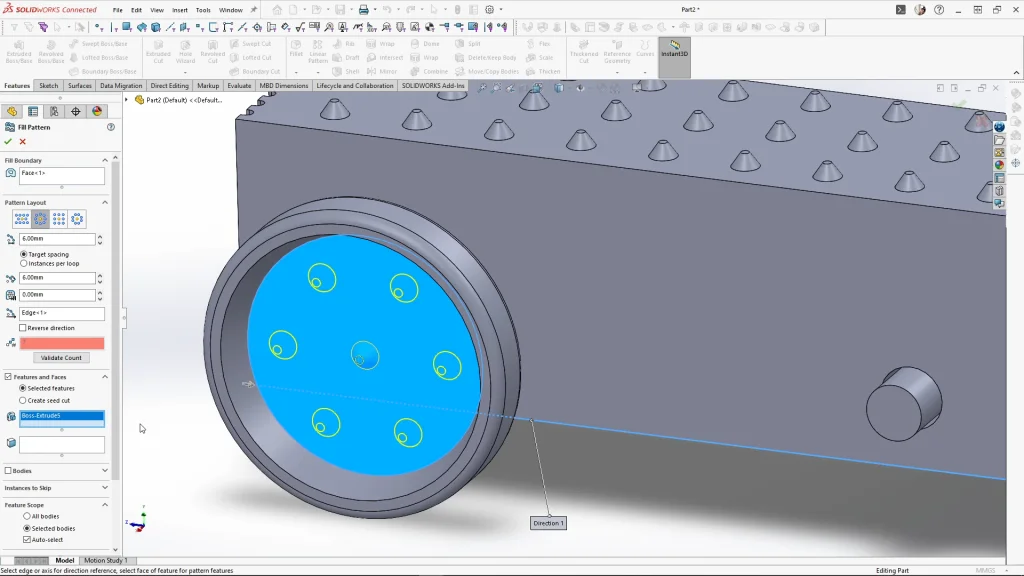
Sketching onto the front face of the carriage, I used the slot to sketch a short curved indent on the midpoint of the edge. Then extrude cut the sketch through all. Using the fill pattern again, I then selected the front faces for the fill boundary, and selected the cut for the pattern feature. Spacing them apart by 1.9mm both ways and apply it. This surface can be used to press dough onto the front of the train to add more playability to the train.
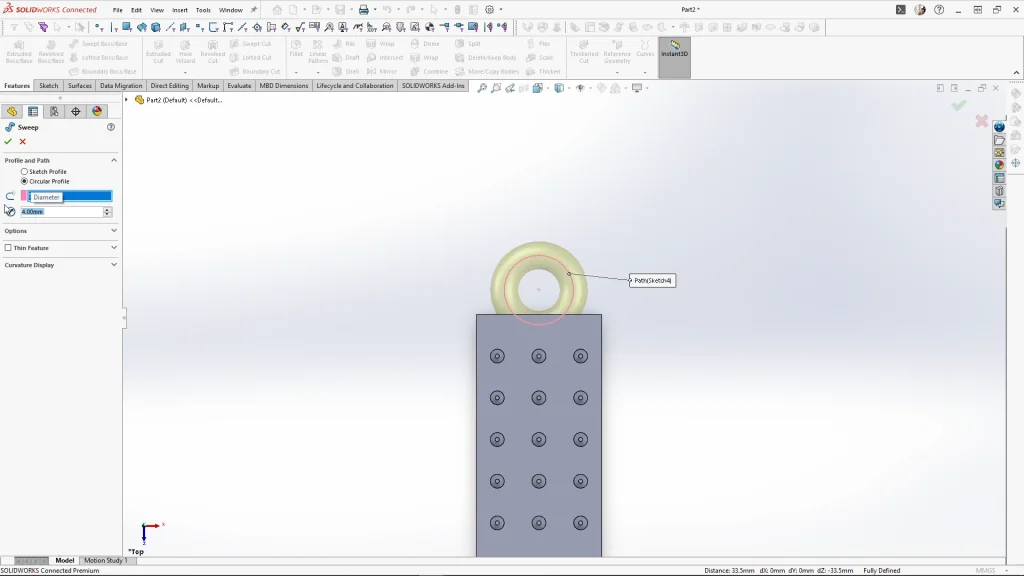
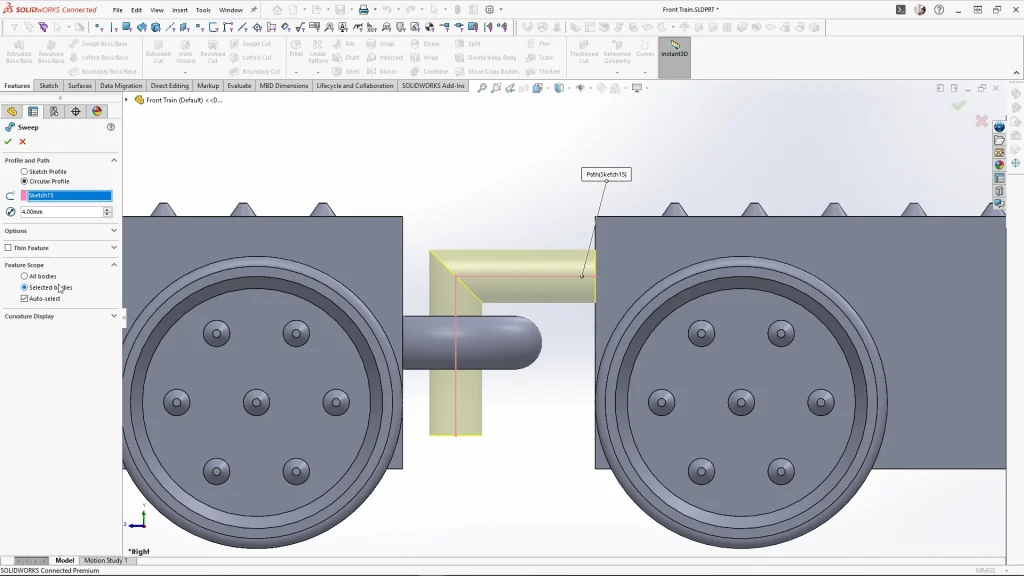
Sketching onto the top plane, I sketched a 10mm circle and fully defined the sketch. Then I used the sweep feature with the circular profile option, the sketch as my path, and a 4mm diameter, merging the result. This creates a loop for linking carriages.
For the wheels, I sketched a 4mm wheel axle and extruded midplane by 24mm. On the end face of the axle I sketched a 22mm circle and extruded the wheel by 4mm blind. I extruded unmerged as I needed to mirror the wheel and its features over later. Sketching onto the extruded wheel face, I sketched a 19mm circle and extrude cut by 2.5mm with a draft angle of 20 degrees.
I also added the same fill feature to the wheel, this will help the dough pushed into the wheels to stay there, again creating more surface area.
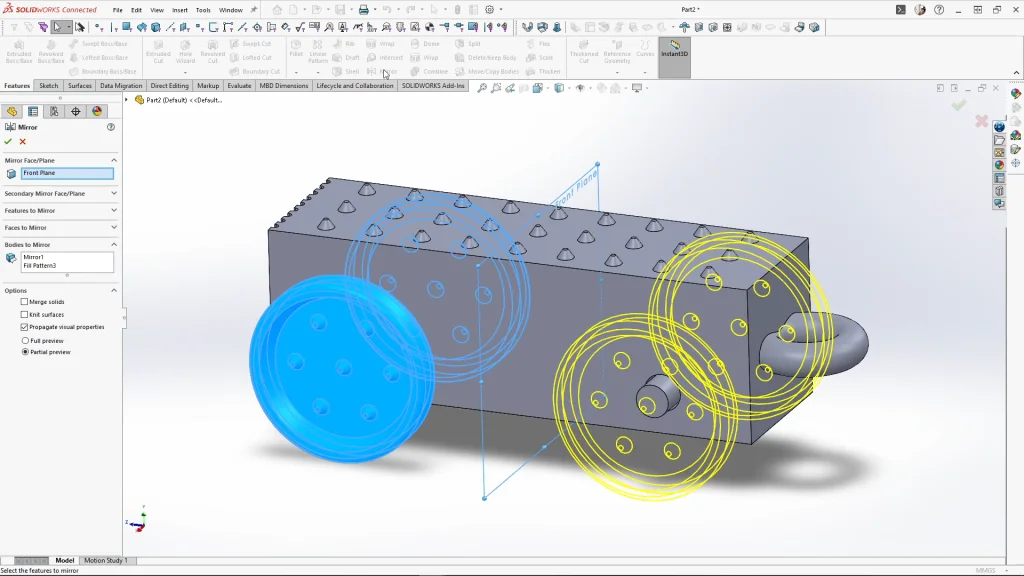
With the wheel done, I mirrored over the wheel across the right plane, and then mirrored over the front plane until I had a set of 4. For 3D printing the wheels and axles as whole parts I combined the wheels and axle sets using the combine add feature. I could then save the part as front train.
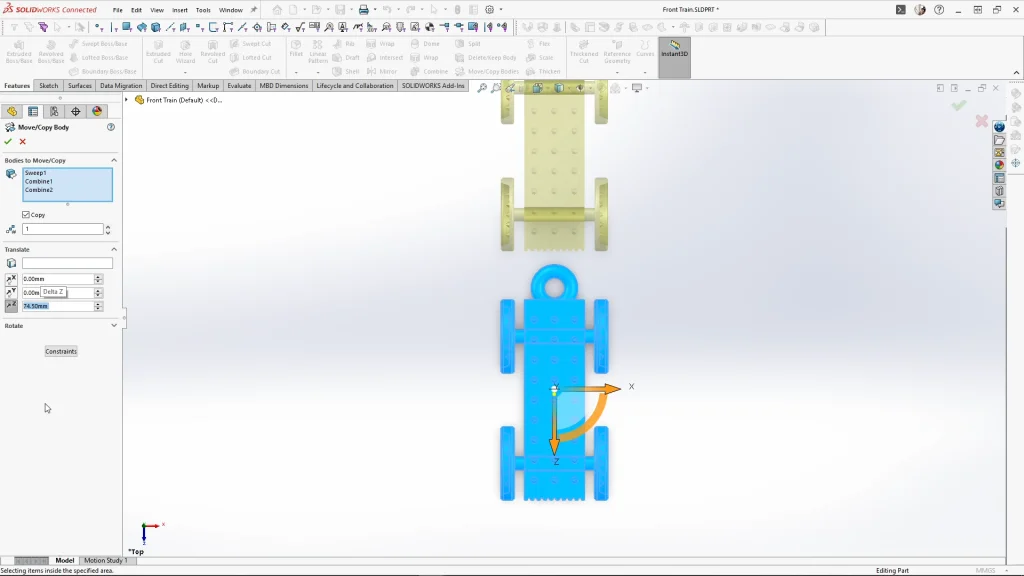
Keeping the part open, I used the move/copy bodies feature to move and create one copy of the train and space it back by 74.5mm. I wanted the back carriage to be a part that can be printed multiple times and reconnected to the train, so I needed to remove the texture on the front of the carriage.
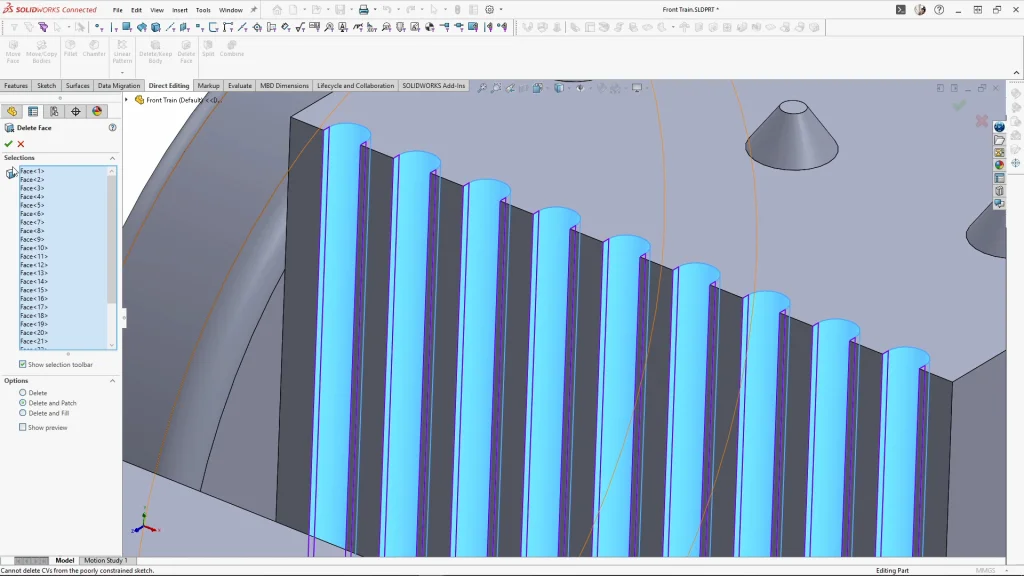
You could do this a few ways, but I used the direct editing tab again and delete face, selecting a patterned cut face and using the selection toolbar I selected the tangent group, and repeating for each indent. Then I can delete and patch to remove the texture.
Sketching onto the right plane, I used the line to sketch a train hook for connecting the carriages together. Fully defining the sketch, I used the sweep feature with circular profile to sweep the sketch by 4mm.
Finally, using direct editing I deleted the front train bodies to leave the back train, and used save as, to save the back train part. I also used save as to save all my parts as STL file for 3D printing. All parts were printed by 3DPRINT UK with the guidance of Kirby Downey. Dependent on your printing material you may need to tweak your roller wheel to make it possible to remove and roll the roller part. Mine was slightly tight but this allowed me to put more pressure onto the roller in use without the roller wheel falling out.
