

After a decade as a certified SOLIDWORKS instructor teaching SOLIDWORKS to hundreds of engineers, designers, and students of all kinds, I’ve noticed something: the same handful of tips and tricks keep blowing their minds. Why? Because the simple tips or tricks are often the ones that make the biggest impact.
If you’re learning SOLIDWORKS and feeling like you’re not yet a power user, that’s okay. Remember: a late train doesn’t skip any stations. You still have to go through the process and put in the work of learning SOLIDWORKS, but with these tips and tricks you can be on the fast track to becoming a SOLIDWORKS power user.
Below, we delve into the top 15 tips that I’ve seen make the biggest impact on SOLIDWORKS learners.
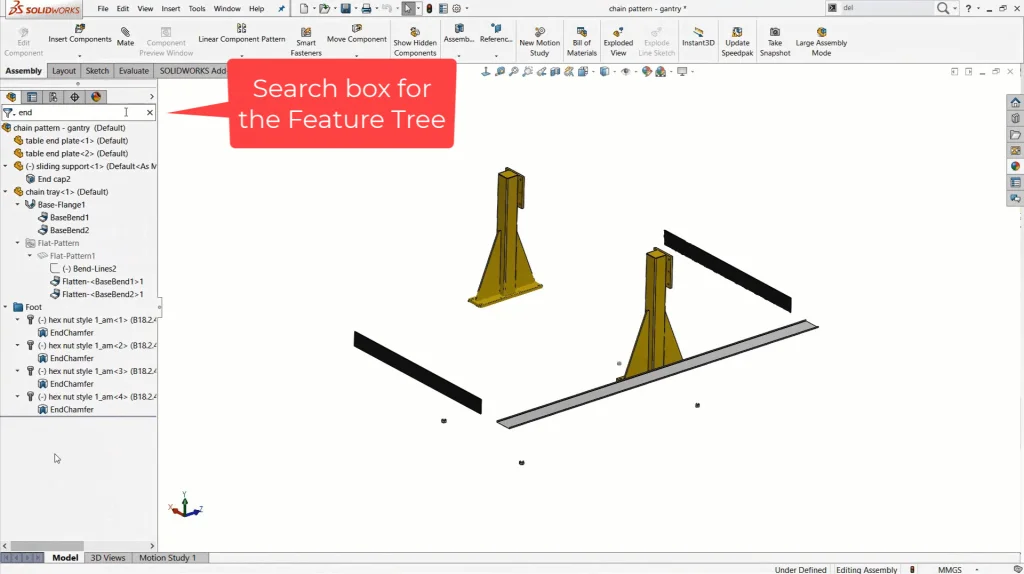
1. Organize the Feature Tree with Design Intent
I’ll never forget a time early in my career when I was told, “Design intent is modeling like someone else will edit it,” and that idea stuck with me. But this concept goes beyond just the design intent behind modeling choices like midplane extrusions or other features. It also applies to the Feature Tree; organize the tree like someone else will work on it.
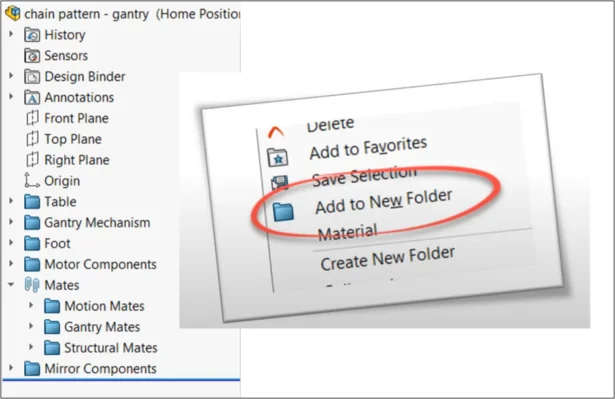
You can organize with folders, and even rename features. Doing this will enable you to leverage one of its most powerful functions, the search function. At the top of the FeatureManager Design Tree (shortened to Feature Tree) there is a search bar that automatically filters the tree as you type.
2. Use the SOLIDWORKS Command Search
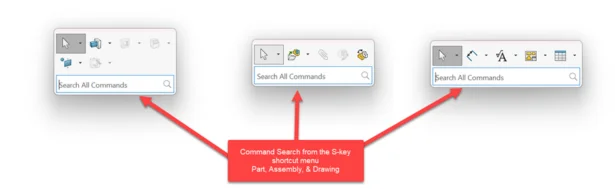
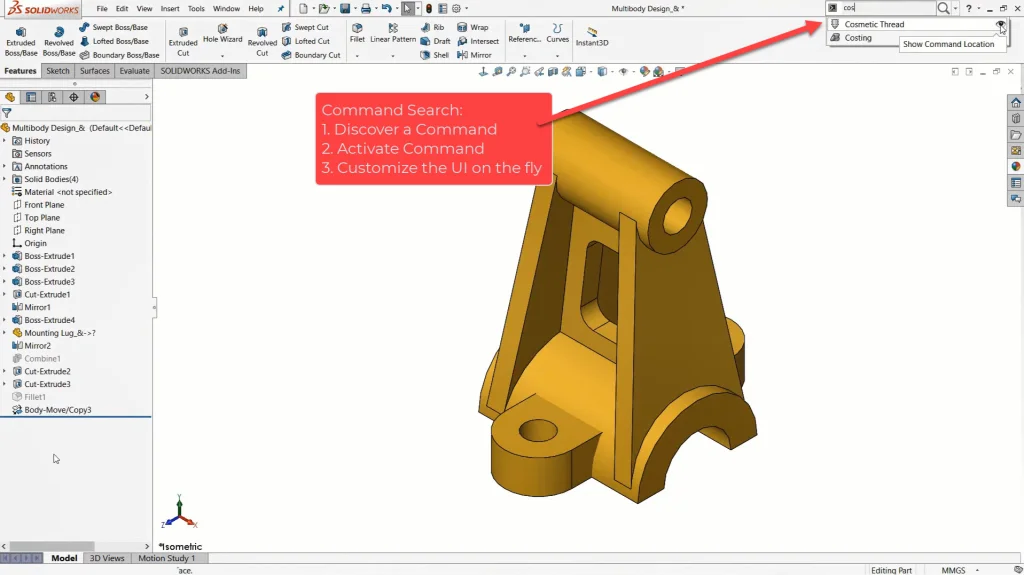
If I had to pick just one feature to share it would be the Command Search. This is one I share with everyone I can, even outside the classroom, in SOLIDWORKS demos, SOLIDWORKS tech support, and more. It saves time for anyone from novice beginners to the most experienced experts. Command Search is the quickest way to use literally all of the SOLIDWORKS commands. It works by bypassing the menus and giving you direct access to commands just by typing the first few letters of the command name.
What’s more, you have two ways to access it. The top right corner of the UI has been the home of Command Search for years, but recently it has also been added to the S-key shortcut menu. Just hit ‘S’ and start typing to easily access any command.
Bonus tip: When learning SOLIDWORKS, the Command Search is incredibly useful because it can even show you where the command lives in the menus, which helps learners discover more about SOLIDWORKS.
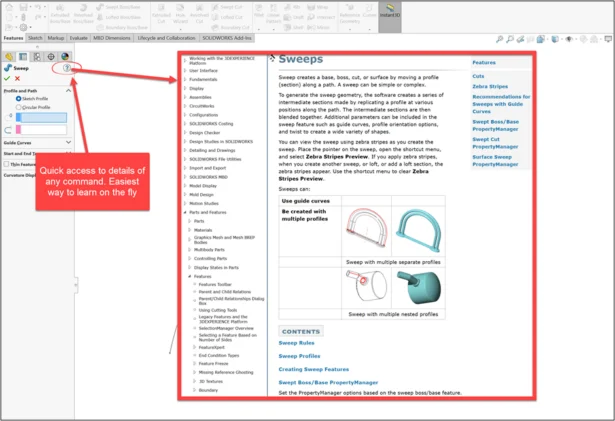
3. Look Up Solutions with Quick Access to the SOLIDWORKS Help File
Here’s an industry secret for you: we don’t know everything about everything. If someone tells you otherwise, they’re lying. Even certified “Elite Experts” at SOLIDWORKS resellers sometimes need to look things up. SOLIDWORKS’ help file is how we do it quickly.
Look for the question mark in the corner of an active Command. Clicking this brings you directly to the relevant help file for the command. This is the quickest way to get detailed information so that you can better understand SOLIDWORKS’ functionality.
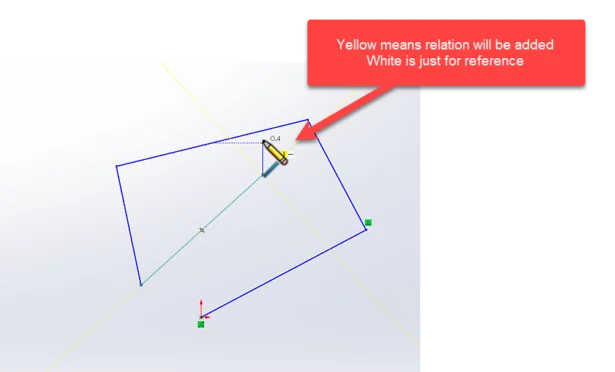
4. Learn to Understand SOLIDWORKS’ Visual Feedback
SOLIDWORKS is talking to you, you just need to learn its language and listen. Sure, SOLIDWORKS is not literally speaking words to you. Instead, the software uses graphical cues through color, icons, symbols and text. These all give you a lot of insight into what’s happening and what you should do next.
If you’re paying attention, this visual feedback can even help you significantly speed up your modeling.
Here’s one of the best examples, which appears when sketching. A yellow relation means it will be added as a relation, while white means it’s just for a visual aid.
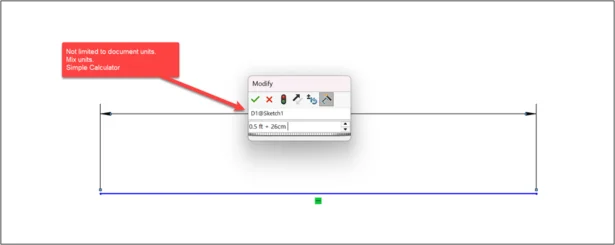
5. Units and Equations Use Flexible Syntax
Keying in dimensions and values is a key step when creating your geometry, and entering values in SOLIDWORKS is a lot more flexible than most users realize. Did you know you’re not locked in to the document’s unit system? As long as you key in the proper unit syntax, you can work with any type of applicable unit.
For example, if you’re working in metric but know a value in inches, just type “2 in” and SOLIDWORKS will automatically convert it to the document units. You can turn this up a notch by keying in basic math equations, transforming the dimension input box into a basic calculator. You can even mix units, such as “2in + 10mm.” Here’s a quick table to keep handy:
Units SW Units Syntax
Inches in
Feet ft
Centimeter cm
Millimeters mm
Meter m
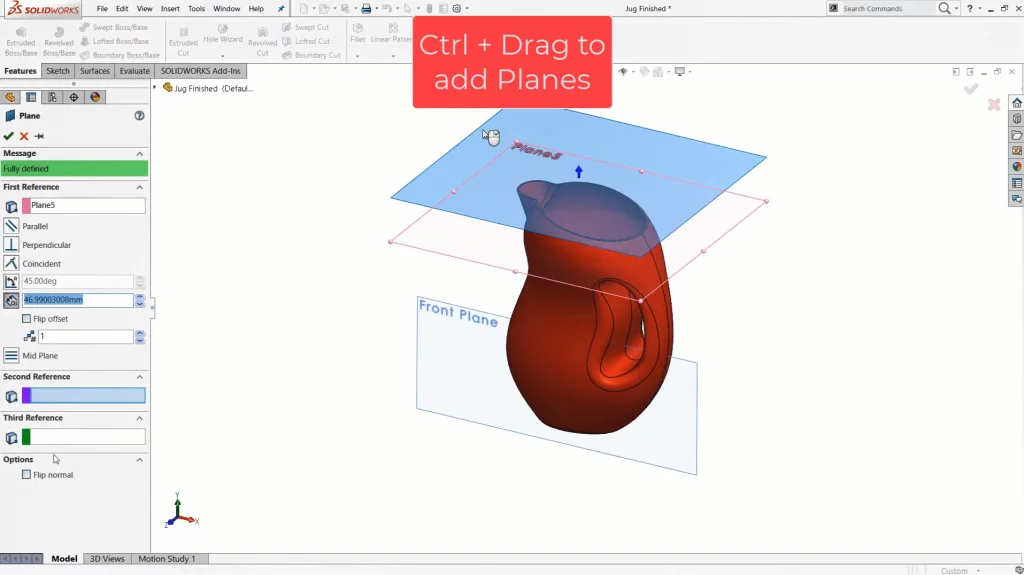
6. Add Mid Planes and Offset Planes Quickly and Easily
Planes are a core tool used to create geometry. Some planes are complicated, adding time and precision, while others can be made quickly so you can keep modeling as fast as possible. These are the two quickest and most useful ways to add reference planes to SOLIDWORKS
Mid plane
Click any two faces to add a plane down the middle. This is the easiest way to add a new plane which you know is centered on parts of your geometry. Pro tip: Use design intent to keep things symmetrical so these become easier to work with.
Offset plane
Hold control and drag from an existing plane to add new plane at an offset. Quick, easy, and it gets the job done!
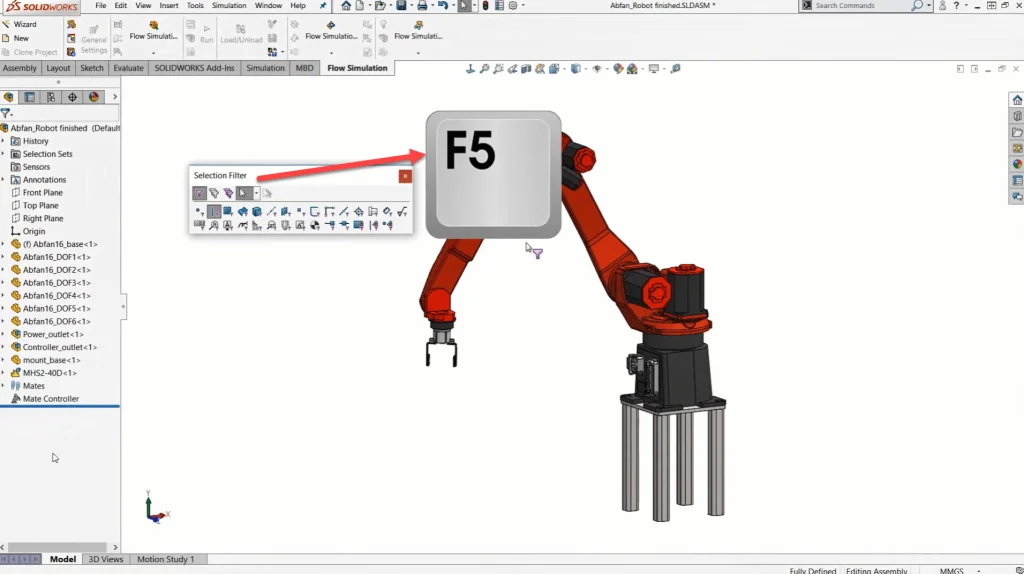
7. Make Use of Selection Filters
In a feature-dense model or cluttered assembly, selecting the right edge, face or vertex is a lot like picking one single raindrop out of a heavy storm. To make selections easier, you can use filters. In fact, most power users keep the filter toolbar active all the time.
F5 turns on the toolbar so you can pick and choose what filters you want. F6 turns on or off the filter functionality. One thing I’ve seen many times is that a lot of people accidentally turn it on by unknowingly hitting F6, and then find themselves unable to select entities.
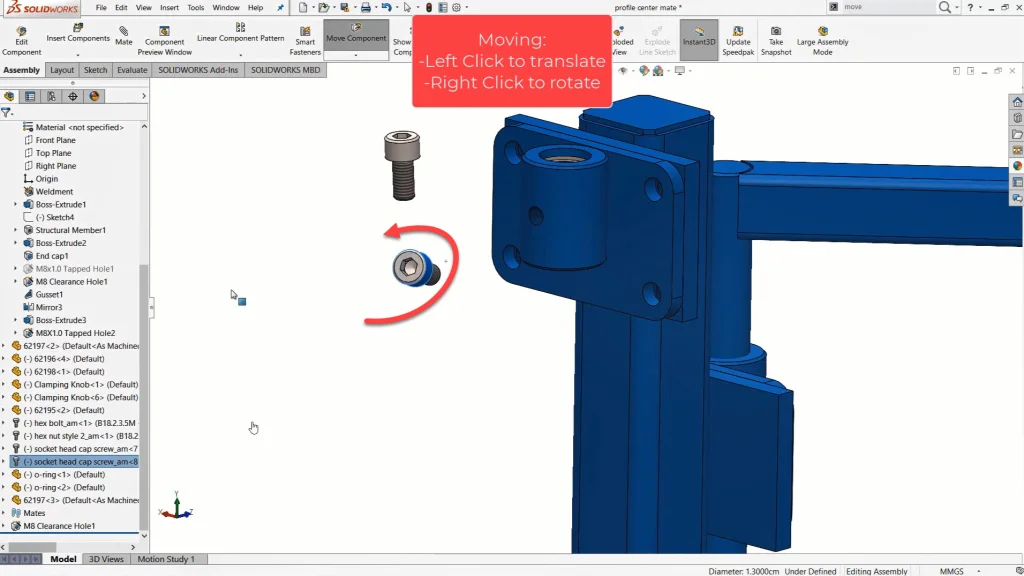
8. Easily Move and Rotate Components in Assembly
As you’re building an assembly, you’ll move components around the graphics area to help get them locked into place using mates. It’s obvious to most users that clicking and holding the left mouse button on a component allows you to drag it around. But many may not be aware that the same click-and-drag with the right mouse button allows you to rotate a component in place. This really streamlines the process of prepositioning a component in an assembly so that it’s ready to be mated in place.
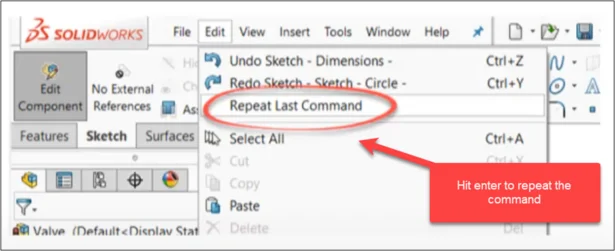
9. Repeat Your Last Command – No Hot Keys Required
It’s not doing something once, but doing it over and over again that really racks up the time. To save some of that time, you can use the Enter key to quickly launch the last command. Think of this as a hot key that gets automatically mapped to the last thing you were doing. This works for things like sketching, features or assemblies.
10. Use the Normal To View
For viewing, “Normal To” means to look at something straight on. But in 3D space there is some ambiguity. There is top or bottom, and front or back. So the Normal To command can be used to give both “normal to positive” and “normal to negative” (remember front/back or top/bottom) views. Just keep hitting the button and it will keep flipping the view.
Pro tip: For added control on the orientation, you can hold Ctrl to select a second face, which will define the “up orientation” while going normal to the first face.

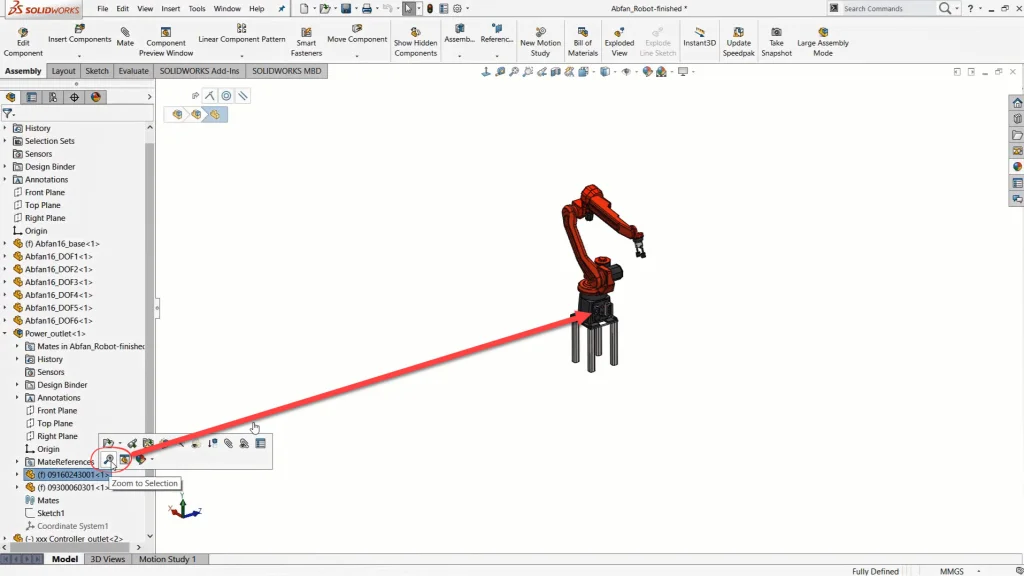
11. Zoom to Selection & Previous View Make Model Navigation Easy
These are two view commands which are very useful but not easily discoverable. I think it has something to do with the icons not being very informative, so it can be tricky for users to discover this functionality on their own.
Zoom to Selection does exactly what it says: zoom in to the selection and fit it to the screen. It’s a little like teleporting around your model directly to a specific feature or part.
Previous View is used to go back to the previous camera orientation. Think about all the times you’re showing someone your model on the screen and they say, “Wait, go back!” You can never get it just right. But clicking this button does that for you. Keep clicking, and it will go back through all the previous orientations you looked at.

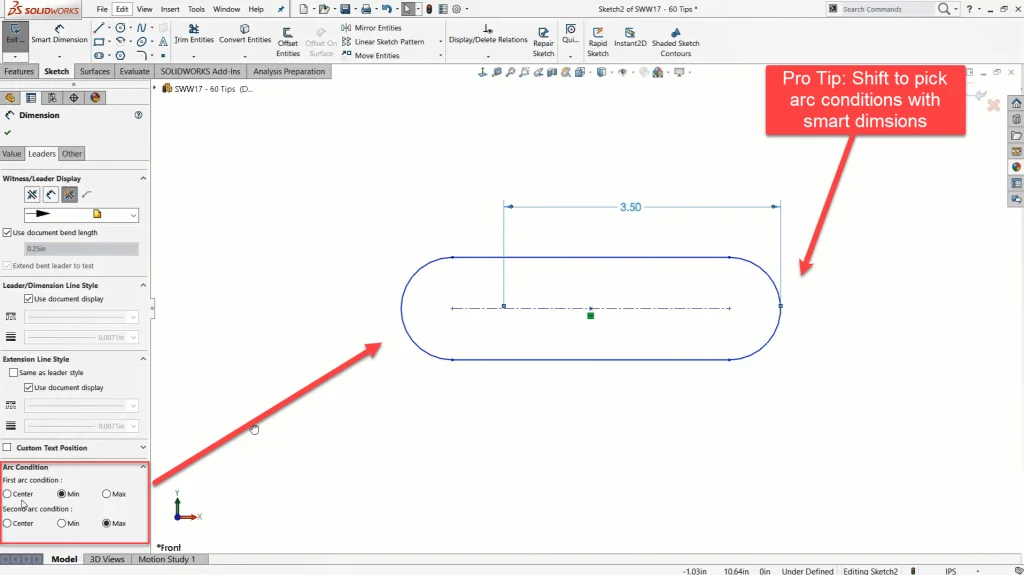
12. Easily Add a Dimension to Tangency with the Shift Key
Adding a smart dimension to a circle or curved entity is easy if you want to dimension to the center of it. If you want anything else, it can feel next to impossible to figure out—without knowing this tip that is.
When you hold the Shift key and click Add Entity to add a dimension, you will dimension to the tangency. This is a lifesaver for those times you want to add these types of dimensions.
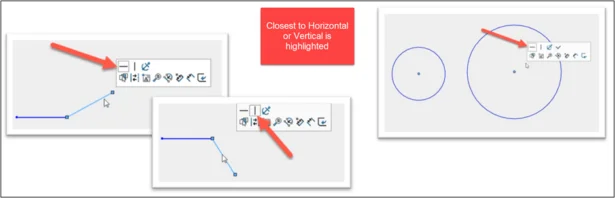
13. Determine Whether Your Line is Horizontal or Vertical
Looking at a line and determining whether it is horizontal or vertical is often harder than it should be. On the XY plane, it’s straightforward; when you’re on any other plane, it’s tough. It’s a byproduct of modeling in 3D space.
SOLIDWORKS can tell you whether a line is closer to horizontal or vertical by highlighting it in the left side of the screen or identifying it with a box in the context menu. Like we said in tip number four, SOLIDWORKS is always talking to you, and learning how to listen takes practice.
14. Use the Biad to Add Angle Dimensions
Drawing a horizontal or vertical line in 3D space is easy, simply draw it and it snaps into place. But an angled line takes a few extra steps, which can be time consuming. The Biad (like the triad for 3D space, but for 2D Sketches) is the quickest way to add angle dimensions to lines. The secret lies in the click sequence to activate it.
First, click the line segment (anywhere other than the end points), then click the end point which will be used to center the Biad. Lastly, click one of the Biad reference lines which defines the angle.
15. Keep Discovering SOLIDWORKS
My last tip is to stay curious and keep discovering and learning SOLIDWORKS. Some of the best tips I teach were once buried in the What’s New features of the latest release. The tools that were the best tools and features back in 2010 aren’t the best tools to use now in 2025. That’s the beauty of SOLIDWORKS. It keeps evolving, and so should you.
Becoming a Power User is a matter of mindset more than anything else. Every expert I know was once frustrated by features, confused by sketches or overwhelmed by the UI. But they stayed on track. These tips and tricks aren’t cheat codes – they’re just tools you need to learn how to use. So, my last tip is simple: keep exploring, keep messing up, keep learning and stay curious, so that one day you will become (and stay) a SOLIDWORKS Power User.