

Hello to all,
Welcome to the new edition of the SOLIDWORKS® Support Monthly News! This monthly news blog is co-authored by members of the SOLIDWORKS® Technical Support teams worldwide. Here is the list of topics covered in this month’s Blog:
- Updating Legacy Cosmetic Threads for Reliable Drawings and Models
- How to Configure a SOLIDWORKS SolidNetwork License Manager Options File to Manage License Usage
1. Updating Legacy Cosmetic Threads for Reliable Drawings and Models
– Nikhil BHIRUD
As designs evolve across software versions, maintaining consistent thread callouts and visibility of cosmetic threads in model or drawings is essential for both manufacturing accuracy and model reliability. Over time, even well-established models can begin to show discrepancies threads that disappear in model, misplaced threads in drawings, or callouts that lose formatting. These small irregularities often stem from data created using earlier versions of SOLIDWORKS.
That’s where this feature comes in: Updating Legacy Cosmetic Threads the simplest way to ensure threaded features behave predictably and display correctly across both models and drawings.
Understanding the Problem:
Many ongoing projects still include models built years ago using earlier cosmetic thread definitions. These legacy threads might look fine initially but can introduce subtle issues such as:
- Missing or inconsistent threads
- Threads that fail to appear in model or drawings
- Mismatched or dangling annotations after rebuilds
Modern versions of SOLIDWORKS manage cosmetic threads with enhanced geometry references, smarter callout links, and improved visualization control. By updating older data, you bring these improvements to existing parts eliminating inconsistencies and restoring full reliability across assemblies and drawings.
How to Update Legacy Cosmetic Threads:
The update process is simple and typically takes only a few moments per file:
- Open the part, assembly, or drawing that contains cosmetic threads.
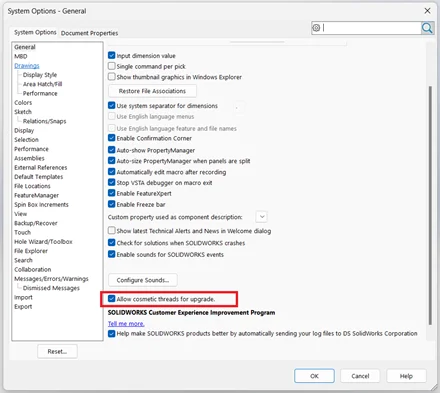
- Go to Tools → Options → System Options → General.
- Enable the setting: Allow cosmetic threads for upgrade. This enables SOLIDWORKS to automatically detect and upgrade legacy cosmetic threads when present.
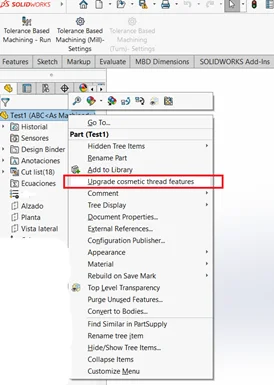
- In the FeatureManager Design Tree, right-click the top-level part or assembly.
- Choose Upgrade Cosmetic Thread Features: This command appears only when legacy cosmetic threads are detected in the open document.
- Wait for the operation to complete, then save the file.
Important: Once saved, the file cannot revert to the old data structure. After updating, open any associated drawings or assemblies and perform a Rebuild so that thread callouts and annotations refresh correctly.
What Improves After the Update:
When legacy cosmetic threads are upgraded, SOLIDWORKS regenerates them using the modern internal structure. You’ll notice several improvements:
- Reliable visibility in shaded, section, and hidden-line display states
- Accurate, associative callouts correctly linked to Hole Wizard data
- Stable mirrored and patterned threads that retain full associativity
- Cleaner rebuilds with fewer missing or dangling annotations
Although geometry remains unchanged, the upgraded cosmetic thread data now follows the same format used in current versions making your design more robust and easier to maintain.
Before we look at results, let’s see the difference this change makes visually.
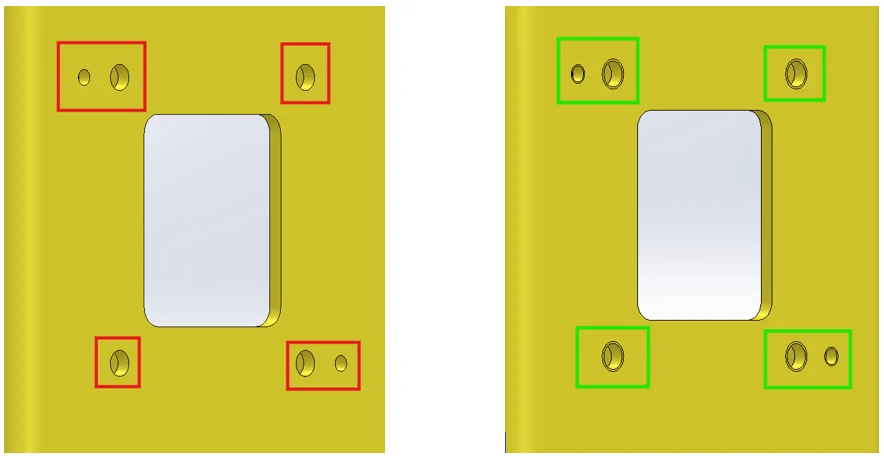
Visual comparison before and after upgrading cosmetic threads.
If threads still do not appear after updating, confirm that Cosmetic threads and (optionally) Shaded cosmetic threads are enabled under: Tools → Options → Document Properties → Detailing → Annotations.
When to Use This Command:
Use the upgrade whenever you encounter:
- Older customer or supplier files
- Archived projects using pre-2020 cosmetic thread data
- Parts showing inconsistent or missing thread graphics in drawings
Running the Upgrade Cosmetic Thread Features command once ensures reliable callouts, consistent display, and smooth rebuilds in all future releases of SOLIDWORKS.
Conclusion:
Updating legacy cosmetic threads is a quick yet impactful way to modernize your design data. It enhances drawing accuracy, stabilizes mirrored and patterned features, and ensures that every thread annotation behaves exactly as intended.
Whether you’re revisiting a classic design or standardizing an entire library, take a moment to run Upgrade Cosmetic Thread Features. It’s a small step that keeps your data dependable, modern, and production-ready.
References:
2. How to Configure a SOLIDWORKS SolidNetwork License Manager Options File to Manage License Usage
– Akhil C
Managing SOLIDWORKS network licenses efficiently helps ensure fair access and optimal use of resources. The SolidNetwork License Manager Options File allows administrators to define clear rules for license allocation.
This way, user or UserGroups can be allowed/denied a specific set of licenses. Licenses can also a reserved for a user/usergroup. For more detailed information, review the FlexNet Publisher Administration Guide > Section ’13. Managing the Options File’
What is Options File?
The Options file (sw_d.opt) works with FlexNet technology to control who can access licenses, how many can be used, borrowing behavior, and inactivity timeouts.
The options file enables the license administrator to control various operating parameters within the constraints of the license model. Users are identified by their user name, host name, display, IP address, or PROJECT (which is set with the LM_PROJECT environment variable).
Creating the Options File:
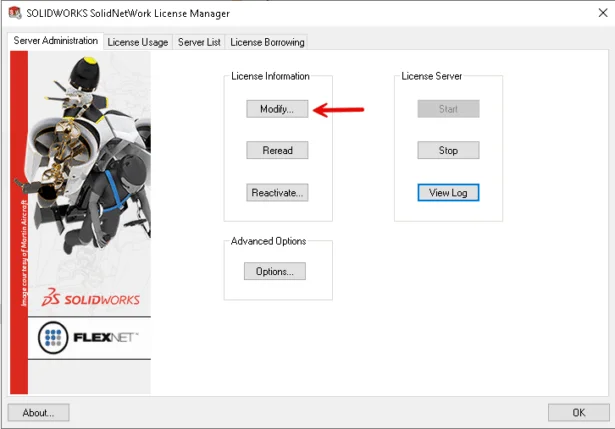
- Open SolidNetwork License Manager on the server.
- Go to Server Administration > Modify.
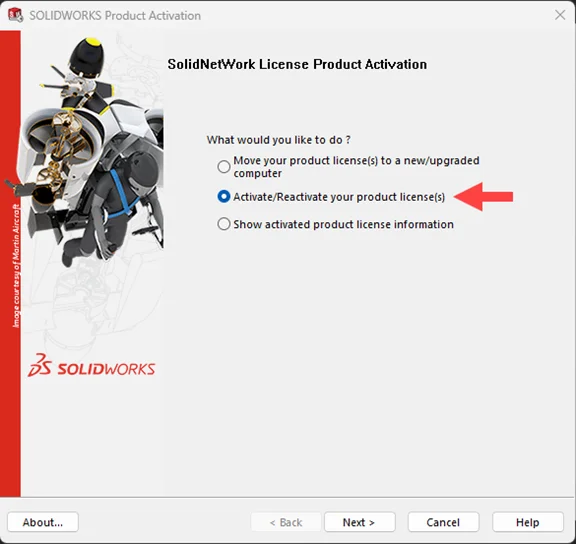
- Choose Activate/Reactivate licenses.
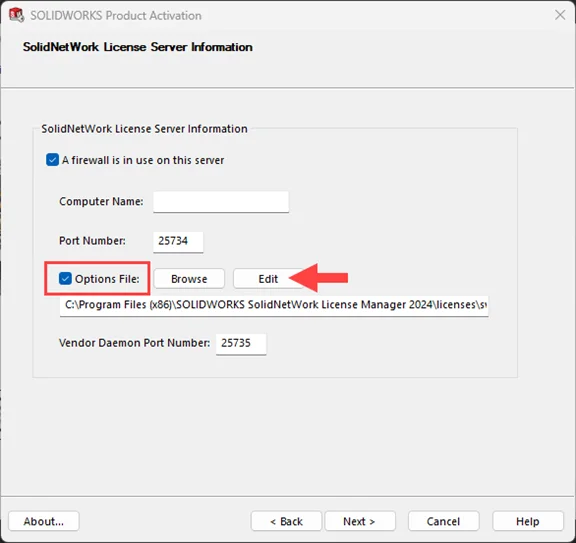
- Enable Options File and click Edit.
- Save the sw_d.opt file after adding rules.
Applying Changes:
Save the file and complete reactivation or reread the file from Server Administration.
Changing an Existing Options File
Based on the requirements, administrators can modify the options file and add/remove require keywords anytime they want. Here are the two method which can be used to edit the Options File.
Method 1: Using the SolidNetwork License Manager
- Open the SolidNetwork License Manager on the license server.
- Navigate to Server Administration and click Modify.
- Select Activate/Reactivate your product license(s).
- Click Edit to open the existing Options file.
- Make the required changes and save the file.
- Continue or cancel the reactivation process.
- In either case, the License Manager service will restart and load the updated Options file.
Method 2: Editing the File Manually
- Open the opt file using Notepad or another text editor.
- Make the necessary changes and save the file.
- Open the SolidNetwork License Manager.
- Go to the Server Administration
- Click Reread to refresh the Options file.
- This applies the changes immediately without restarting the service or resetting license logs.
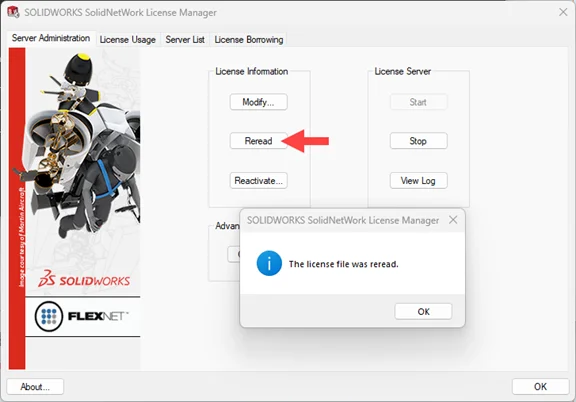
- This applies the changes immediately without restarting the service or resetting license logs.
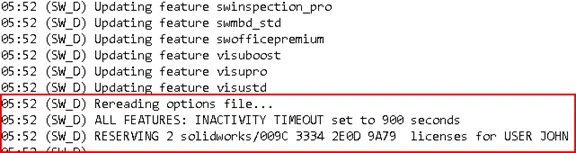
Note: After the OptionsFiles is modified, the license has to be Reread [SNL Manager Server > License Information > ‘Reread’]. Just modifying the Options Files, won’t implement the changes made. To confirm if the changes made in OptionsFile are implemented, open the LMGRD Log [Server Administration > License Server > View Log], and check if the newly added keyword appears in this section (see image below).
Happy Customization……..!!!!