

Hello to all,
Welcome to the new edition of the SOLIDWORKS® Support Monthly News! This monthly news blog is co-authored by members of the SOLIDWORKS® Technical Support teams worldwide. Here is the list of topics covered in this month’s Blog:
- SOLIDWORKS® Toolbox Manual Repair/Update for Local Installs
- Various hatch pattern options available in SOLIDWORKS®
1. SOLIDWORKS® Toolbox Manual Repair/Update for Local Installs
– Deepika PUJARI
When your SOLIDWORKS Toolbox is installed locally (i.e., not shared over a network or managed via PDM or the 3DEXPERIENCE platform), you have more direct control over its repair and maintenance. However, this flexibility also brings risks if updates or repairs are done improperly. This guide walks you through the safe and effective way to identify, repair, or update a locally installed Toolbox.
Backup First – Always!
Before making any changes to your Toolbox, back up the entire Toolbox Data folder, including:
- Custom parts
- Modified configurations
- The entire folder structure (typically located at “C:SOLIDWORKS Data” or similar
Why? One misstep during repair can corrupt your Toolbox or lead to lost customization. A backup ensures you can recover quickly.
Identifying a Local Install
You are likely using a local install if:
- Toolbox is stored on your local drive (not on a shared network).
- Toolbox is not under SOLIDWORKS PDM.
- You do not access it through the 3DEXPERIENCE Platform.
- You can freely browse and edit Toolbox files without network restrictions.
To confirm:
- Launch SOLIDWORKS, navigate to Tools > Options > System Options > Hole Wizard/Toolbox
- Check the folder path – it should be local (e.g., C:…).
Toolbox Repair Process (Local Setup)
- Run as Administrator: Right-click the SOLIDWORKS shortcut and select “Run as Administrator”. This ensures sufficient permissions to access and modify Toolbox files.
- Check File Access: Ensure read/write access to the following critical files in your Toolbox directory:
- *.sldedb (Toolbox database)
- *.index file
- *.dat file (configuration data)
- If you encounter access errors, check with your IT team to adjust file permissions in Windows.
- Use Toolbox Utilities
- sldserdocprop.exe
- Located in “C:Program FilesSOLIDWORKS CorpSOLIDWORKSToolboxdata utilities”
- Ensures parts created from Toolbox retain proper “Toolbox” flags.
- Use to batch-verify or fix the Toolbox property on older or duplicated parts
- UpdateBrowserDatabase.exe
- Also known as the Toolbox Settings Tool / Browser Database Updater
- Use to: Scan Toolbox for inconsistencies, Repair outdated database entries and update structure following a version upgrade
- This method is safer than manually editing database files.
- sldserdocprop.exe
Database Format Awareness
Depending on your SOLIDWORKS version, Toolbox may use:
- *.mdb – Microsoft Access-based (used in older versions)
- *.sldedb – Newer, more secure format
If your Toolbox still uses .mdb, consider upgrading. You may need to run the conversion utility “DatabaseConverter.exe” during installation or contact SOLIDWORKS support.
Tip: Please refer to my earlier post, “SOLIDWORKS® Toolbox Data Utilities: Essential Tools for Maintaining Your Toolbox”, for detailed instructions on using these utilities.
Versioning Considerations
If you have multiple versions of SOLIDWORKS installed:
- Ensure the Toolbox version matches the active SOLIDWORKS version.
- A mismatch can cause corrupt part generation or database errors.
- Avoid pointing multiple versions to the same Toolbox unless officially supported.
Note: If SOLIDWORKS was installed using an Administrative Image, repair options via the Toolbox Settings utility may be disabled.
Test Before Applying to Production
- Perform all updates or repairs on a test machine or backup copy first.
- Validate that all standard and custom Toolbox parts function as expected.
2. Various hatch pattern options available in SOLIDWORKS
– Rohit CHAVAN
Various hatch pattern options available in SOLIDWORKS.
As we are already aware that SOLIDWORKS provides us the functionality to add the hatch pattern to various views in drawings.
SOLIDWORKS provides us option to edit or create hatch pattern from multiple location in Tools > Options, which might look similar but they are not. As per the requirement we can access the options.
In today’s blog we will check exactly on what location these options are available, and what are the significance of each.
- From Tools > Options > System Options > Drawings > Area Hatch/Fill.
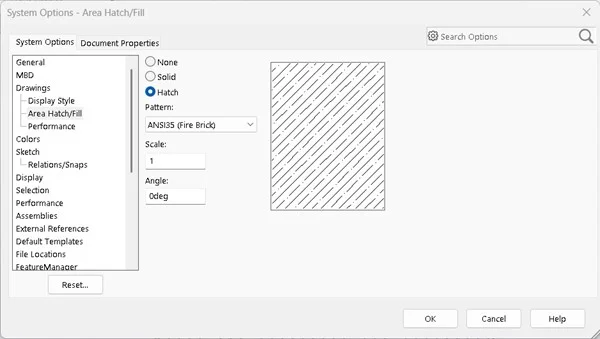 This option is used to define hatch manually to any enclosed area or a closed loop of sketch entity. You can use this option to define hatch pattern in both SOLIDWORKS model environment sketches and in SOLIDWORKS drawing sketches.
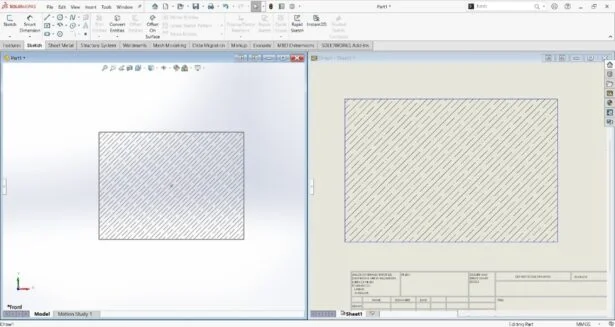
- Tools > Options > Document Properties > Material Properties.
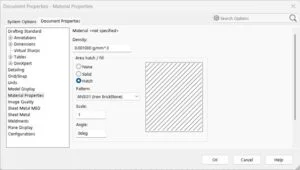 This option is available when you are in part modelling environment. This is what a user will get in drawing section view, or any other view until any specific material is applied.Consider below example, where a simple rectangle is created. Material is not applied to the part model. Later drawing is created with front view and section view is created from front view. When section view is created, the default hatch pattern generated is the same which is defined in above image.
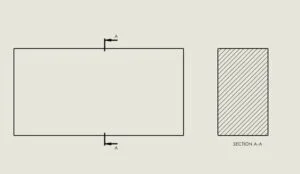 Later you can edit the hatch pattern from the PropertyManager by selecting it.When you define any specific material from the existing one available in material library in part model, then the hatch pattern options under ‘Tools > Options > Document Properties > Material Properties’ will be greyed out. It will display the details of the hatch pattern of that material applied, which are not editable.