

Struggling during quarantine? Have a toddler? Me too! This blog details the design of a multi-functional structure that helps with everything from cooking at home to school time… and folds up when you’re finished!
I got the idea for this design while searching for some sort of stool that would allow my 2-year-old daughter to reach the counters in the kitchen safely and help me prepare meals. I noticed that one of the models I found folded up which is ideal for storage in between uses – especially with limited space. Other models transformed into desks which is fantastic for learning and craft activities that require sitting down, but none of the models I found did BOTH, so of COURSE I got to work in SOLIDWORKS. It couldn’t be that difficult, right?
One of the things I love about SOLIDWORKS is that it is so incredibly versatile in terms of workflow. These days I tend to like conceptualizing in a part and then jumping into an assembly when I’m ready to add hardware and test out movements, but I easily could have designed everything from an assembly instead.
My first shot design was as simple as it comes and took maybe 5- or 10-minutes max to draft up in SOLIDWORKS. I used a 3D sketch and weldments to get an idea of the basic structure needed for a toddler tower, which is the perfect amount to time to spend on something that you’re going to end up scrapping and re-conceptualizing. Nevertheless, it was a good starting point.
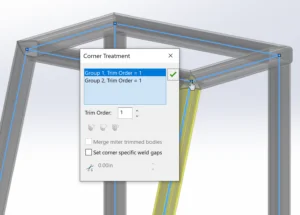
The only semi-tricky part of this was making sure that the trim order was correct at each intersection. To specify this, all we need to do is click on the intersections inside the Structural Member command and toggle the trim orders up/down.
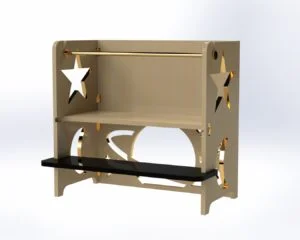
Here’s what my “toddler tower take one” looked like when it was finished:
This is great except for two big things: (1) it doesn’t turn into any sort of desk and (2) it definitely doesn’t fold. Again, this only took me about 5 minutes, so it really wasn’t a loss. I love that I can work so quickly in this software and not lose tons of time during conceptualization.
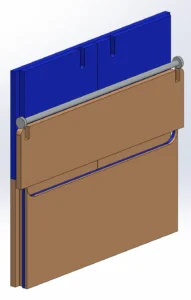
Nevertheless, time to move on to bigger and better designs! As I mentioned previously, I started in a part and moved on to an assembly to add hardware. This made it super simple to add dimensional relations between the pieces that would end up folding together. Instead of a rigid structure, I began this design with folding in mind. I lengthened the body to provide more room for my daughter to move back and forth and also to provide enough room for the outside flaps to fold in. Here’s a quick peek at the early stages of the redesign:
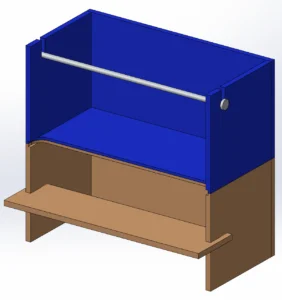
To make it easier to see how things would fold, I applied orange and blue to the “halves” that would end up folding open to create a desk. I also used the Move/Copy Bodies command to better visualize the folding process before even getting to the assembly.
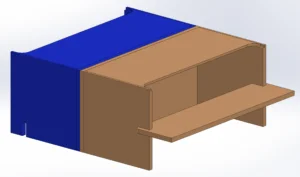
Here it is in early stages completely folded:
… and here it is in desk form:
Now that we have our basic structure down, let’s jump into an assembly using the Save Bodies command.
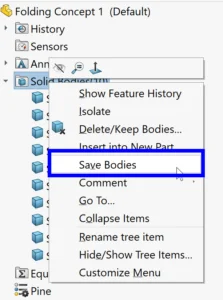
From this command, all we need to do is select to save ALL bodies and also Create Assembly.
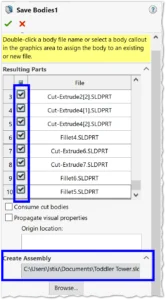
This will create a Part for each body in our original Part file and it will also create an Assembly with all of the parts inserted and fixed in space. I also could have given all of my bodies a new part file name from the Save Bodies command, but I completely forgot about this at the time and instead renamed all of my parts from the FeatureManager Design Tree with descriptive names. (Note: This feature can be enabled from Settings > System Options > FeatureManager > check the box next to “Allow component files to be renamed from FeatureManager Tree.”)
After creating my assembly, and as a best practice, I chose a single part to fix in space and used Right-click > Float to release the rest of my parts so that they could be properly mated together before hardware was added. I also added some top-level appearances to parts before moving to the next step – adding hardware!
The hardware was pretty simple: I added 180 degree hinges to the back to keep the top and bottom together and some 90 degree hinges in all of the inner corners. I used two tricks here:
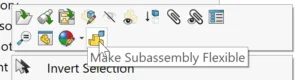
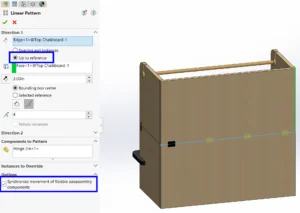
(1) I only placed ONE hinge per piece and patterned it after adding mates.
(Right-click in tree > Make Sub-assembly Flexible to make sure that it can move before mating.)
The trick with this is to check the box at the bottom of the linear pattern options that read “Synchronize movement of flexible subassembly components” so that all the hinges will move together. I also used the AWESOME “Up to reference” option to capture design intent in case I decided to change the size of the tower.
(2) I inserted Angle Limit Mates into the hinge sub-assembly to create the 90 degree stop and the 180 degree stop hinge types. These are also super useful if we decide we want to use Mate Controller later.
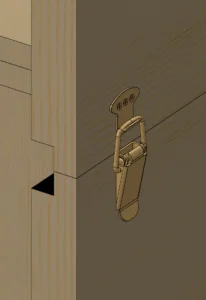
To finish the hardware off, I added a pair of latches to keep everything together vertically and changed the appearances of the inner cutout to indicate the presence of magnets.
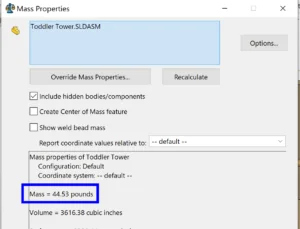
Now that everything is connected, we’re almost finished, but wait! There’s one more thing we want to check – weight. I don’t know about you, but I am not in good enough shape to lift a 200 lb toddler tower to set it up… so let’s make sure before we make it!
I went to Evaluate > Mass Properties and initially I found a weight of 44.53 lbs. Doable, but we can do better!
To get rid of some extra weight, I decided to make some fun cutouts and I also decided to add ANOTHER function to the back of the tower – a chalkboard! (Because WHY NOT?)
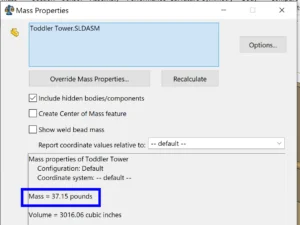

After these changes, everything comes out to a manageable 37.15 lbs – just slightly more than my toddler!
I know you’re probably dying to see the final result. Here it is in all of its glory:
Tower:

Desk:
Folded:
Now that I have this essential tool, the rest of this quarantine is going to be a breeze. Time to put the 2-year-old to work making a lasagna like this kid. I WILL NEVER COOK AGAIN! (yeah, right!)
Thanks for following along! I hope you had as much fun as I did and maybe you even learned something new. Please stay tuned for more and comment below if you have any topics you want covered.