
Quite often I see SOLIDWORKS users struggle with the display of parts and subassemblies in a bill of materials (BOM). A common way is hiding the unwanted rows in a BOM, but this can lead to a lot of manual work and a high risk of errors. In this tech blog I want to show you different options to manage the display of components in the BOM. These options can all be applied at assembly level, so the BOM will use these settings.
Using Child Component Display Properties
Suppose you have a main assembly that contains three subassemblies. Each subassembly has two components.
- Main Assembly
- A
- 1-1
- 1-2
- B
- 2-1
- 2-2
- C
- 3-1
- 3-2
- A
You want subassemblies B and C to appear as dictated by the BOM Type (Top-level only, Parts only, or Indented) setting. But you want A to appear differently. In this case you can use the Child component display when used as a subassembly options to override the BOM Type setting.
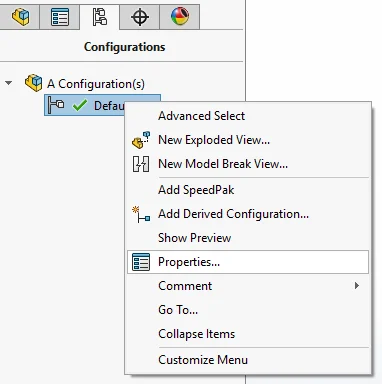
To change these options, we open subassembly A and go to the ConfigurationManager, then we right-click the Default configuration and select Properties.

The Configuration Properties PropertyManager appears. It contains a section with Bill of Material Options.
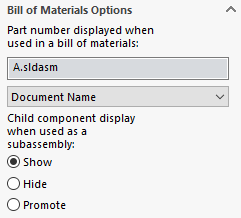
Here you can find the Child component display when used as a subassembly settings:
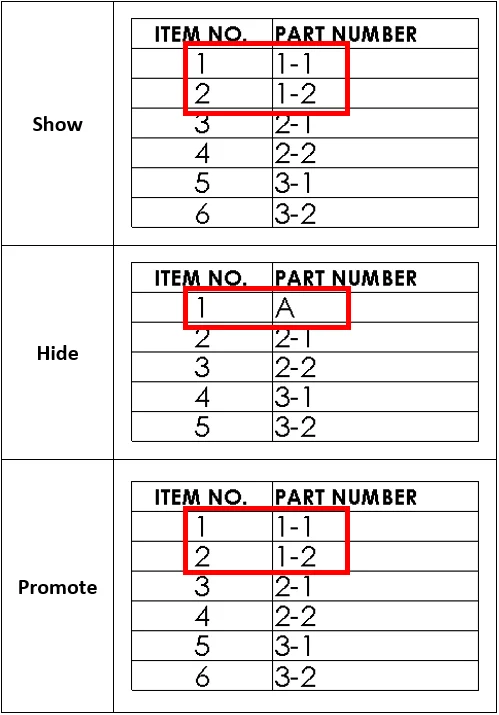
- Show Shows child components in the BOM if dictated by BOM Type in the Bill of Materials PropertyManager. For example, child components are not shown in a Top-level only
- Hide Hides the child components in the BOM, even if BOM Type normally would show them. The subassembly appears as a single item in the BOM. For example, a Parts only BOM usually lists child components as individual items. If Hide is selected, the subassembly is listed instead.
- Promote Dissolves the subassembly in the BOM and shows its child components, even if the BOM Type would normally show them. For example, a Top-level only BOM usually lists just the subassembly and not its child components. If Promote is selected, the child components are listed and the subassembly is not.
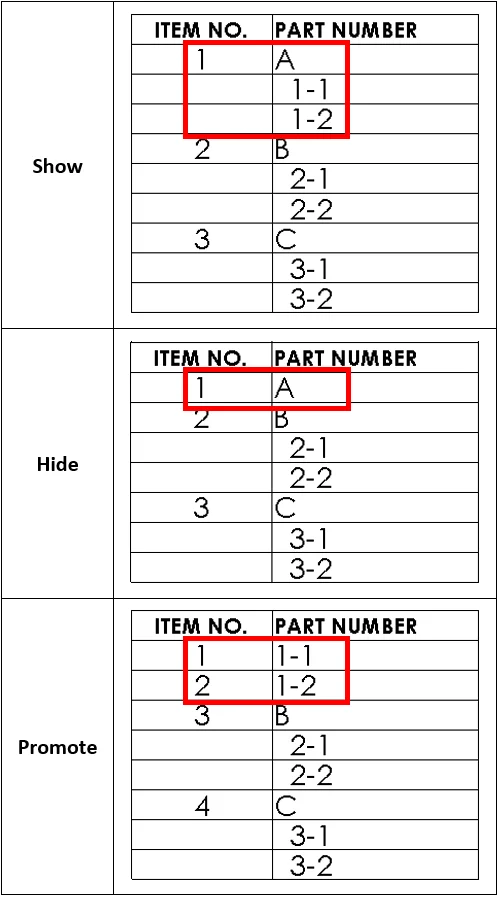
Example – BOM Type set to Indented
In this example, BOM Type is set to Indented.
Child component display when used as a subassembly setting for each subassembly:
- For A, set as indicated in the table
- For B and C, set to Show
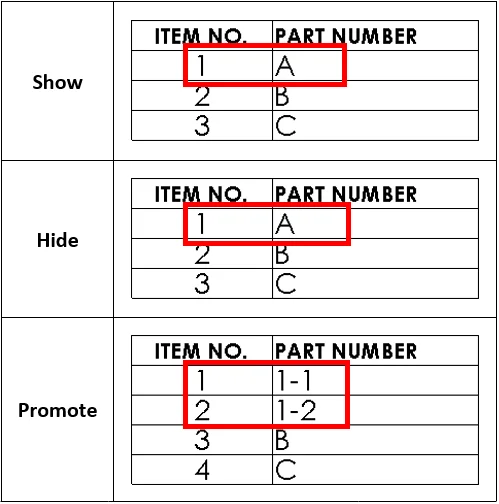
Example – BOM Type set to Top Level Only
In this example, BOM Type is set to Top Level Only.
Child component display when used as a subassembly setting for each subassembly:
- For A, set as indicated in the table.
- For B and C, set to Show.
Example – BOM Type set to Parts Only
In this example, BOM Type is set to Parts Only.
Child component display when used as a subassembly setting for each subassembly:
- For A, set as indicated in the table.
- For B and C, set to Show.
Conclusion
As we have seen, you can greatly influence the display of subassemblies in a bill of materials with the help of the Child component display when used as a subassembly setting. This can be very useful when you add a subassembly of a buying component. Such a component should be listed as one item in the bill of materials. By hiding the child components of this subassembly, you can achieve this.
Written by Martijn Visser, Elite Application Engineer, CAD2M