
Being able to have an overview of changes to designs since initial release is an important aspect to time-efficient engineering. Making use of an automatically updated revision table helps with that.
- What version are we using?
- Who has made these changes?
- Where can I see who made changes?
A well structured PDM system can answer most of these questions.
Integrated Revision Tables
The go to method for years within Computer Aided Design is implementing revision tables. In older versions of SOLIDWORKS and SOLIDWORKS PDM the revision table did not necessarily correspond with the revision version in the SOLIDWORKS PDM Vault. A few years ago SOLIDWORKS added a functionality to SOLIDWORKS. This functionality allowed the user to add revisions to the revision table and have them automatically update in the vault. Having all the data in the SOLIDWORKS environment correspond with the PDM vault saves engineers a lot of time. The requirement for the Integrated Revision Tables is having access to SOLIDWORKS PDM 2018 (or older) and making adjustments to the PDM Administrator settings. This Tech blog will teach you how to do this.
How to implement a Revision Table
To make sure that SOLIDWORKS retrieves the right information from the drawing the user will have to map the variables within the revision workflow. The user will have to do two things in order to accomplish this. Firstly, the user will have to implement a Revision Table within SOLIDWORKS. This is done by navigating to the Administration tool and enabling the revision table:
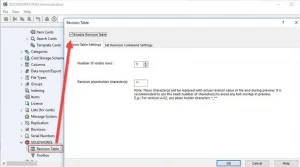
Go to Administrator tools and click on Revision Table. There you will find a checkbox that enables/disables the table. In the same menu you will also be able to indicate how many rows you want to make visible in the Revision Table.
Detemine and configure a Revision Table
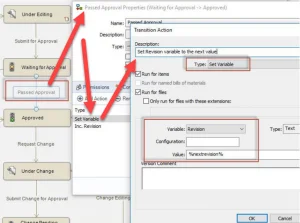
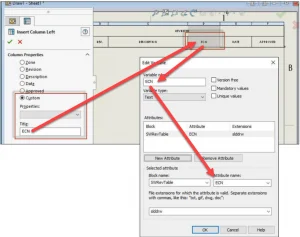
The second step is to determine and configure a revision workflow. The user will have to set up workflow transition actions that update the variables to the “SWRevTable” block. To accomplish this navigate to the Administrator Tool once again and select ‘Revision’, afterwards click on ‘Variables’. In the following menu it is important to type ‘Revision’ in the ‘Variable name’ box. Create a new attribute by clicking on the aptly named ‘New Attribute’ and select ‘SWRevTable’ as the block name on the flyout menu below.
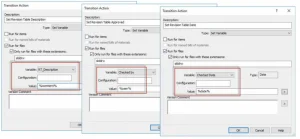
Having followed the previous steps the user is now able to change custom properties within the revision workflow. For example, say that the user wants to add a step to the revision workflow where he or she can add a description to the changes that are made. The first step is to change the type settings to ‘Set Variable’. In the case of a description the variable is ‘ RT_Description’ and the value assigned is %comment%.
Note that the once a name is title is given to specific step within the workflow this name has to remain the same everywhere. Additionally, we recommend thoroughly testing the revision table and the variables assigned to the workflow.
If you have any questions regarding the Integrated Revision Tables within the SOLIDWORKS PDM environment get in touch with the CAD2M helpdesk. If you are located in the Benelux it is also possible to attend our SOLIDWORKS PDM Administrator course.
Are you in the mood to learn more? Why not read one of our previous tech blogs!