

Now that every SOLIDWORKS license comes with access to the 3DEXPERIENCE platform, I hope you all are taking advantage of putting your data on the cloud to get the most value out of your data.
Once your data is on the platform, you can easily manage it and collaborate with your team and external stakeholders.
Today, I want to cover a couple of ways you can save your data on the platform. The two primary methods are the Save to 3DEXPERIENCE option directly in SOLIDWORKS and the Batch Save to 3DEXPERIENCE tool. Additionally, I’ll review how to use the File Preparation Assistant to refine the source data before uploading it to the platform.
Saving Files to the Platform Directly from SOLIDWORKS
Once you have started SOLIDWORKS desktop with the 3DEXPERIENCE add-in loaded for Collaborative Designer for SOLIDWORKS or launched 3DEXPERIENCE SOLIDWORKS, your SOLIDWORKS session will be connected to the platform.
First off, click the Open icon from the SOLIDWORKS main tab and browse to the local or network folder where the source files are located. Select the file, then click Open.
In the MySession task pane, you’ll see the structure of the files if you chose an assembly or a drawing. Most of the files will have the “File has not yet been saved into 3DEXPERIENCE” orange flag icon.
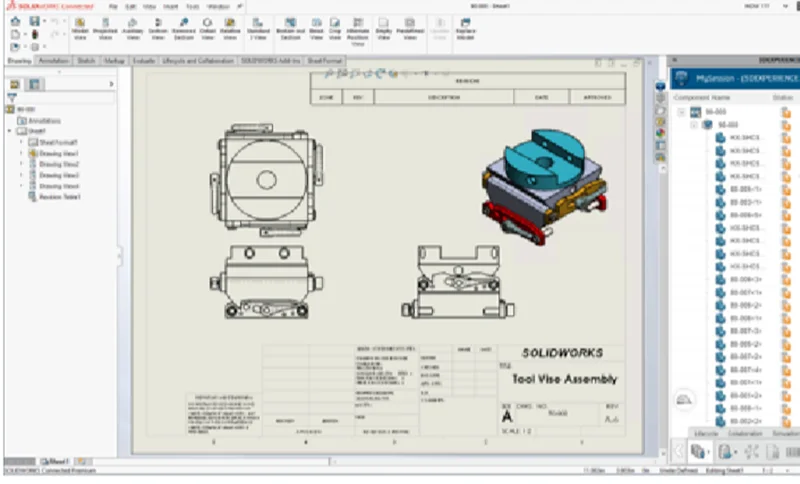
If you opened a drawing or assembly, right-click on the top node in the structure and select Save with Options. If you just opened a single part, then just right-click on it.
In the Save to 3DEXPERIENCE dialog, click the Select Bookmark button. Wait for the Select a Bookmark dialog to populate, then select a bookmark or create a new one to associate the files with. Bookmarks are a great way to organize and interact with your data. Then click the Apply to all button at the bottom of the dialog.
Next, click the Save button. MySession will then show that all files in the structure from the folder you saved are on the platform. From here, close your file and any other files that are open.
Using the Batch Save to 3DEXPERIENCE Tool
To upload a bulk amount of data, you can use the Batch Save to 3DEXPERIENCE tool. But before doing a bulk upload, it’s a good idea to analyze and clean up the source data beforehand. The File Preparation Assistant is a great tool for doing this. It can be accessed from the Tools Menu in SOLIDWORKS.
If not already specified, select or create a folder for where the tool should put the log files and where to create backups. Click Add Folder and browse to the desired folder containing the source files.
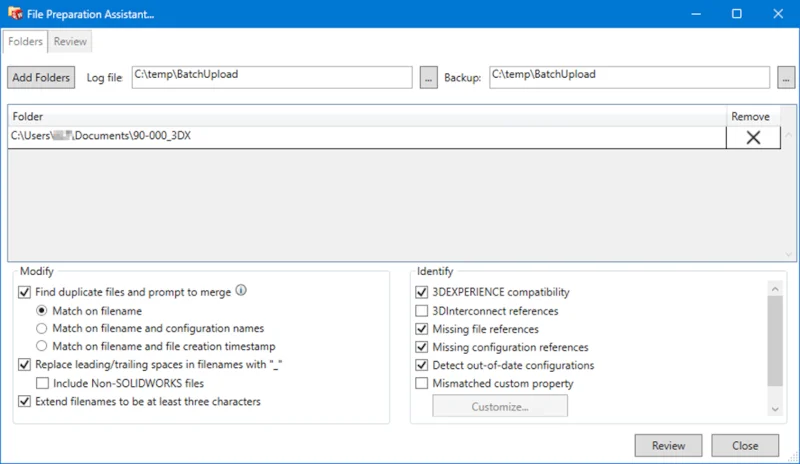
Select the desired options as needed. Then click the Start button. The Custom Property checks will look for custom property data that would not be compatible with the corresponding attribute type on the platform. For instance, if a platform attribute was defined as an integer and the mapped custom property type is text, the two would not be compatible.
The Merge Duplicates window will appear if the Find duplicate files and prompt to merge option was selected, and if it finds a duplicate in different folders. You would then select each duplicate file, and then click the Analyze references button. The location of each instance is shown, and you can select which one should be the master. The master will keep its original name and location, while the others will be renamed or deleted depending on whether the Merge and Delete option was selected. Note: the file will be removed from the source folder, but a backup copy is created. Click the Apply button. Close the Merge Duplicates window.
Browse in the log folder and open the log text file. Log files are named with the date and exact time they were created. Notice the entries for the changes the tool made. Close the File Preparation Assistant.
Now your files are ready for a batch save. You can upload and save multiple folders containing SOLIDWORKS files to a collaborative space using the Batch Save to 3DEXPERIENCE add-in.
To save multiple SOLIDWORKS files to the 3DEXPERIENCE platform in SOLIDWORKS, click Tools, Batch Save to 3DEXPERIENCE.
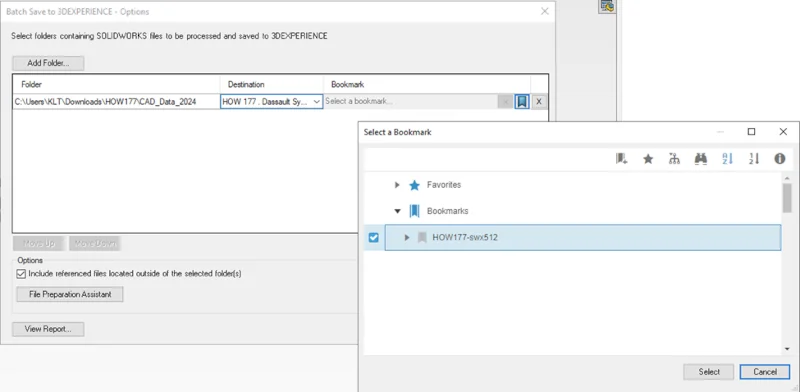
In the Select Folder dialog box, navigate to a folder and click Select Folder. Populate the list of folders that you want to upload. In the Select Folder dialog box, navigate to the top-level root folder containing the files you want to save. Click Select Folder. In the Batch Save to 3DEXPERIENCE dialog box, click Move Up or Move Down to change the order of the folders. Depending on the order of the folders in the list, it is prioritized during the save process.
Under the Destination column, select a collaborative space. If there are multiple organizations belonging to a common collaborative space, the name of the organization is displayed along with the collaborative space.
The Bookmark column displays the object name that is selected as a bookmark. When you right-click, the Reset option removes the bookmarked object.
Click the Bookmark icon to add the bookmark using the Bookmark Editor.
The same folder structure is retrieved on the 3DEXPERIENCE platform. The mapping is done based on the folder name or bookmark title. To remove a folder from the list, in the corresponding row, click X.
To ensure that you are gathering all documents related to the model, under Options, click Include referenced files located outside the selected folder(s).
The Include referenced files located outside the selected folder option includes all the referenced files that are placed outside the selected folder for the save process. Also, these files are added in the selected bookmark if the Assign Bookmark to referenced data located outside selected folder option is selected.
The Assign Bookmark to referenced data, located outside selected folder option, is enabled only when Include referenced files located outside the selected folder is selected.
To view a report of the batch results, click View Report. Click Save to run the Batch Save add-in.
The Save command here follows an asynchronous approach toward saving the data. This allows you to continue using SOLIDWORKS, open and view data from the 3DEXPERIENCE platform, create new files, all while the save process is in progress. You can minimize the dialog box while the save is in progress. When the save process is completed, a message appears at the bottom right of the screen.
Note, you can only work on the files that are not in the scope of the ongoing save operation.
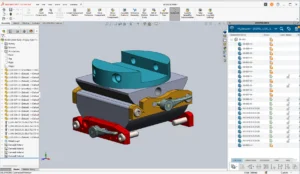
The folders are saved with a bottom to top approach and the data is not duplicated until the local cache is cleared. The data created in the 3DEXPERIENCE platform is in In-work maturity state.
I recommend using the Save to 3DEXPERIENCE option directly in SOLIDWORKS when you have a small number of files or just one assembly or drawing structure to upload. For larger amounts of data coming from multiple folders, use the Batch Save to 3DEXPERIENCE tool.
If you’d like a demo, please reach out to your local reseller and see how transferring your design data from local storage to the 3DEXPERIENCE platform makes it easier to access, collaborate, and build on your work. Discover how moving your data to the cloud can improve team collaboration and project efficiency.