

As per these layers, the drawing looks like this:

When a new drawing is created, these 3 layers are seen by default:
- PER STANDARD : Refers to Document Properties
- None : Refers to System Options
- FORMAT : Refers to everything that is on Sheet Format
These are the Default SOLIDWORKS Layers. Whereas the ones created by the user are called SOLIDWORKS Layers. In this case, 0, D1, BOM1, B1 & N1 are SOLIDWORKS Layers. The properties of these layers like line thickness, line style and color can be modified from Layer window seen above. We need to save this drawing as .dwg/.dxf with different layer properties than SOLIDWORKS Layers.
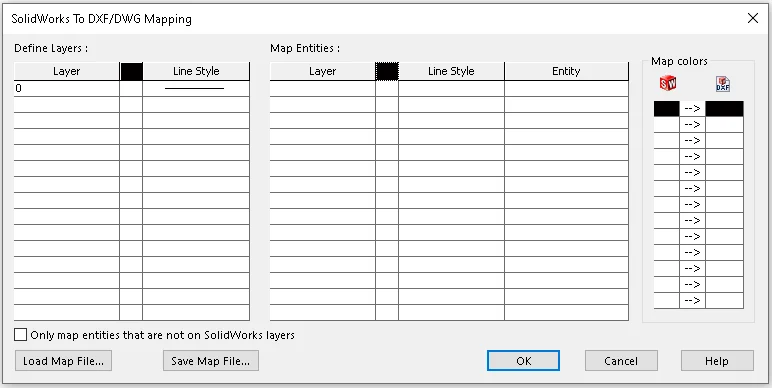
- Define Layers section allows you to define new layers, assign colors to them and set their line style.
- Map Entities sections allows you to assign these newly created layers to list of entities that might be present on the drawing sheet.
- Checking option ‘Only map entities that are not on SOLIDWORKS® layers’ only maps the new layers to entities on drawing sheet that are not on SOLIDWORKS® Layers or are on Default Layers.
- Button ‘Load Map File…’ allows you to load existing map file.
- Button ‘Save Map File…’ allows you to save recently defined layers in the window as a map file. This file can then be loaded at any given time to map entities with layers set in it.
- Click OK to save .dwg.
- Click on ‘Save Map File…’ and browse to desired location to save the map file to be used later.
NOTE : In SOLIDWORKS® drawing, if entities are in combination of SOLIDWORKS Layers and Default Layer and if new layers are defined in ‘SOLIDWORKS To DXF/DWG Mapping’ window for every existing entity on drawing, checking option ‘Only map entities that are not on SOLIDWORKS layers’ will only apply new layers to entities that are on Default Layer in SOLIDWORKS® drawing.
3. Obtaining CPU Utilization Information for SOLIDWORKS® PDM Database
-by Tim KWONG
There are different methods and third-party applications to obtain CPU utilization of a Microsoft® SQL Server service. This blog presents an overview of three on demand methods available in SQL Server Management Studio (SSMS) to determine CPU usage.
- Activity Monitor: Provides an overall SQL Server CPU usage.
- SQL Server Profiler: Obtains detail CPU usage on stored procedures.
- XEvent Profiler: Obtains detail CPU usage on stored procedures.
SSMS: Activity Monitor
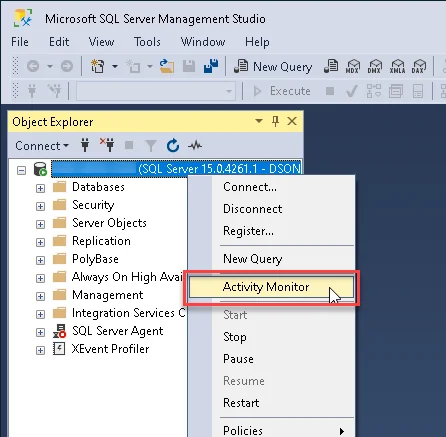
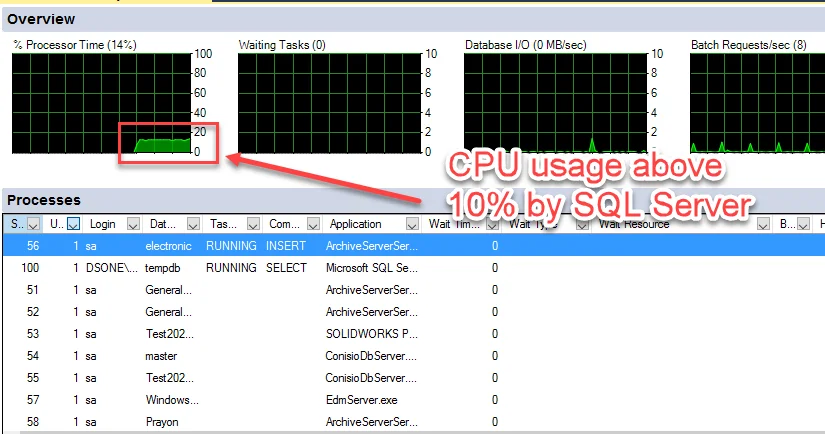
Activity Monitor is a quick way to obtain an overall CPU usage by the SQL server service. After launching and connecting to the SQL Server instance, right-click the server and select ‘Activity Monitor’ option.
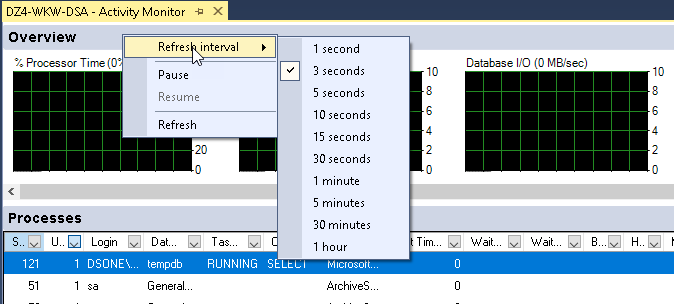
SSMS displays the activities for a set time interval. The interval can be changed by right-click the ‘Overview’ heading and selecting the ‘Refresh interval’ option.
The image below shows the archive server service using greater than 10 percent of the total CPU.
SQL Server Profiler
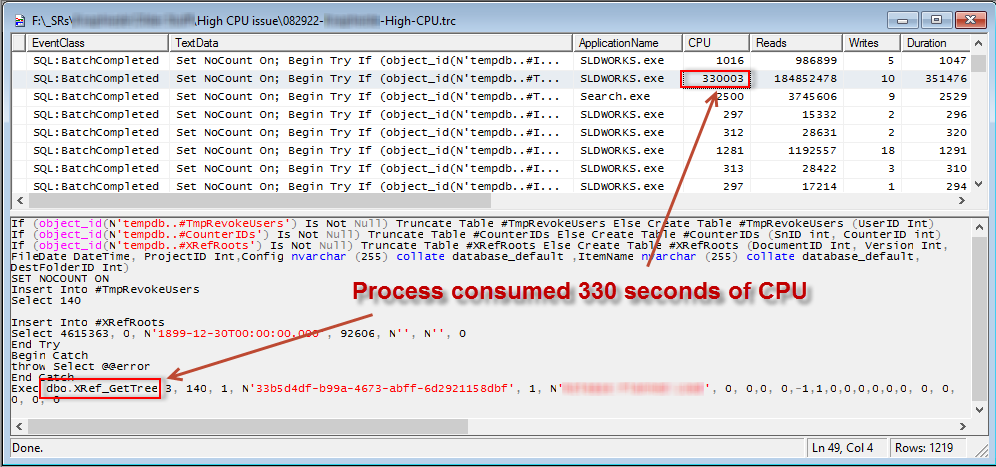
SQL Server Profiler enables you to capture detail CPU usage for SQL processes for one or many databases. Review knowledge base article QA00000112812 for details on properly configuring and using SQL Profiler. The CPU usage information along with other metrics which can be useful in troubleshooting performance issues. This tool is designed for short-term captures and running this long-term can affect overall performance of SQL Server. Use Extended Event for long term monitoring. The image below shows the XRef_GetTree stored procedure lasting over 330 seconds.
XEvent Profiler
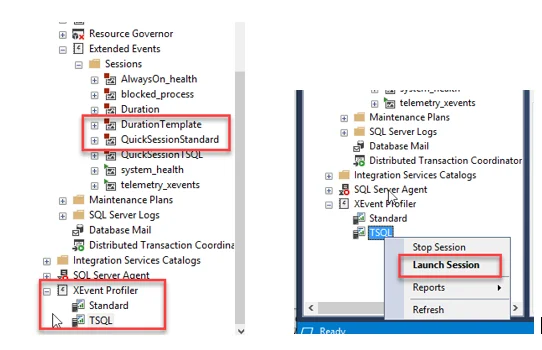
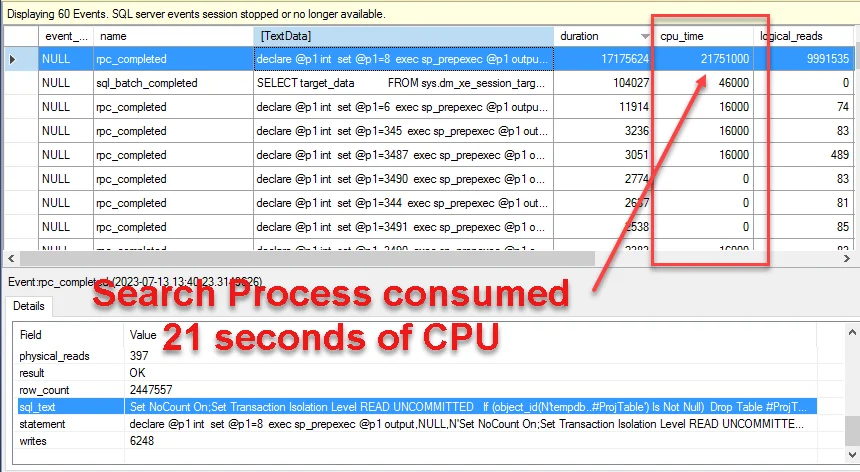
XEvent Profiler is based on Extended Events using two customizable Extended Events templates called QuickSessionStandard and QuckSessionTSQL. Review knowledge base article QA00000117731 for details on using Extended Events. XEvent Profiler provides a live view of captured events. After stopping the capture, events can be sorted by column values to determine high CPU usage. The image below shows a process lasting 25 seconds.
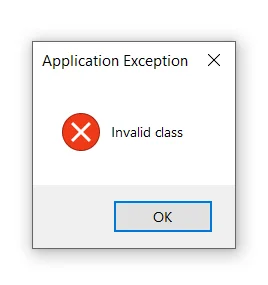
4. How to Troubleshoot the error ‘Application Exception: Invalid Class’, when trying to open eDrawings®?
-by Sohan DHAKE
When trying to open eDrawings® application, you will receive an error ‘Application Exception: Invalid Class’.
This error is displayed when there is some issue with the Windows® Management Instrumentation (WMI). Because of this, you cannot even view the system information file. In attempting to look at the SystemInfo.nfo, you receive an error, “Cannot access the Windows® Management Instrumentation software.” To resolve the issue, rebuild the WMI. Let us find different ways to rebuild the WMI:
By renaming the WMI Repository folder
- Click Start and type Command Prompt (CMD). Right click on CMD and select Run as administrator.
- Command Prompt window will pop up, type the command net stop winmgmt and press Enter.
- Leave the command prompt minimized and open Windows® File Explorer.
- Browse to path C:WindowsSystem32wbem rename the folder Repository to Repository_old.
- Switch back to command prompt window and type net start winmgmt and hit enter to execute the command.
- Close all the windows, restart the system and try to run the application.
By re-registering all the ‘.dll’ files and re-compiling ‘.mof and .mfl’ files:
- Click Start and type Command Prompt (CMD). Right click on CMD and select Run as administrator.
- Command Prompt window will pop up, type the command net stop winmgmt and press Enter.
- Enter the command for /f %s in (‘dir /b /s *.dll’) do regsvr32 /s %s and press Enter. Let all the ‘.dll’ files be registered.
- Once the above step is completed, enter this command for /f %s in (‘dir /b /s *.mof’) do mofcomp /s %s and press Enter.
- Enter another command after successful execution of the above attempt, for /f %s in (‘dir /b /s *.mfl’) do mofcomp /s %s and press Enter.
- Now type net start winmgmt and hit enter to execute the command.
- Reboot the system and try to open the application.
Re-installation of eDrawings® and repairing the corrupted DLL’s:
- Click Start and type Command Prompt (CMD). Right click on CMD and select Run as administrator.
- Enter the command SFC /scannow and press Enter.
- Uninstall eDrawings® if installed as a standalone application from Control Panel. If it is installed along with SOLIDWORKS®, go to Control Panel>Programs and Features>Uninstall a Program. Right click on SOLIDWORKS® and click Change. Select Modify your installation and move forward to Product Selection window. Uncheck eDrawings® and click Next>Modify Now. This will uninstall eDrawings® form the system.
- There are some registries present on the system after uninstalling. As a system administrator, open Registry Editor and find the following registries:
- HKEY_LOCAL_MACHINESOFTWAREeDrawings
- HKEY_CURRENT_USERSoftwareeDrawings
- Rename the registry folders eDrawings to eDrawings_old.
- Restart the system and install eDrawings.
Hello to all,
Welcome to the new edition of the SOLIDWORKS® Support Monthly News! This monthly news blog is co-authored by members of the SOLIDWORKS® Technical Support teams worldwide. Here is the list of topics covered in this month’s Blog :
-
SOLIDWORKS® file sharing made easy: Setting up Share and Markup
-
Map SOLIDWORKS® Drawing entities and layer properties
-
Obtaining CPU Utilization Information for SOLIDWORKS® PDM Database
-
How to Troubleshoot the error ‘Application Exception: Invalid Class’, when trying to open eDrawings®?
1.SOLIDWORKS® file sharing made easy: Setting up Share and Markup
-by Jennifer TASHIRO
With the July 2023 enhancements, it is easier than ever to share your SOLIDWORKS® models with other people and get their feedback on your designs.
The people who are viewing your models and providing feedback do not need any licenses. In order to share your models with them, you need either of the following software:
- SOLIDWORKS Desktop 2023 SP3, plus Design with SOLIDWORKS R2023x FD03
- SOLIDWORKS Connected R2023x FD03
Here are videos about installing Design with SOLIDWORKS and SOLIDWORKS Connected. If you don’t have a license, ask your administrator.
If you don’t see the Lifecycle and Collaboration tab on the CommandManager, you can show it using the Customize command. If you don’t see the Share a file button on the Lifecycle and Collaboration tab, you can add it by dragging the button from the Customize window. These workflows are shown in the video below.
Regarding usage, here is a video about using Share and Markup.
2. Map SOLIDWORKS® Drawing entities and layer properties
-by Tushar NAYAK
Do you want to provide SOLIDWORKS® drawing as .dwg/.dxf file to your customer, vendor or anyone who works with these file types with entities in colors they prefer? Here’s what you can do! You can map SOLIDWORKS® drawing entities and their colors to control and manipulate the colors in the saved .dwg/.dxf file. Go through below given steps:
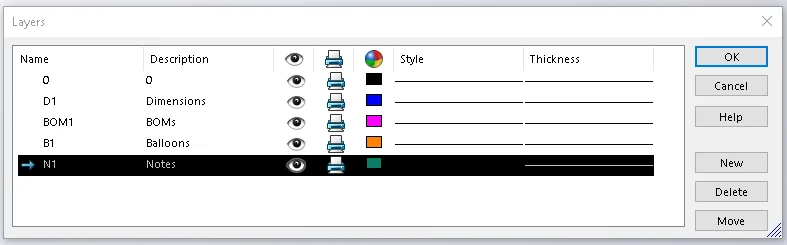
- Open drawing that has several layers assigned to entities present on the drawing sheet. The drawing that is used for demonstration here has layers seen in below image :
As per these layers, the drawing looks like this:
When a new drawing is created, these 3 layers are seen by default:
- PER STANDARD : Refers to Document Properties
- None : Refers to System Options
- FORMAT : Refers to everything that is on Sheet Format
These are the Default SOLIDWORKS Layers. Whereas the ones created by the user are called SOLIDWORKS Layers. In this case, 0, D1, BOM1, B1 & N1 are SOLIDWORKS Layers. The properties of these layers like line thickness, line style and color can be modified from Layer window seen above. We need to save this drawing as .dwg/.dxf with different layer properties than SOLIDWORKS Layers.
- Go to File > Save As… > Select ‘.dwg’ file type > Click on ‘Options…’. System Options – DXF/DWG window appears.
- From Custom Map SOLIDWORKS to DXF/DWG, check ‘Enable’. This activates existing map file browse option. Let this path be empty. Make changes in other sections if wanted and click OK to close this window.
- Click on ‘Save’ in Save As window. SOLIDWORKS to DXF/DWG window appears.
- Define Layers section allows you to define new layers, assign colors to them and set their line style.
- Map Entities sections allows you to assign these newly created layers to list of entities that might be present on the drawing sheet.
- Checking option ‘Only map entities that are not on SOLIDWORKS® layers’ only maps the new layers to entities on drawing sheet that are not on SOLIDWORKS® Layers or are on Default Layers.
- Button ‘Load Map File…’ allows you to load existing map file.
- Button ‘Save Map File…’ allows you to save recently defined layers in the window as a map file. This file can then be loaded at any given time to map entities with layers set in it.
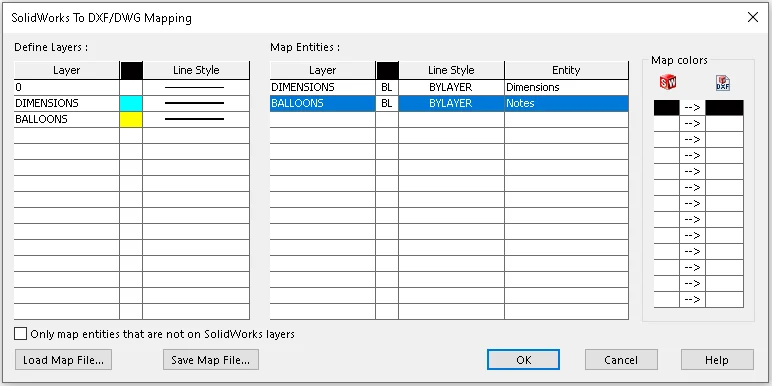
- Define new layers by naming them in the first column. Let’s say, DIMENSIONS and BALLOONS. Set their colors (that do not match with ones in SOLIDWORKS® Drawing) and their line style to ‘Visible Edges’. Line style can vary to any amongst the list of styles.
- In ‘Map Entities’ section, select the layer name (DIMENSIONS in this case) from the drop down list by clicking in the blank cell under Layer column. Set the color and Line Style to ‘BL’ (By Layer). In the Entity section, select entity to which you want to assign this layer to. In this case, Dimensions. Similarly, select the second layer and assign it to the Notes in the last column to assign BALLOONS layers to balloons on the sheet as balloons are considered as notes. Also View Labels and notes in sheet format will be considered as notes.
- You may now want to do any of the following :
- Click OK to save .dwg.
- Click on ‘Save Map File…’ and browse to desired location to save the map file to be used later.
- Open the saved .dwg file and compare with SOLIDWORKS® drawing.
NOTE : In SOLIDWORKS® drawing, if entities are in combination of SOLIDWORKS Layers and Default Layer and if new layers are defined in ‘SOLIDWORKS To DXF/DWG Mapping’ window for every existing entity on drawing, checking option ‘Only map entities that are not on SOLIDWORKS layers’ will only apply new layers to entities that are on Default Layer in SOLIDWORKS® drawing.
3. Obtaining CPU Utilization Information for SOLIDWORKS® PDM Database
-by Tim KWONG
There are different methods and third-party applications to obtain CPU utilization of a Microsoft® SQL Server service. This blog presents an overview of three on demand methods available in SQL Server Management Studio (SSMS) to determine CPU usage.
- Activity Monitor: Provides an overall SQL Server CPU usage.
- SQL Server Profiler: Obtains detail CPU usage on stored procedures.
- XEvent Profiler: Obtains detail CPU usage on stored procedures.
SSMS: Activity Monitor
Activity Monitor is a quick way to obtain an overall CPU usage by the SQL server service. After launching and connecting to the SQL Server instance, right-click the server and select ‘Activity Monitor’ option.
SSMS displays the activities for a set time interval. The interval can be changed by right-click the ‘Overview’ heading and selecting the ‘Refresh interval’ option.
The image below shows the archive server service using greater than 10 percent of the total CPU.
SQL Server Profiler
SQL Server Profiler enables you to capture detail CPU usage for SQL processes for one or many databases. Review knowledge base article QA00000112812 for details on properly configuring and using SQL Profiler. The CPU usage information along with other metrics which can be useful in troubleshooting performance issues. This tool is designed for short-term captures and running this long-term can affect overall performance of SQL Server. Use Extended Event for long term monitoring. The image below shows the XRef_GetTree stored procedure lasting over 330 seconds.
XEvent Profiler
XEvent Profiler is based on Extended Events using two customizable Extended Events templates called QuickSessionStandard and QuckSessionTSQL. Review knowledge base article QA00000117731 for details on using Extended Events. XEvent Profiler provides a live view of captured events. After stopping the capture, events can be sorted by column values to determine high CPU usage. The image below shows a process lasting 25 seconds.
4. How to Troubleshoot the error ‘Application Exception: Invalid Class’, when trying to open eDrawings®?
-by Sohan DHAKE
When trying to open eDrawings® application, you will receive an error ‘Application Exception: Invalid Class’.
This error is displayed when there is some issue with the Windows® Management Instrumentation (WMI). Because of this, you cannot even view the system information file. In attempting to look at the SystemInfo.nfo, you receive an error, “Cannot access the Windows® Management Instrumentation software.” To resolve the issue, rebuild the WMI. Let us find different ways to rebuild the WMI:
By renaming the WMI Repository folder
- Click Start and type Command Prompt (CMD). Right click on CMD and select Run as administrator.
- Command Prompt window will pop up, type the command net stop winmgmt and press Enter.
- Leave the command prompt minimized and open Windows® File Explorer.
- Browse to path C:WindowsSystem32wbem rename the folder Repository to Repository_old.
- Switch back to command prompt window and type net start winmgmt and hit enter to execute the command.
- Close all the windows, restart the system and try to run the application.
By re-registering all the ‘.dll’ files and re-compiling ‘.mof and .mfl’ files:
- Click Start and type Command Prompt (CMD). Right click on CMD and select Run as administrator.
- Command Prompt window will pop up, type the command net stop winmgmt and press Enter.
- Enter the command for /f %s in (‘dir /b /s *.dll’) do regsvr32 /s %s and press Enter. Let all the ‘.dll’ files be registered.
- Once the above step is completed, enter this command for /f %s in (‘dir /b /s *.mof’) do mofcomp /s %s and press Enter.
- Enter another command after successful execution of the above attempt, for /f %s in (‘dir /b /s *.mfl’) do mofcomp /s %s and press Enter.
- Now type net start winmgmt and hit enter to execute the command.
- Reboot the system and try to open the application.
Re-installation of eDrawings® and repairing the corrupted DLL’s:
- Click Start and type Command Prompt (CMD). Right click on CMD and select Run as administrator.
- Enter the command SFC /scannow and press Enter.
- Uninstall eDrawings® if installed as a standalone application from Control Panel. If it is installed along with SOLIDWORKS®, go to Control Panel>Programs and Features>Uninstall a Program. Right click on SOLIDWORKS® and click Change. Select Modify your installation and move forward to Product Selection window. Uncheck eDrawings® and click Next>Modify Now. This will uninstall eDrawings® form the system.
- There are some registries present on the system after uninstalling. As a system administrator, open Registry Editor and find the following registries:
- HKEY_LOCAL_MACHINESOFTWAREeDrawings
- HKEY_CURRENT_USERSoftwareeDrawings
- Rename the registry folders eDrawings to eDrawings_old.
- Restart the system and install eDrawings.