

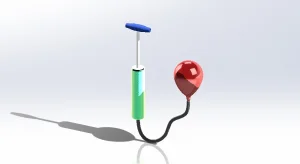
[A New Balloon Air Pump Design]
Welcome to The Last Chapter! This is Part3 of Flexible component, for those who seeing this blog for the first time, you can go to the “Part1 – Introduction of Flexible Component” and “Part2 – Basic Flexible Component” for better understanding.
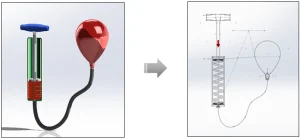
This time our goal is to create a flexible balloon which is a little bit complicate then the spring part, it needs to use some tips and tricks on the sketches to achieve. But no worry, we will go through the details in steps. Before we start, let’s see the full version of the air pump assembly in sketch with those two flexible parts (spring & balloon)!
Step 1 For Flexible Balloon (Ref. Plane)
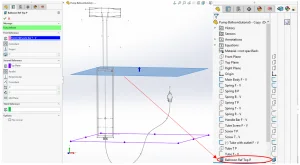
The most important thing is to setup the reference top plane (Ref TOP P) for external reference in assembly. I use the bottom of the handlebar as the reference point because I want to create a situation that while pushing down the handlebar, the balloon will become bigger.
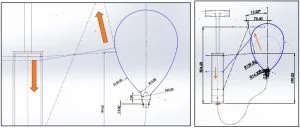
Step 2 For Flexible Balloon (Guide Line)

(this design is just my idea, it can be any style you can think of)
Step 2 is to setup the “orange guide line” for the moveable range of the balloon sketch, and it is related to the moveable range of the handle bar. To achieve this situation, we can simply create reference line “A” & “B” for finding the intersection point “C”, then we can move to next step to continue.
Step 3 For Flexible Balloon (Balloon Sketch)
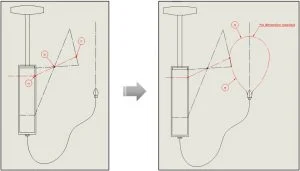
Based on step 2, we create a construction line that coincident with point “a”, “b” and “c”. Then, for the balloon sketch, create arc line “d” and “e” which are not fully defined, and make the joint coincident with the point “c”. The reason is to simulate when pushing down the handle bar, the balloon sketch will move simultaneously along with the “guide line”.
Below is my entity sketch and movement relation for your reference:
Step 4 For Flexible Balloon (Part Feature)
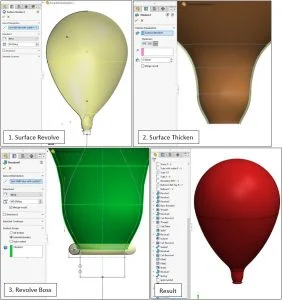
I would like to use 3 steps to create the balloon body as shown on above. When the balloon part is finished, you need to add it into the assembly with correct position.
Step 5 For Flexible Balloon (External Reference)
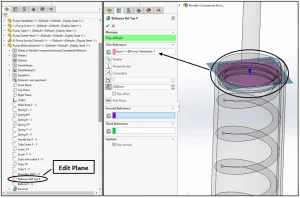
Now we can setup the external reference for the Balloon Ref TOP P. Again, the external reference also will be the handlebar bottom surface, just like the spring setting.
Step 5 For Flexible Spring (Make Part Flexible)
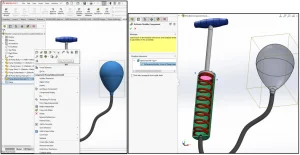
Last step, apply “Make Part Flexible” feature to your balloon part. Inside the make part flexible feature, select the handlebar bottom surface as the flexible references. And you should be able to make the balloon become flexible.

Written by Roy Fu, Intelligent CAD/CAM Technology Ltd