15 Quick Steps to Setup a Design Library Feature
Are you finding yourself generating the same feature every time you create a new part? Would you like an easy way to stamp your company logo into your products? Then the SOLIDWORKS Library Feature is meant for you!
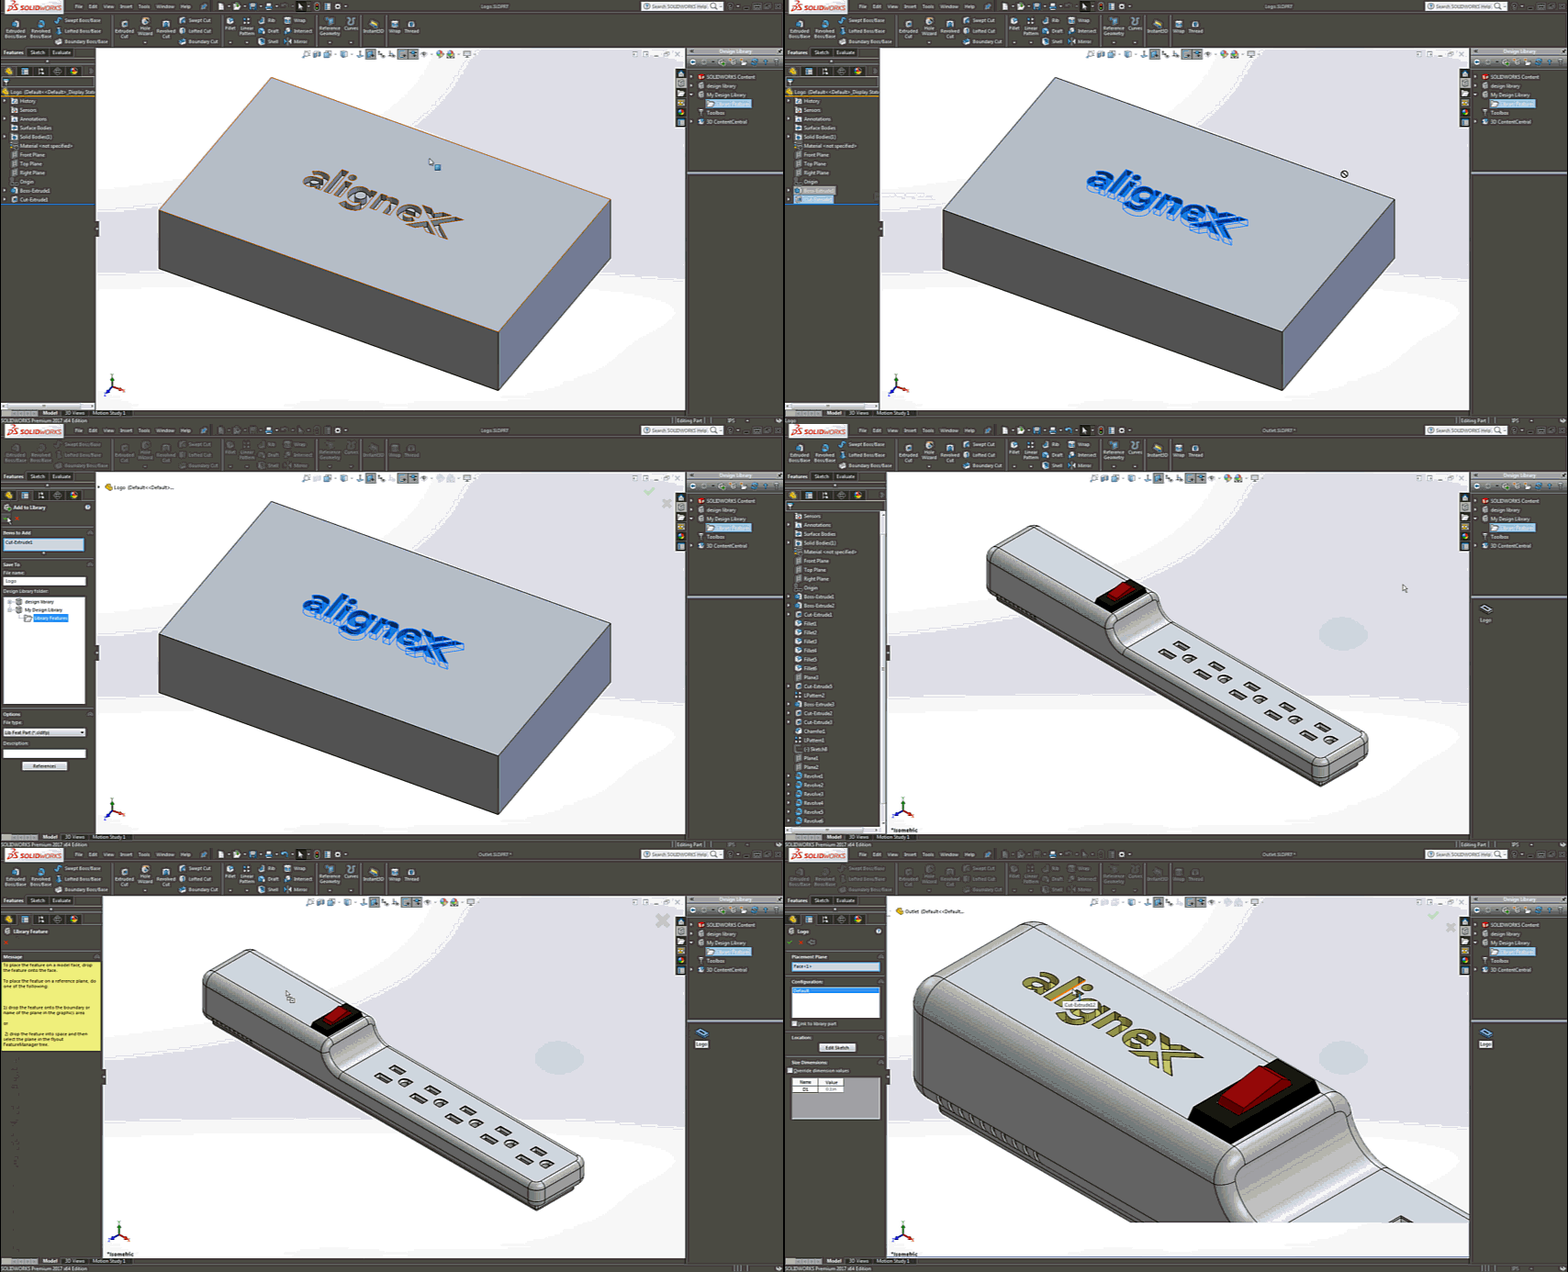
Library features allow you easy access to commonly used features with all of the parameters and dimensions pre-defined to your specifications. Simply drag and drop onto your model and SOLIDWORKS takes care of the rest.
Let’s take a look at how this is done.
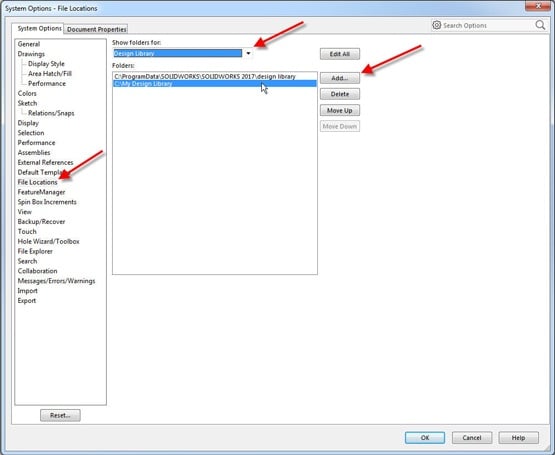
Before we get started, you’ll first want to create a custom Design Library directory to save everything into, whether on your personal hard drive or on a server to share with colleagues. You will reference this location in your settings [Tools > Options > File Locations > Design Library].
Now when you go to the Design Library tab in the Task Pane you will find a folder to the directory you linked. Right click on this and create a new folder.
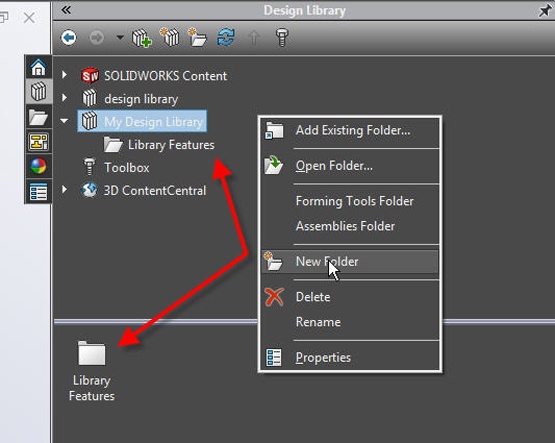
With the folder structure in place you are now ready to create your library feature.
Step 1: Create a Place Holder Extrusion
Begin by creating a place holder extrusion, similar to the geometry you plan on inserting this library feature onto. In this particular example I commonly create a vent sketch on rectangular faces so I will use this type of shape as my place holder.

Step 2: Sketch the Geometry
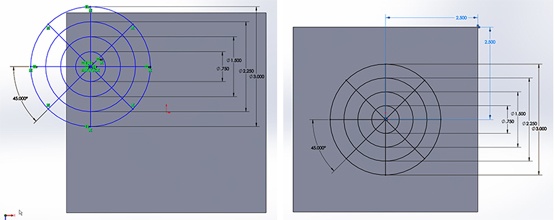
Sketch the geometry you will be using with the library feature. As you create the sketch you should avoid creating relations tied to the origin of this place holder model, otherwise SOLIDWORKS will attempt to use this as a Reference when re-using the feature. You can either sketch off to the side or as you sketch hold the CTRL key on your keyboard to avoid creating a coincident relation to the origin.

Step 3: Define Sizes of Sketch Entities
Next, fully define the sizes of your sketch entities if necessary. You want to make special considerations for the dimensions or relations controlling the geometry’s position in space. These References will be used when we turn this into a library feature in a few steps.
Because I typically dimension my vent off of edges of rectangular faces I will dimension the center position of my vent with this in mind. Note that even though the center is on top of the origin there is no coincident relation to it. As an alternative option if you would prefer to drop the feature onto any geometry regardless of its edge conditions you should not use these locating dimensions/relations and should instead leave the sketch under-defined. I often leave my sketch under-defined when creating a logo as shown in the final step of this article.
Step 4: Create Features for Library Feature
From here you can create your cut or boss/base feature and any additional features you would like to incorporate into the library feature. You do not need to limit yourself to one sketch or one feature. How far you go is up to you. In my example the sketch is all I need.
Step 5: Drag Feature(s) into Folder within Design Library
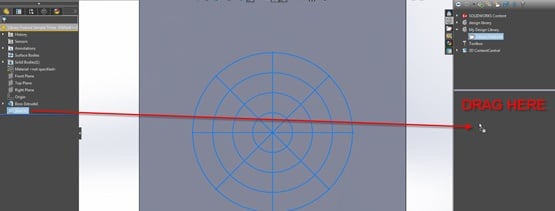
When ready you will left click on the feature(s) to be used and drag them into the folder within your Design Library. In this step you do not want to include your place holder feature(s).
Step 6: Define Design Library Saving Preferences
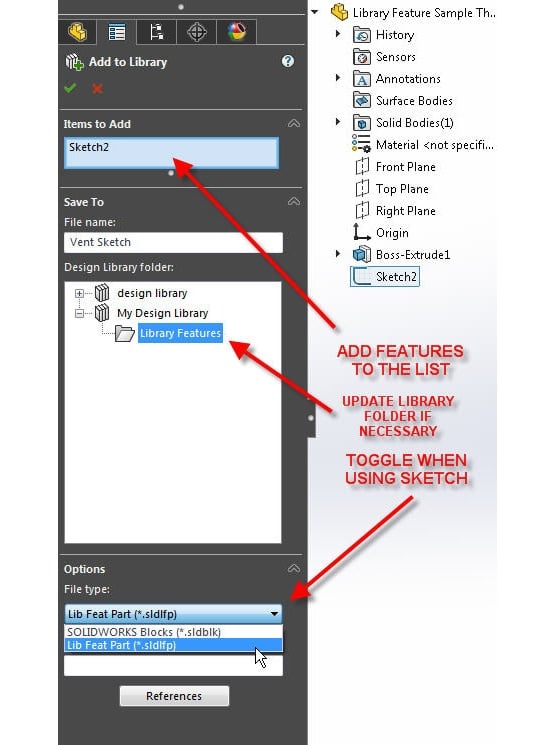
The “Add to Library” PropertyManager should appear on the left allowing you to define what, where, and how you want to save into your Design Library. If you missed any features you can still add them to the list. For the File Type dropdown you will choose “Lib Feat Part (.sldlfp)”.
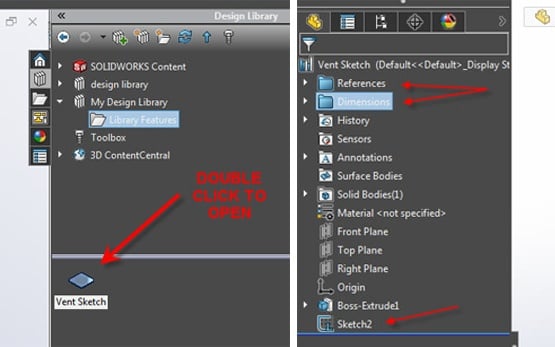
Step 7: Open Library Feature Part
Once complete you will see the Library Feature Part in your Design Library. Save your original model if you wish, but you will want to close the original file and then open the Library Feature Part by double clicking it. You will notice there are some unique folders in the feature tree and all of the library features will have an “L” over their icons.
Step 8: Add Additional Features to Library Feature Part (Optional)
If you wish to add additional features to the Library Feature Part you can always right click on them in the tree and choose “Add to Library”. An “L” should appear over the feature’s icon.
Step 9: Move Dimensions into Locating Dimensions Folder
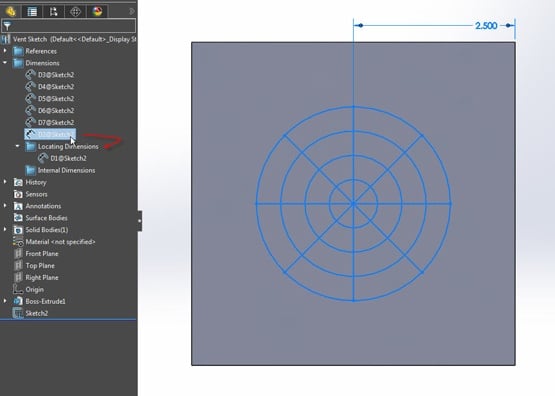
If you want an easy way to modify the Locating Dimensions when you use this library feature in a new part you will want to move the appropriate dimensions into the Locating Dimensions folder. These will be used later in step #13. The Internal Dimensions folder is further explained in step #14.
Step 10: Drag and Drop from Design Library to Model
Save the changes and close the Library Feature Part. You are now ready to use your library feature in a new model. Simply drag and drop from the Design Library onto your model.
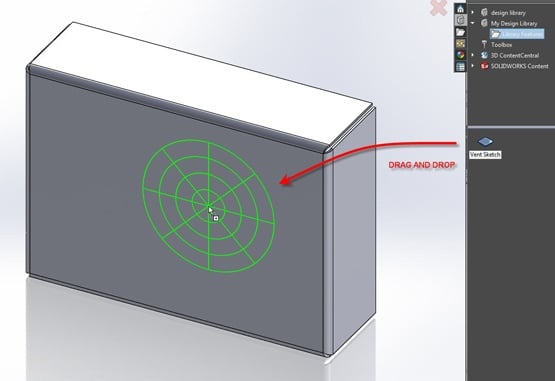
Step 11: Define Face/Plane to Place Feature Onto
The Property Manager that appears will allow you to further define which face/plane you wish to place the feature onto. If the library feature has configurations you can choose it from the list. There is also a Link to library part option which will cause the feature to update in the future if the Library Feature Part is ever changed.
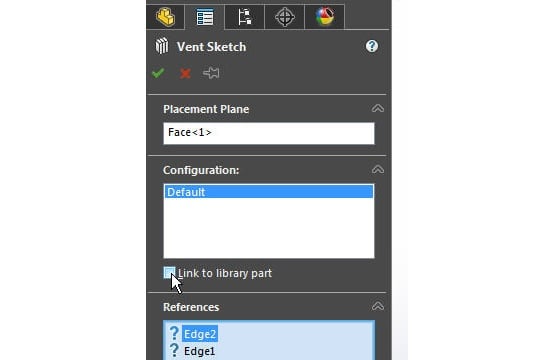
Step 12: Select the New Edge to be Referenced in New Model
The References will list the geometries you used for positioning purposes (from step #3). Select each item and a small window will appear showing the original model. Within this model it will highlight the original edge referenced by the first dimension/relation. Within your new model you will need to select the new edge to be referenced. In my example I dimensioned to the edges of the rectangular face to control the vent position so I need to select the appropriate edges in my new model. If there were no references used in the original part there will be nothing listed here.
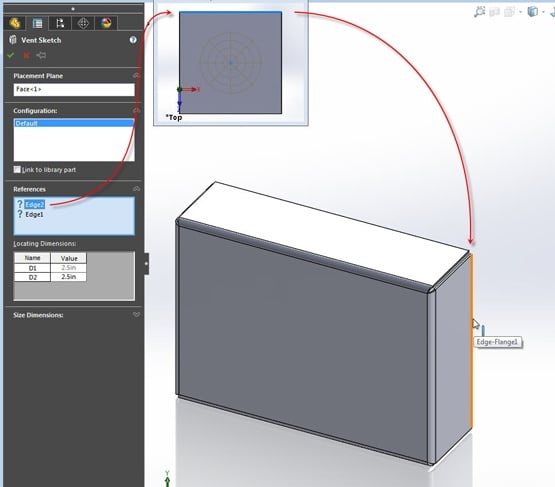
Step 13: Adjust Dimensions Further in ‘Locating Dimensions’ Folder
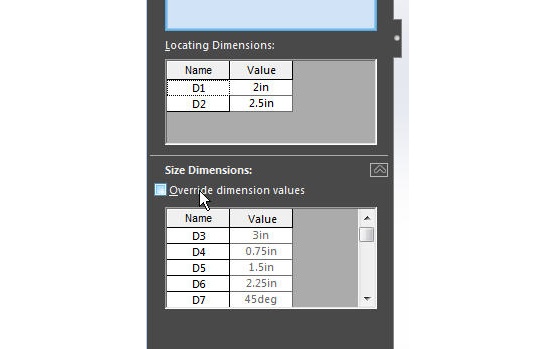
Because I placed dimensions into the ‘Locating Dimensions’ folder within the Library Feature Part (step #9) I can easily adjust them to further control the position of my feature.
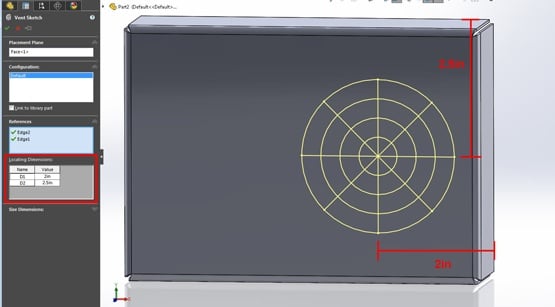
Step 14: Add Dimensions NOT to be Changed to ‘Internal Dimensions’ Folder
Under ‘Size Dimensions’ you can check the box to override the original dimension values. If there are any dimensions you do not want the ability to change you will want to add them to the “Internal Dimensions” folder referenced in step #9.
Step 15: Confirm to Add Library Folder into FeatureTree
After you confirm the options you will see a Library Folder added into your FeatureTree. Within this folder will be the library features.

In my example only the sketch carried over but you can see in the example below we can incorporate as many features as we want when creating these Library Feature Parts. For additional examples to spark ideas on how you could apply this tool I would encourage you to look at the samples in the default Design Library which comes pre-installed with SOLIDWORKS. They are found within the ‘Features’ folder.
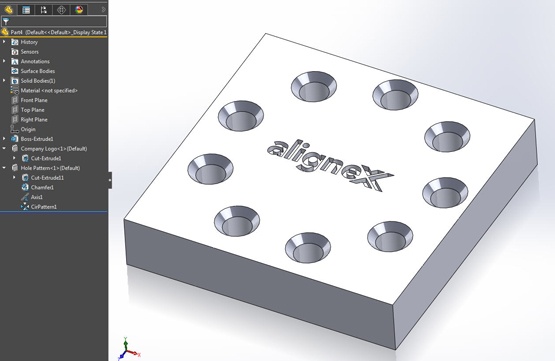
You will notice above I created a Library Feature for the Alignex logo. If you wish to create your company logo in SOLIDWORKS you can find out how in our Smooth Sketching Using Splines in the SOLIDWORKS Sketcher article. Thanks for reading!
Written By: Jesse Butwinick, Application Engineer at Alignex, Inc. Jesse is a regular contributor to the Alignex Blog. Find more tech tips on the Alignex Blog and subscribe to get content like this delivered straight to your inbox.


