
Halloween is upon us and with my young nephews staying for the weekend I’m looking for any way possible to stop them from wrecking my house. To do so I decided it might be time for us have a dig around in the cupboards for something to do. The back of my cupboards revealed a bag of gingerbread mix, one small issue being I didn’t have any Halloween themed cutters and some how a Halloween reindeer shape didn’t seem quite appropriate. Thankfully as I subscribe to 3DEXPERIENCE SOLIDWORKS for Makers I knew I’d be able to quickly throw together some cutter designs that I could then 3D Print and use to shape some cookies. Now I’ll make clear if I hadn’t have had a 3 and 6 year old in the house without any car seats to take them anywhere I would have probably like most people headed to the local shops to buy some cutters.. and while the designs I’m about to show may be simple they show how easy it is to make some cookie cutters quickly come to life. This could be a great way to make your own custom shapes for say a Holidays, weddings or birthdays, where you wouldn’t be able to simply buy that shape off the shelf.
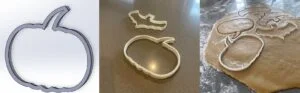
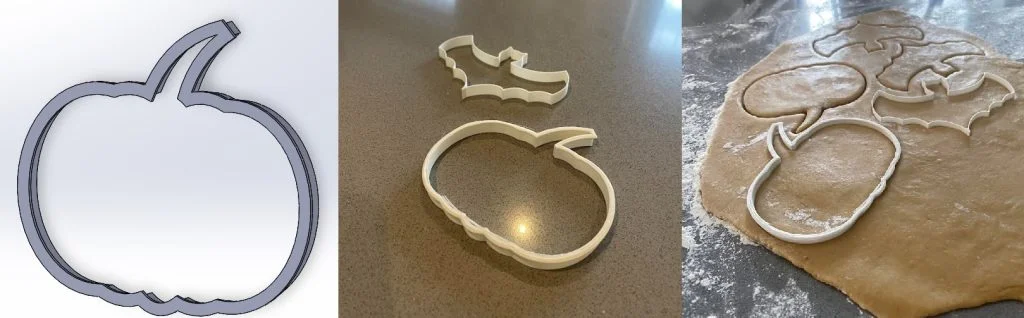
The first thing I needed to do before getting started with the designing element of this project was to get some agreement from my nephews on what shapes they wanted us to make, not an easy task as any parent will agree. We settled for a pumpkin, very classical and a bat. I added a ghost into the mix just so we had another shape to play around with. I headed to google to find myself some free opensource templates from which we’d be able to create our cutter designs. I then saved these into the file directory I’d be working from. Firing up 3DEXPERIENCE SOLIDWORKS for Makers I headed straight to the sketch tool bar creating a new sketch on the top plane, I always try to use the plane closest to that of the orientation of the product or item, I Just find it not only easier to visualize the design, but it also makes it easier when importing into assemblies! On this sketch plane I used an amazing tool called sketch picture, this tool allows you to import artwork into the sketch plan making it easier to trace outlines, I often pair this with the auto trace tool to select areas to convert into a sketch. On this occasion though I used simple sketch tools such as splines to follow the outline of each design.
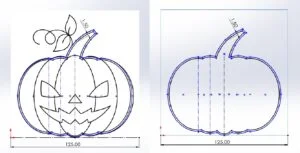
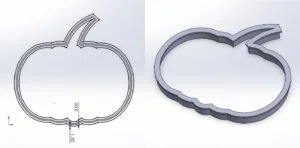
I find SOLIDWORKS sketching to be easy once you’ve got to grips with what I call the shortcut tools such as mirroring, patterns (Linear and Circular) and the use of centerlines for reference points. For the pumpkin design I set a centerline across the broadest part of the pumpkin before adding a central oval and then repeating this process twice more to get the outer shape locked in, from here I used the power trim tool to quickly remove all the extra non needed lines. With one half of the pumpkin sketched out I simply mirrored this around the centerline. The last part of this design was to add the stalk of the pumpkin, again tracing the outline of the sketch picture using some splines. From here I used the offset command to create a second line 1.5mm apart from the original sketched line.
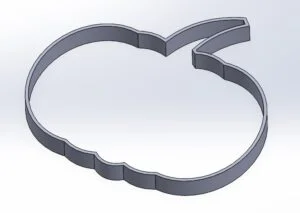
Now that I had the wall profile sketched out I used the extrude command to create a 10mm high wall. I had some worry that the thinness of this wall profile would twist when pushed into the rolled dough so I opted to create another sketch on the top of the created wall before offsetting the edges 1.5mm to create a flat brim like surface which would provide some rigidity to the wall. I extruded this 1.5mm again to create the material. The final feature which I wanted to then add was a pair of chamfers to the bottom of the wall surface, this was intended to help move the dough out of the way as the cutter was pushed into it. I selected both edges and used the chamfer tool to remove 0.5mm of material at a 45-degree angle from both edges.
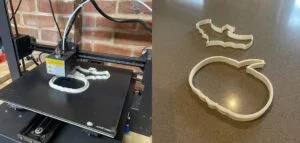
For the other two designs I repeated the process, however, for the bat design I couldn’t find a shape I liked so I decided to wing it and freehand my design straight into the sketch. With the designs completed I saved these as an STL file for 3D printing before heading into my slicing software to prepare these files for printing. With my files converted and my G-Code program in hand, well my SD card containing it in hand I headed towards the workshop and turned on my 3D printer. After fielding a host of questions on 3D printing, how it worked and what it could be used for, we finally got the printing underway! Luckily as we’d kept the designs small the print only took 50 minutes to complete.
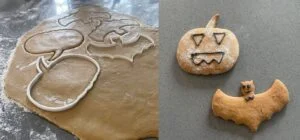
With the cutters printed and support material removed it was time to get to the baking part. We followed the simple instructions on the pack before rolling out to around 5mm in thickness. I got the boys to use the cutters we’d designed and printed to cut a number of cookies in their chosen shapes, these were then placed in the oven for around 10 minutes before we left them to cool. We then mixed up some black icing to decorate with, with the lack of a piping bag we got inventive here and used a zipped storage bag with the corner cut off! The results are below, the cutters worked well but we probably need a lesson in decorating using icing!
Thanks for reading this blog, I hope you enjoyed the read and are thinking of cookie shapes your going to design! Checkout the video below.