
In “Dabbling in Dimensions – Part 1” I briefly covered the “Modify” dimension box, or “the classic look” as i called it.
In this blog post I will cover the Instant version of the dimensions.
Within SOLIDWORKS you have 2 types of instant dimension, Instant2D and Instant3D. Both of them are very strong tools once you get used to using them.
Defining the Dimension
To switch on the Instant2D or the Instant3D you need to activate it in SOLIDWORKS.
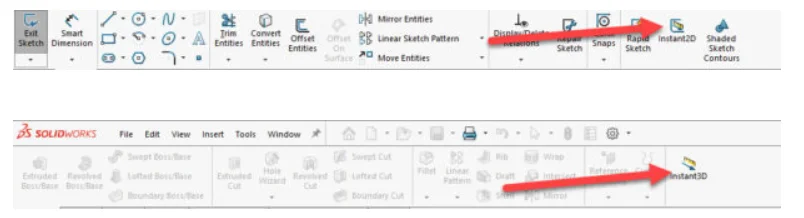
The buttons can be found in your toolbar:


If you often switch between the standard dimension box and the Instant version, you can setup a keyboard shortcut.
This will make it much easier to switch between the two dimension tools.
Instant 2D (introduced in SOLIDWORKS 2016)
The Instant 2D is a sketch feature that allows you to quickly modify your dimensions in a more organic way, than the standard “Modify box.
When using the instant 2D you have 2 options for modifying your dimensions: Insert the dimension and drag the dimension to the desired location.
The “Instant dimension box” however has its limitations.

As you can see, you do not have the same options in the instant version as you have in the “Modify” version.
This is not the only option you have when using Instant2D.
You also have the possibility to drag your measurement, quite precise to the desired location.
Just left click and hold on the edge of the dimension arrow and you can drag the dimension into place.
As you can see you have an on screen ruler, that becomes more precise the more you zoom in.
If you drag it past “0” the dimension adapts.
Also note if you double click on the tip of the dimension arrow you access the “Modify” dimension box.
Instant 3D (introduced in SOLIDWORKS 2011)
The Instant 3D is a very similar to the instant2D version, but a much more advanced modeling tool, that allows you to shape your model in a more intuitive way that using the “modify box”.
The tool has several different uses, and can be used on parts, assemblies and weldment parts.
Modify
You can modify the your existing 2D and 3D dimensions in the same way as you can when using Instant2D. One thing to remember is to rebuild the part if the “modify” box has been used.
Create Extrusions or Cuts
You can uses existing sketches to create extrusions or cuts in your model.
Simply click on the sketch and drag the arrow in the desired direction. You can even change an extrude to a cut and vice versa (of this is possible in according to the model)
Edit Live Section Plane
The Instant3D feature is also used to modify Live section planes.
These are very useful when you want to edit some of the features of your design that is not easily accessible
Simply insert the plane using “insert”->”Reference Geometry”-> “Live Section Plane”.
Now you need to place it, using the tools in instant3D.
Once the plane is in the desired location, you can activate it and modify the features that is intersected with the plane
Bonus: Mirrored Features
You can use the Instant 3D functionality to edit mirrored features.
Note that when manipulating the original feature you get the dimensions of the feature.
No dimension is visible when manipulating the mirrored feature.
This is all I have for now regarding dimension boxes.
If you have any requests on a an in-depth look of SOLIDWORKS features, please let me know and i will look into it.