

When working in SOLIDWORKS you have a few options when working with the dimension box.
You have the classic dimension box and you have the Instant2D (introduced in 2016) and the Instant 3D.
Which one you wish to use is of course entirely up to you, but as you will see in this and later a follow-up blog post, both types have their advantages.
In this blog post i will go through the “Classic dimension box”, and the options you have when using it.
In a later blog post I will go over the “Instant” version of the dimension.
A Classic look.
Most users know this dimension box, but not all people know about all the possibilities you have with the dimension box.
Basically an analysis of the dimension box can be broken down into seven segments.
These are:
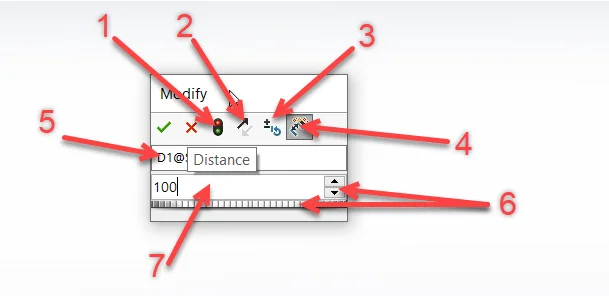
- Regenerate Model
- Reverse Direction
- Change Increment
- Mark for Drawing
- Name Dimension
- Increment Dimension
- Dimension Field
Of course you have the “accept” cancel option but these are the segments most people use, either by using the buttons or the shortcuts (ENTER and Escape).
In the following section I will go through the different segments, and try to explain what they can be used for and give examples. But as with most things in SOLIDWORKS “If you try it, you will master it” (this is not the official SOLIDWORKS mantra, only mine), so try it, play around and you will find that the dimension box tool is very useful.
Regenerate Model
You have the option to rebuild the model (or “Regenerate Model”) with newly inserted dimension to see if provides the desired result.
This way you do not need to open the dimension box several times if you need to change the dimension, or if you use the calculator (see item 7.2) you can easily review the result.

Reverse Direction (of the dimension)
On occasions it can be useful to flip the direction of the dimension in the text box. By pressing this button you are able to do just that.
One thing worth noting is the way the dimension behaves if you edit it in the 3D model instead of within the 2Dsketch.
Change Increment
This button gives you the option to indicate how much you want the dimension to increase/decrease when you press the increment button (see segment 6).
Usually your increment is controlled in “Tools”->”Options”->”System Options”->”Spin Box increments”.
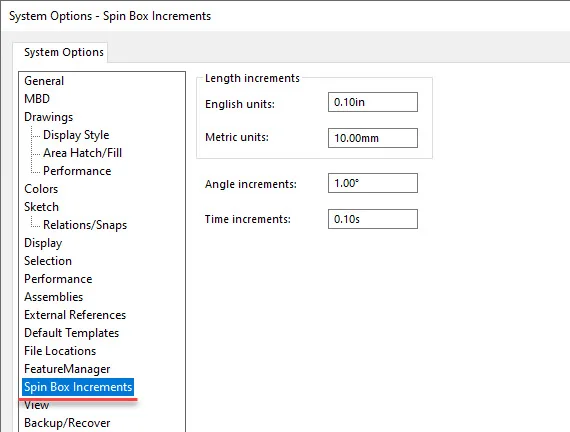
but sometimes there are exceptions to the rules, which is where you need to change the increment, and in this particular file you might need the increment to be a little higher or a little lower. See the below video for demonstration.
When setting the spin box increment, you have the option to press “make default”. This will change the increment in the system options and use it a standard setting. When you shut down SOLIDWORKS the “change increment” setting in the Dimension box, will be reset to the standard increment.
Mark for Drawing
This button Is activated by default, and gives the option to select/deselect if a drawing is to be inserted automatically into a drawing view.
Either when the view is created (see this LinkedIn post for further detail) or when using “model item”, as shown in the below video.
Name the Dimension
The naming of a dimension is particularly useful if you want to refer to it,either by another dimension in the sketch, or when using equations. (see video)
If for instance, you know that this is the height of the part, it will be much easier to refer to it by the name “Height@Sketch1” than by “D35@Sketch1”.
Increment Dimension
These are the two options where you can increment the dimension by using the arrow,or by using the slider underneath the dimension.
As you can see in the video, it is possible to increment or decrement the dimension past 0, meaning a negative dimension is possible.
The Dimension Field
In the dimension field you can of course insert the needed dimension.
However, you also have some other options in this field, other than “just” your dimension.
Units
If you have your drawing in mm, and you have measurement in inches, you can type in the measurement in inches and write “in” after the dimension. Your inch dimension will then be converted to a mm dimension according to the drawing.
Note that if you delete the “standard measurement” you get the option to choose from a list of supported unit types.
The abbreviations in the unit type stands for: a: Angstrom cm: Centimetre ft: Feet in:Inch uin: Micro inch m: Meter um:Micrometer mil: Mil mm: Millimetre nm: Nano meter
Calculator
Moreover the text field also operates as a Calculator, which can be used to make your SOLIDWORKS model more dynamic.
The calculator has some predefined functions for instance: Cosine, Sine and Tangent (see the complete list here).
If you start your dimension by inserting an equation (=) sign it activates the calculator.
This gives you a wide range of possibilities to make your model more dynamic.
But be careful not to overdo it, as too many equations and calculations can give prolonged opening time of a file.
I hope that you found this brief introduction of the dimension box useful. As mentioned previously I will, in a later blog post, cover the advantages of using the “instant” version of the dimension