

Thanks to you, our customers, the SOLIDWORKS® browser-based roles are continually progressing to be a powerful toolset. The roles are purpose-built for your needs and include parametric modeling, subdivision (Sub-D) modeling and much more. In addition, since they run on the 3DEXPERIENCE® platform, you also get built-in data management and collaboration capabilities that benefit the whole team.
I recommend getting your hands on as many as possible and I encourage you to look at the SOLIDWORKS Cloud Offer as it includes all the browser-based roles: 3D Creator, 3D Sculptor, 3D Structure Creator, 3D Mold Creator and Manufacturing Definition Creator, to get the best bang for your buck.
The latest enhancements in these solutions include 2D drawing improvements, smart mates, net surfacing, and more to help you be as productive as possible, in addition to improving downstream communication for manufacturing.
Let’s have a look at this year’s top 10 enhancements.
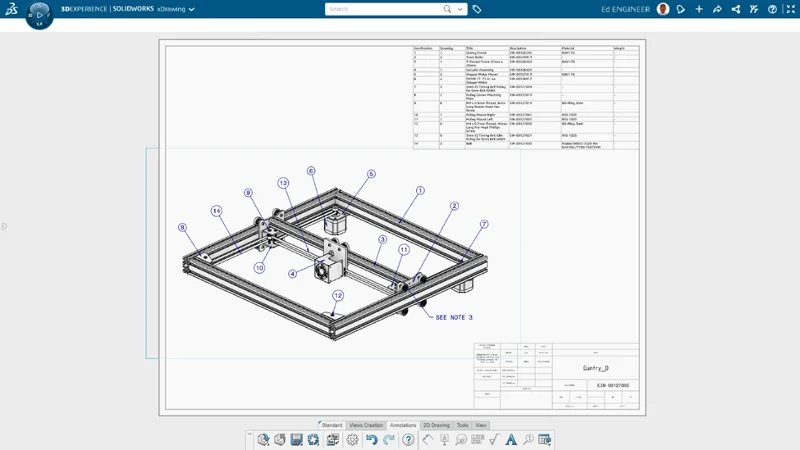
- 2D Drawings | Manufacturing Definition Creator – easily create both 3D definition and 2D drawings to meet supplier requirements faster.
Manufacturing Definition Creator is a unique solution that enables you to easily create both 3D product manufacturing information (PMI) and 2D drawings. This role enables you to easily use a model-based definition (MBD) approach or a 2D approach, breaking down the barrier between 3D and 2D. It allows you to leverage model-based workflows while also providing the flexibility to preserve existing manufacturing processes and supplier relationships that still use 2D drawings.
With Manufacturing Definition Creator, you don’t have to create a 2D drawing from scratch, you can use your existing 3D PMI to create a 2D drawing complete with definition, in a matter of a few mouse clicks.
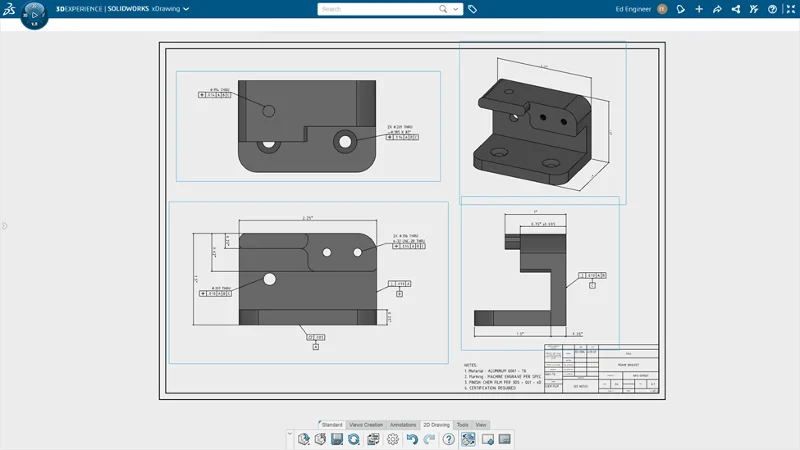
Learn more in this blog.
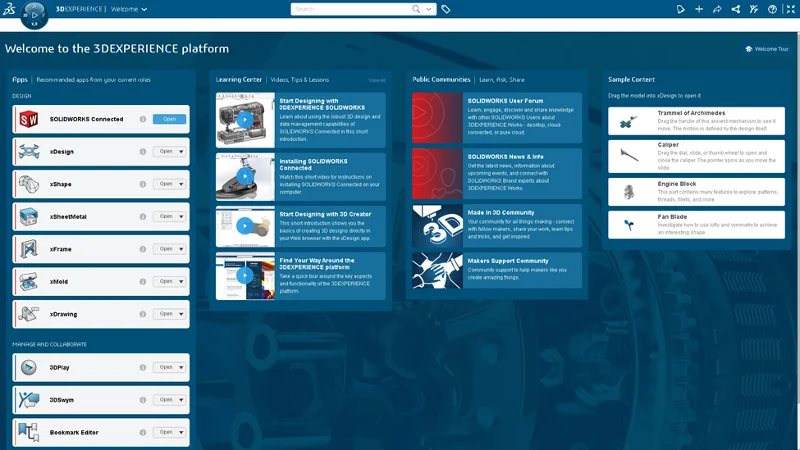
- Welcome app | 3D Creator – Easily get up to speed quickly on your new solutions with a personalized welcome experience.
Whether you’re a new or novice user, the Welcome app in the 3D Creator parametric design role is going to help you get up to speed on your roles and apps fast. Directly from the app you can access beneficial resources, such as tutorials, the SOLIDWORKS online communities and even switch between your roles. For instance, in the Learning Center, you’ll find tips for getting started, short video tutorials, and access to more in-depth learning tutorials. It also features Sample Content where you can drag and drop a model to your interface to check out the role’s modeling features.
In addition to launching your roles, you can open your collaboration and management apps, such as 3DPlay, the Bookmark Editor and more right from the Welcome app.
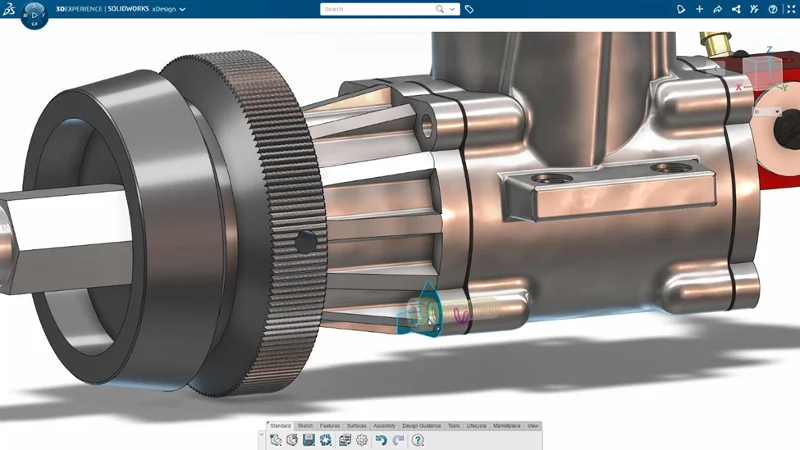
- Design Assistant Smart Mate with Artificial Intelligence (AI) | 3D Creator – put assemblies together faster.
The Design Assistant Smart Mate is one of many AI-enabled features that uses built-in machine learning algorithms that offer design guidance based on your workflows. This tool is designed to help you create mates by dragging and holding a component in the position where you want it to mate with the surrounding components.
The Smart Mate command will automatically launch when you drag a component close to another components edge.
Learn about other AI features in this blog.
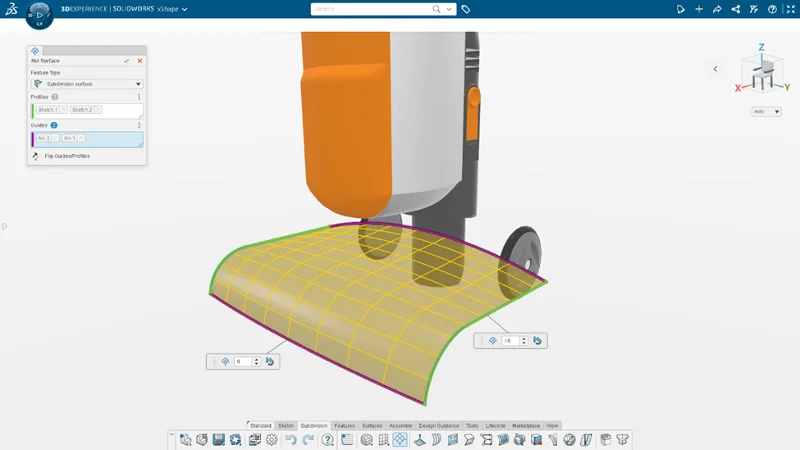
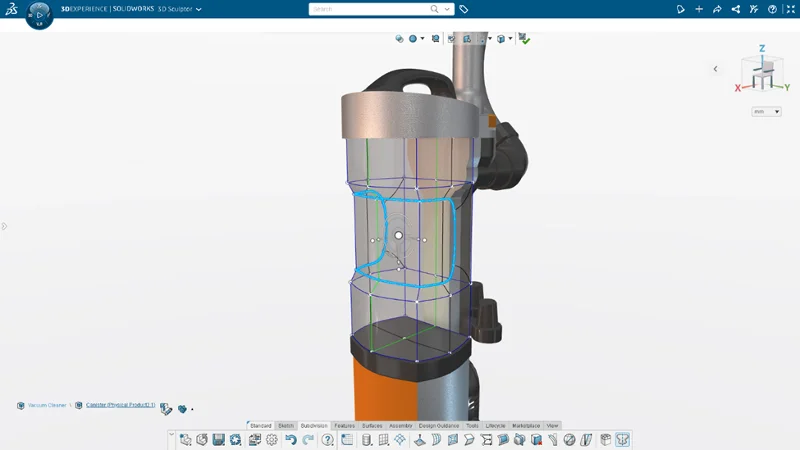
- Net Surfacing | 3D Sculptor – easily create a subdivision surface using familiar CAD operations.
Create your own primitives using a loft, a boundary condition, or a sweep with the Net Surfacing Command in the 3D Sculptor Sub-D modeling role. Start by defining a surface using familiar parametric commands. Then use freeform Sub-D modeling to modify the shape of your customized primitive. You can also toggle between the customized parametric surface or subdivision surface. To increase design efficiency, choose pre-defined primitives or create your own with the Net Surface command.
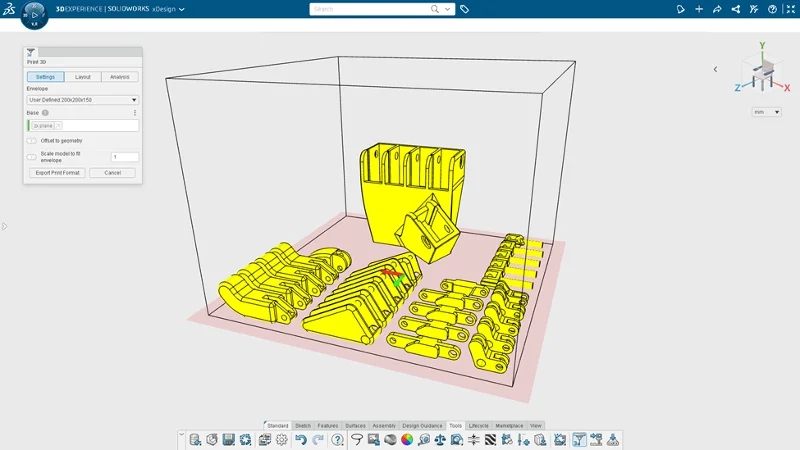
- 3D Print Orientation and Nesting Optimization | 3D Creator – automatically set your parts up for success and save time on 3D prints.
The Print3D feature gives you the option to auto-arrange a selection of parts on the 3D printer build plate. This saves you the time of not having to do it manually, and helps you get the most efficient layout of your assemblies. This feature also helps reduce material costs.
- BOM Tables | Manufacturing Definition Creator – define your assemblies with clarity and provide critical assembly information.
Provide more valuable information with your 3D definition and 2D drawings with the ability to create and include a bill of materials (BOM). Automatically link BOM table values directly with ENOVIA® for consistent, up-to-date information.
Customize your BOM tables using familiar table editing functionality and provide a wide range of linked assembly properties, such as part quantities, revisions, part numbers, etc.
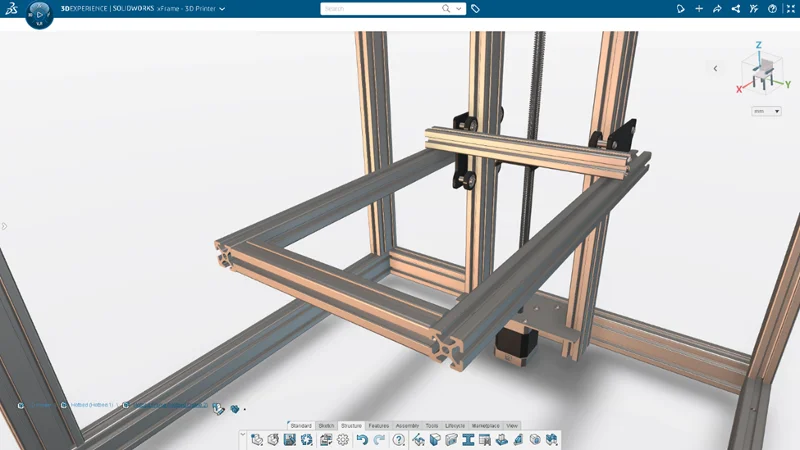
- Automatic Corner Trimming | 3D Structure Creator – save time by automating corner trimming processes.
Create accurate, manufacturing-ready structure designs, and do it quickly with 3D Structure Creator. The Automatic Corner Trims feature is just one of the time-saving capabilities. It enables you to automatically trim members during member creation, so you don’t have to do this after you create the members. Easily create members based on sketch segments, model edges, points, or intersection planes, or between two members, and check Enable Automatic Corner Trims to trim corners and end points.
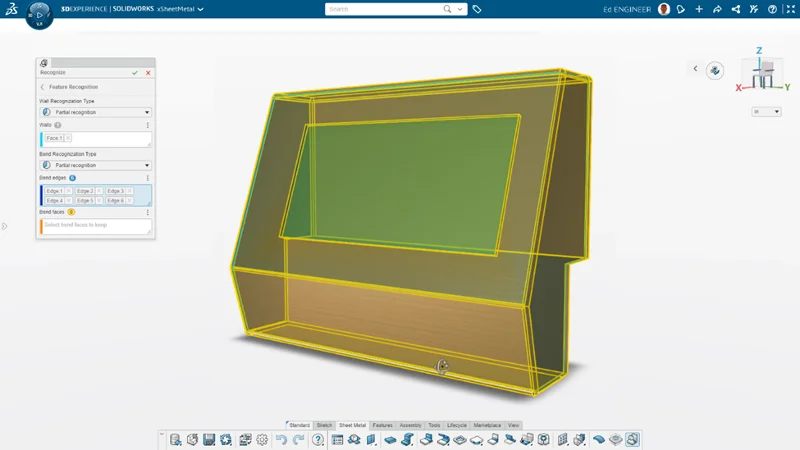
- Recognize Command | 3D SheetMetal Creator – increase productivity and create complex sheet metal shapes using traditional modeling features.
3D SheetMetal Creator features easy-to-use associative parametric sheet metal design tools. The Recognize command, for instance, includes solid and surface options so you can easily create complex sheet metal shapes and reduce complex design workflows. In addition to the “thin” option, you can convert solid bodies and surfaces with automatically generated flat patterns for manufacturing that doesn’t require shelled or uniform thickness geometry.
You can also customize bends, walls, splits, gap distances with a single command.
- Selection Accelerators | 3D Sculptor – speed up your selections and easily shape the sub-D mesh.
There are several new selection accelerators you can access from the context toolbar and by using shift select.
If you need to select a group of tangent edges or faces, you can use the Select Tangency accelerator on the context toolbar. If you need to select edges around the face of a box or quad ball, there’s a Corner Loop accelerator that lets you shift select two edges on either side of a corner to select the entire loop. And for creased edges, you can use the Select Crease accelerator on the context toolbar so you can select connected creased edges. Also, shift select will follow along creased edges.
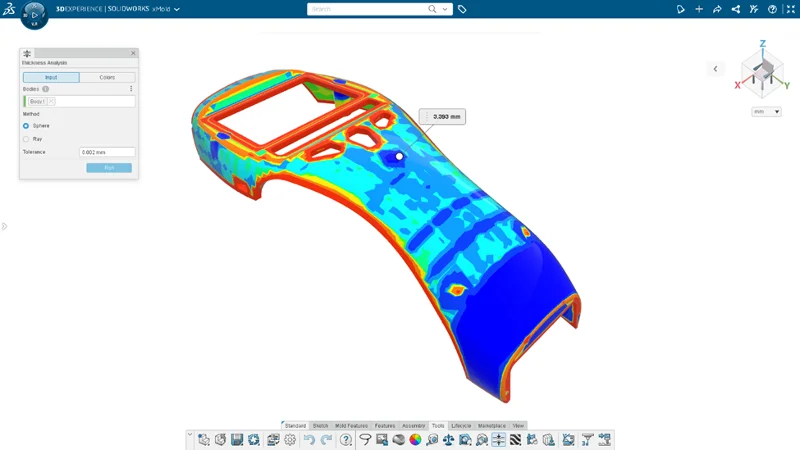
- Thickness Analysis | 3D Mold Creator – ensuring uniform thickness and improve design integrity by verifying that parts will fill properly.
3D Mold Creator provides specialized mold tooling design functionality that enables faster, automated and more robust design of mold core, cavity and inserts. The Thickness Check tool, for instance, enables you to perform thickness checks using a rolling ball “sphere” method or the normal distance “ray” method. You can easily identify the thickness range using colors, in addition to manually investigate thicknesses at specific locations by clicking on the area you’d like to investigate.
That sums what’s new in 2022, but remember we’re always adding updates throughout the year and looking for your feedback so let us know what you think.
Learn more about the top 10 enhancements in our browser-based roles here.
To see what’s new in SOLIDWORKS 2023 check out: https://www.solidworks.com/product/whats-new or click on the banner below.
And in case you missed any of the updates we’ve done in 2022, you can read the following blogs below:
2022 Recap of browser-based role enhancements:
July 2022 Update
April 2022 Update
February 2022 Update
./brands/solidworksblog/2022/02/whats-new-3dexperience-works-design-2022-february-update.html
