
Following on from the design phase of my Workbench project, stage two was the manufacturing phase. If you haven’t read the first part of this project, you can find that here. I’m a strong believer that proper planning gives a proper result so, in my usual engineer mindset, I set about calculating the best yield from the least material. A simple handwritten list of lengths revealed per bench that I would need 4 lengths at 1500mm, 4 lengths at 800mm and 8 lengths at 520mm. For the bench design with the rear panel, I’d need 2 additional lengths at 595mm. There’s a load of great tools online which calculate the best nesting pattern for your entered lengths from standard stock lengths of material. They will even let you add the thickness of your saw blade (Kerf) to the calculation, so you’re not left a few millimeters short when you come to the real cutting. From the calculation I knew I’d need 5x3600mm lengths and 2x 2400mm lengths of 45x90mm material and 4x3600mm lengths of 45x120mm material giving me an overall utilization figure of around 93%.
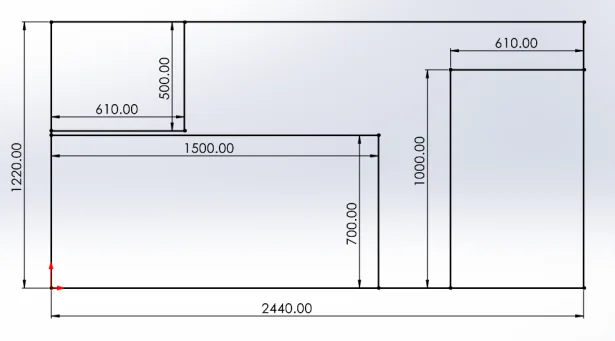
For the top and bottom worktop pieces I jumped back into 3DEXPERIENCE SOLIDWORKS and created a sketch. I drew a rectangle equal in size to that of the sheet material. From here, with some playing around, I sketched the sizes of the top surface followed by the bottom surface. I made an executive decision to split the bottom surface into two pieces; one at 500mm long and the other at 1000mm long. I chose to do this on the bottom surface as I wanted to keep the top surface join free not only as it would look better aesthetically but because the join would likely allow dirt and mess to fall onto the lower areas of the workbench. The resultant sketch told me that I’d need 2 full size (2440x1220mm) sheets of material to get the needed coverage. Not the best utilization at around 75% but I’ll use the offcuts for another project in the future.
I jumped in the car and headed to my local hardware shop, list in hand eager to get started on the build. Anyone in the UK will admit we’re not quite as well setup for moving building materials around as our friends in the USA. By this I mean our cars are small and any chance of moving a full sheet of timber around usually involves paying a hefty delivery fee and waiting several days if not weeks for it to eventually turn up damaged. Luckily my hardware shop of choice offers to cut sheet material to size and with my 3DEXPERIENCE SOLIDWORKS sketch printed in hand and sheet material on my trolley I headed off to the cutting area.
To say the employee was impressed when I handed over my printed sketch of what cuts I needed in what order would be an understatement. I probably should have mentioned I’d need the same cuts on both of the two boards before watching him have to reposition the saw to the same measurements twice, but we live and learn! Up next was car Jenga which thankfully was uneventful and with the materials deposited in the workshop it was time to get going with the build.
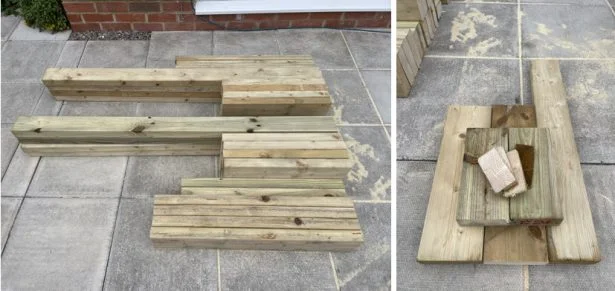
Grabbing my printed cut lists and set about cutting all my structural material to length, sorting into sets as I went. Scrap was minimal as calculated (shown below).
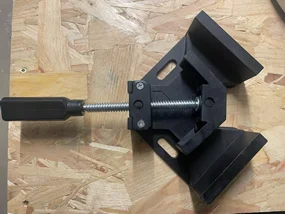
I planned to build the upper and lower frames first before joining together with the uprights. For the longest 1500mm lengths, I marked where the bracing pieces would be secured before I started the assembly process to make this flow better without having to keep stopping and marking but I ended up double checking with a tape measure. To keep everything as square as possible I used some corner clamps. If you’ve not seen or used these before, they’re nothing short of amazing. They not only hold your material tight as you screw it together, but they also centralize and square up your joints making framework like this much easier and faster to do.
Once I had the two sets of frameworks completed, I had to get creative with how to connect them together with the uprights. With the frames on the floor side on, I then secured the uprights to it using a single screw to act as a hinge. Once I was happy all corners were aligned correctly, I added another 2 screws to lock the joints into place. All my connections were made using 4x70mm wood screws with a pilot hole drilled to aid the process.
I installed the castor wheels at this point, as I didn’t want to get myself into a situation where I had all the framework and worktops installed and could no longer turn or flip over the assemblies. I always assign material in SOLIDWORKS Parts when I’m going to be building the part for real. This allowed me some good insight that the full assembly was roughly 35kg. Manageable, but due to the size of the assembly geometry I didn’t want to take the chance. From this point I installed the lower worktop followed by the upper worktop, again securing with screw fasteners in a slightly smaller size than those I had used on the framework.
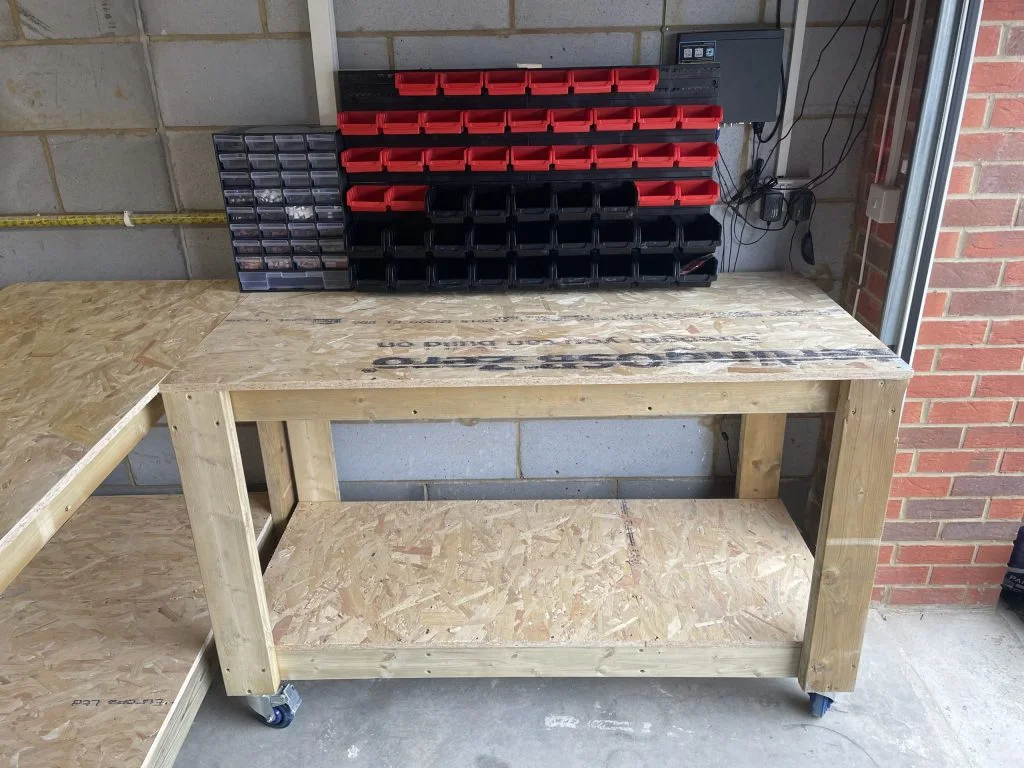
For one of the workbenches, we’d reached the end! Completed and pushed to one side while the second neared completion, I just had the panel supports and bin panel to add. Again, measuring and marking first I then installed the two final pieces of framework before securing the metal panel in place using the supplied fixings. Now came the hard part… tidying up and deciding how to arrange everything!

I hope you’ve enjoyed reading this post and following my design and build project, I’ve released a set of PDF plans and 3D model for anyone who would like to have a go at building their own work bench. Have a go at editing the model and adjusting the size of the design to suit your own available space!
To learn more about 3DEXPERIENCE SOLIDWORKS for Makers be sure to click the link!