

Hello to all,
Welcome to the new edition of the SOLIDWORKS® Support Monthly News! This monthly news blog is co-authored by members of the SOLIDWORKS® Technical Support teams worldwide. Here is the list of topics covered in this month’s Blog :
-
DraftSight®: Customize drawing title block using ‘Sheet Set Manager’ and fields
-
One-Minute-Tip: Propagating cut list properties
-
Access SOLIDWORKS® Documents Seamlessly with Platform Bookmarks
-
Configuration Publisher: Insert component configurations in an Assembly the easier way
1.DraftSight : Customize drawing title block using ‘Sheet Set Manager’ and fields
– by Gayatri KESKAR
Sheet Set Manager functionality was added in DraftSight® 2020SP2 and is one of the popular feature in DraftSight® ever since. It is a great tool to manage your drawings, sheets, views throughout the project. Most common use of Sheet Set Manager is to import drawings and organize them, so that files can be accessed easily and used for project. However many of us might not be aware of other advanced features sheet set offers. In this article we will have a look at how Sheet Set Manager can help us to add custom properties in drawing and customize title blocks with the help of Fields.
In DraftSight® there are multiple ways to create and edit our title blocks. e.g. We may insert title block as an reference and store the title block data as text within each drawing or we might use custom template file with embedded title block in it and then edit title block attributes each time to create a new drawing from the template. However above process can be tedious and error prone if we are working on a large project and our drawings have multiple project level or sheet level custom properties.
Sheet set manager helps us to automate the process of updating title block data by using fields. The fields allows to include sheet set data in a drawing title blocks hence as sheet and sheet set data changes, the title block updates. Let’s understand this in more detail:
Creating sheet set with custom template:
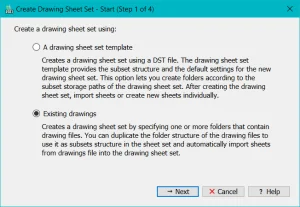
- Type command SheetSet in DraftSight® command window :This will activate Sheet Set Manager wizard in DraftSight task pane
- Click on option New Drawing Sheet Set (You can either use an existing Sheet Set file (.dst) as a template, or simply choose some existing drawings)
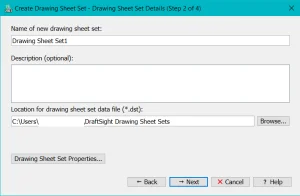
- Specify suitable name for your sheet set and location to save it and click Next.
- Browse to folder containing .dwg files that you want to add in this sheet in next window or keep it empty at this point and proceed.
- Now you can see your sheet set has been create successfully. Select the created sheet set>right click and choose New Drawing Sheet to create new drawing sheet from a custom template.
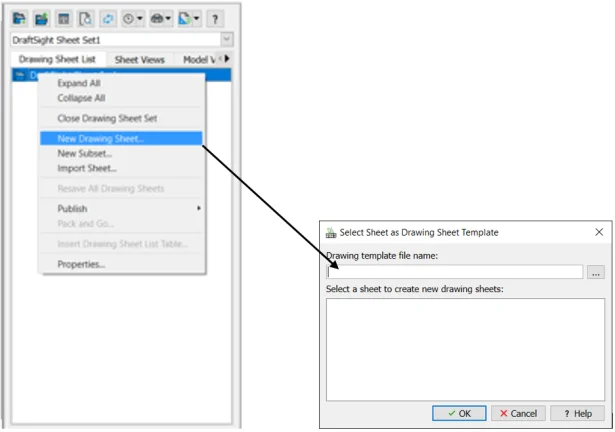
- Now you can see your sheet set has been create successfully. Select the created sheet set>right click and choose New Drawing Sheet to create new drawing sheet from a custom template.
- After specifying correct template to use in new sheet, click next and specify sheet details according to your company standard or project requirements.
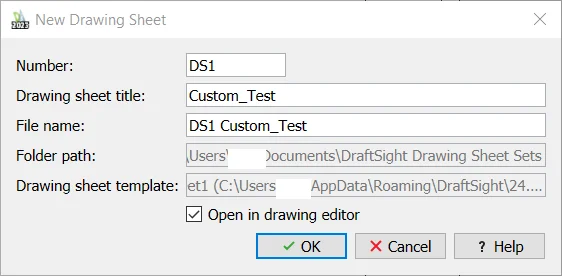
(Enable ‘Open in drawing editor’ to open sheet automatically in DraftSight® after its creation)
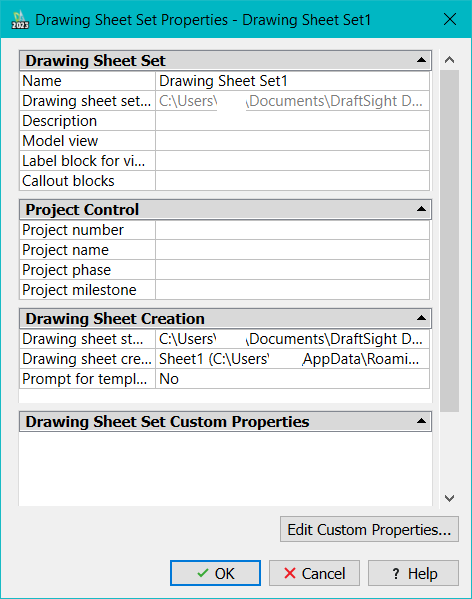
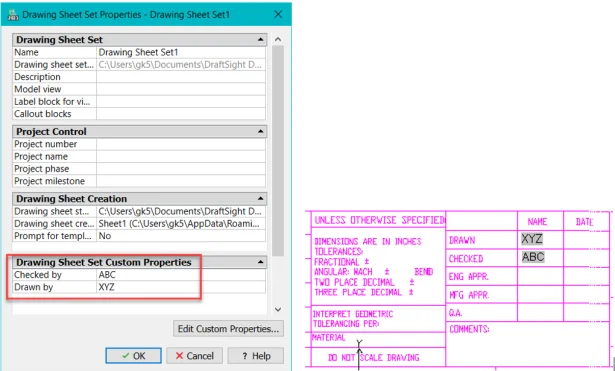
- Right click on Sheet set ‘DraftSight Sheet Set1’ from task pane>Properties. This will open Drawing Sheet Set Properties window.The Drawing Sheet Set properties includes information about the drawing sheet set data file (.dst), drawing sheet creation template, and custom properties associated with the drawing sheet set. The properties are grouped in the following categories. We can fill this information as per our requirement and it will be used for all the sheets created under this sheet set. This way we can ensure that our project uses standard template, custom properties and project information. For more details about it refer DraftSight help: https://help.solidworks.com/2023/english/DraftSight/ssm/ssm_sheet_properties.htm
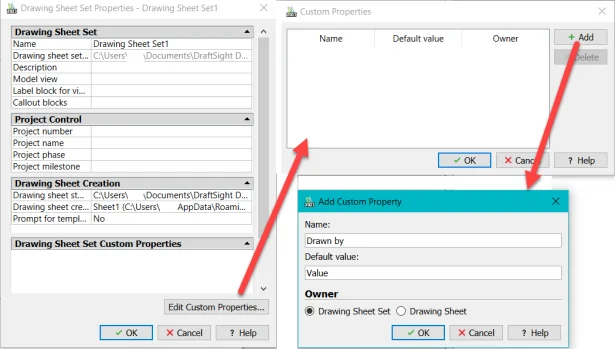
- Click on ‘Edit Custom Properties’ and add custom properties needed from the project.There are 2 types of properties can be added:
- Drawing Sheet Set: User-defined custom properties associated with the drawing sheet set.
- Drawing Sheet: User-defined custom properties associated with each sheet in the drawing sheet set.
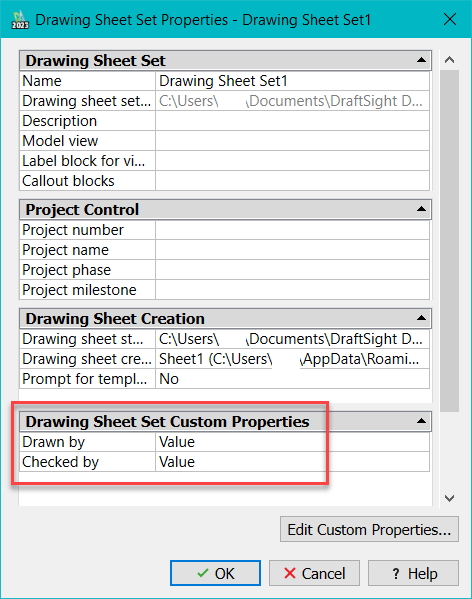
Here I created 2 custom properties for drawing sheet as below:
Now we can access these properties in Fields in a new a sheet used for creating sheet set as below:
- In a sheet (which is already open in DraftSight® after step5) type command Field. In Field window >Category select DrawingSheetSet and under Name click CurrentDrawingSheetCustom as below and we will notice custom properties that we created in step7.
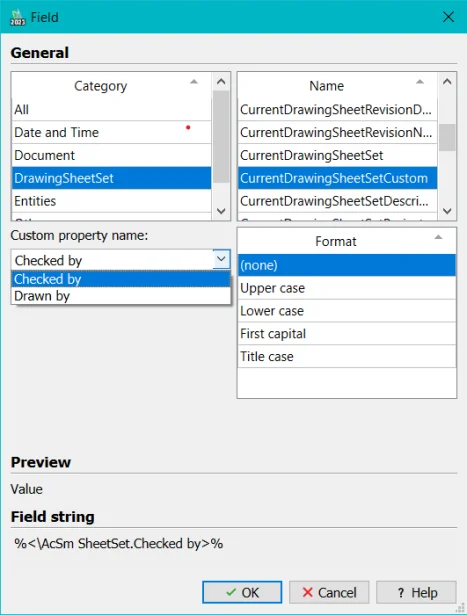
- Insert these properties one by one for relevant attributes in title block so that their values will be linked to these fields.
Now if we update values of these properties from Sheet Set Manager, their values will automatically update in title block.
By creating title blocks in Sheet Set Manager using above method we can update the information in our sheets at any time without even opening a drawings. Thus we can save lot of time and avoid mistakes that can occur while working on larger projects.
2. One-Minute-Tip: Propagating cut list properties
-by Mario IOCCO
Problem Definition: Sometimes users want to create cut list properties and propagate these properties to some or all of the other cut list folders. However, there isn’t an intuitive way of doing this. In this video, I have demonstrated the two methods to achieve this :
- Propagate the New Cut List Property to all folders.
- Use the “Property Tab Builder” to Propagate to Selected Folders

3. Accessing SOLIDWORKS® Documents Seamlessly with Platform Bookmarks
-by Bhavya JHAVERI
With R2023x FD03 enhancements, the addition of bookmarks on the platform as file locations to access SOLIDWORKS® documents like sheet formats, BOM templates, sheet metal bend tables, weldment cut list tables, revision table templates, appearances, and many more is made possible for 3DEXPERIENCE® users.
The incorporation of bookmarks as file locations can facilitate the sharing and accessibility of documents by users.
Below is a short workflow that involves the uploading and addition of a BOM template to the bookmarks, and the subsequent inclusion of it in the file locations within SOLIDWORKS. A similar workflow can be employed for the addition of other folders as well.
Once the file location is introduced to SOLIDWORKS®, a local folder is created in the system. This folder is situated under the path C:UsersPublicDocumentsSOLIDWORKS<platformID>.
In the System Options > File locations tab, the Update tool can be utilized for the management of the local content downloaded from a bookmark. The Update dialogue box is comprised of options such as Check All, Update, and Purge. These options offer assistance with the following:
- Check All: This option aids in the quick selection of all the folders to verify whether they are Out of Date.
- Purge: The locally created folder at the file location mentioned above is deleted using this option. However, it is important to note that it will not remove the bookmark location added in the file location.
- Update: This option is designed to check and update the data in the selected folders with the data available in the bookmarks on the platform.
4. Configuration Publisher: Insert component configurations in an Assembly the easier way
-by Akhil C
As SOLIDWORKS® users, you might have come across scenarios where you have to insert a component’s (part/sub-assembly) specific configuration into an Assembly. But if this components contains large number of configurations, it becomes tedious task to find the exact configuration you need from the long list, while inserting it into an Assembly.
In such cases, SOLIDWORKS provides you the ability to filter the configurations based on some filters/checklist.
For Example: While inserting a Part into an Assembly, user wants SOLIDWORKS to show only the configurations of this Part which has cut-extrude feature slot1. Using Configuration Publisher tool in SOLIDWORKS, user can set an appropriate filter and only list the Part configurations which has this feature, excluding all other configurations.
So this way you can filter your part/sub-assembly configuration easily. Isn’t it a great time saver?
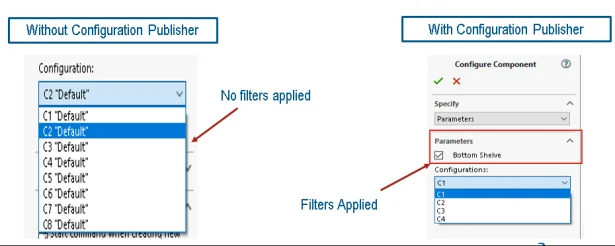
The image below depicts the behaviour with and without Configuration Publisher. If you see in the left Image, there are 8 configurations shown while inserting the component into an Assembly. But in the right image, there is a filter applied and based on which there are only 4 possible configurations.
Now let’s understand how we can implement Configuration Publisher to filter required configurations. We will understand this with a simple example.
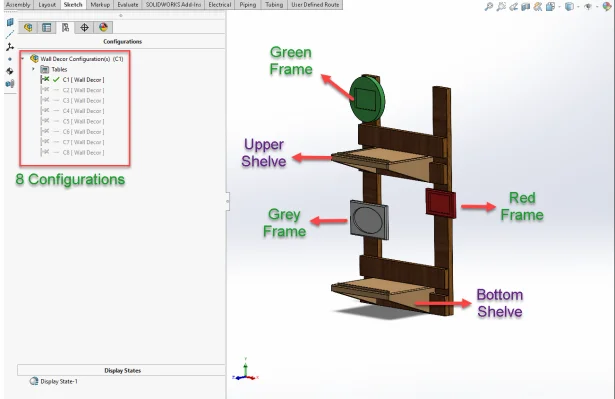
The following image shows a sub-assembly named “wall decor”, which has an Upper Shelve, the bottom shelve, and three small frames for photograph (Marked Green, Grey and Red). Let us ignore other parts as of now. The left side of the image shows the ‘configuration Tab’ which shows the 8 available configurations for this Sub-Assembly.
Let me walk you through the steps which is required to use this tool:
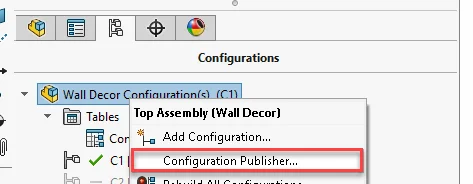
- On the Configuration Tab, Right-Click the Assembly and select Configuration Publisher.
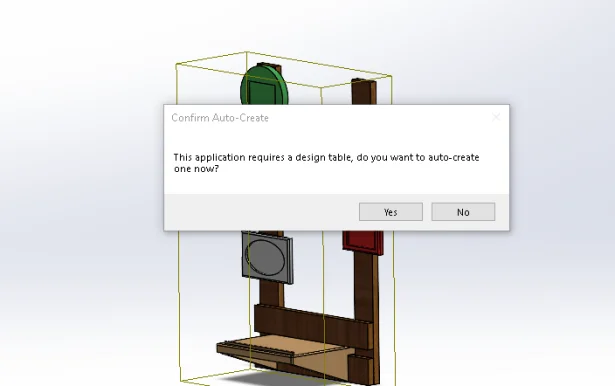
- Note that, a Design Table is required as a pre-requisite to use ‘ConfigurationPublisher’. Hence, if the design table is not already created, you will receive a message “This application requires a design table, do you want to auto-create one now? Let click ‘yes’ and lets Auto-Create a design Table.
- Once you click ‘Yes’, the design Table is created and Configuration Publisher window is launched. On the left side of the window, you will observe the Parameters/ Design Table variable listed which can be used to create filters. The list could contain Mates/components/features and so on.
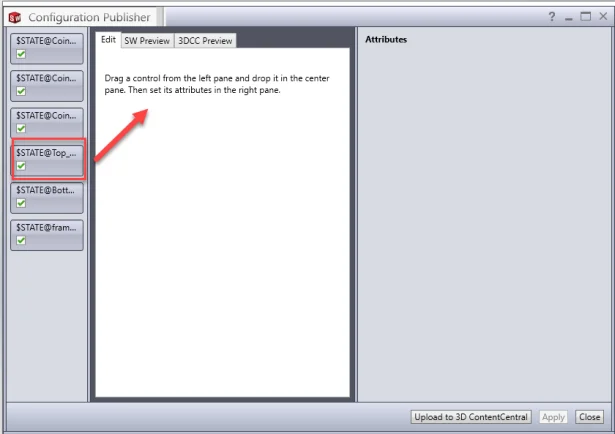
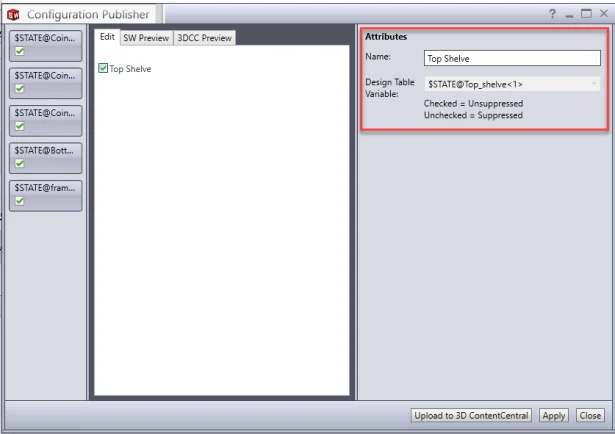
- In the left pane, you will see the list of fields you can use as parameters to filter configurations. Let’s Drag and drop the field ‘$STATE@Top_shelve’ in the Edit Box. Observe that, there are attributes in the right pane which you can modify. Let’s change the name to ‘Top Shelve’ to make it more meaningful. The check/uncheck mark indicates the unsuppressed/suppressed state.
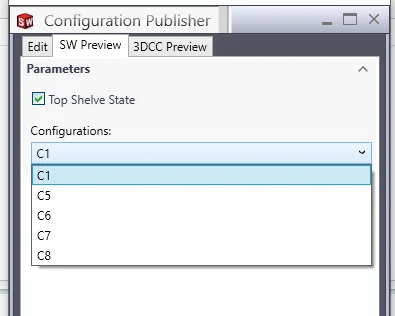
- SW Preview Tab can be used to see the preview as how the configuration list would look once the filters are applied. In our example, we see ‘Top Shelve’ and as we have checked the box for ‘Top Shelve’, it will list all the configurations in which the ‘Top Shelve’ is unsuppressed. This is the list of configuration which will be displayed when you insert this Assembly into a Top Level Assembly.
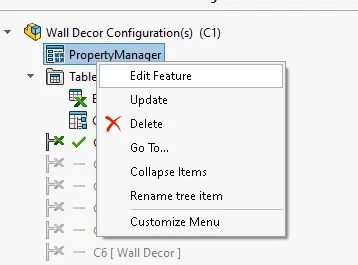
- Let switch to Edit Tab and click ‘Apply’ and ‘close’. As shown in the following image, a PropertyManager for configuration Publisher is generated, which can be edited/updated later.
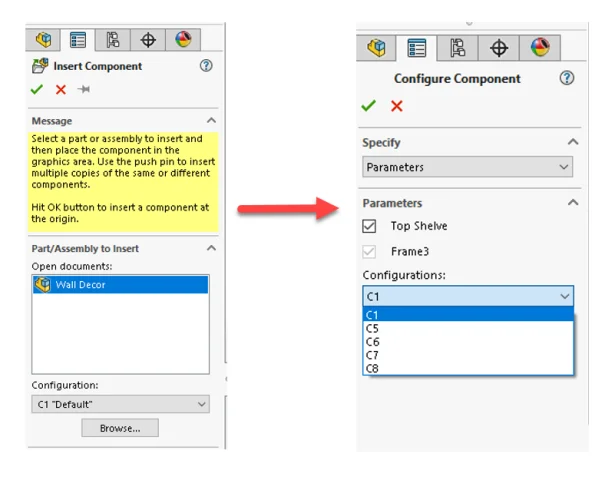
- As the ‘ConfigurationPublisher’ for the component is set up, let’s now insert this sub-assembly ‘Wall Decor’ into a Top Level Assembly, and see how easy it is to filter the configurations. Once you select this component to insert into an Assembly, Configure component PropertyManager would appear. This window would list the parameters which you defined in the ConfigurationPublisher window. In our example we have checked the box for ‘Top Shelve’. Hence, this will only list the configurations in which ‘Top Shelve’ is unsuppressed (5 out of 8 configurations). This tool is very useful when the configuration list is large.
With this easy method, you can use configuration Publisher for any component (sub-assembly/Part), which has large number of configuration. Once this is done, you can filter and select the appropriate configurations based on various parameters, when you insert this component inside an Assembly.
You can use a feature/mate/component suppression state as a parameter to filter required configurations from a big list of a component configurations.