SOLIDWORKS includes many powerful toolsets that enable designers to start from a basic set of features to more demanding processes. In this video, I’ll demonstrate a technique that enables users to control a solid object and transform it into a complex surface. By harnessing the unique Dome and Deform SOLIDWORKS offers, we can move from a simple designing approach into one that will take seconds to accomplish.
Video Transcript
Hi everyone, my name is Jackie and in this video, I’m going to show you how to generate a triangulated surface on top of a domed surface. I‘ll be demonstrating all the features in SOLIDWORKS that’ll accomplish this along with the strategy that I used to model and setup the surfaces beforehand. Let’s take a look!
The first thing we’ll need to get started is a surface that’ll be adequate enough for this project. Therefore, I’ve decided that the route that I’ll be taking is to generate the surfaces first via a lofted solid. This can easily be done by drawing two sketches and then afterwards, creating the lofted geometry. Notice that I chose the solid route and that I decided to add a couple more lofted profiles positioned in a way that it’ll fill in this triangular path. The reason is that in the next steps, we want to ensure that SWX has the easiest path to multiply this group of lofts.
Before doing this, I’ll create a new sketch of a rectangle that’ll ensure we’ll have enough of these bumps to fill in this area. I just noticed a problem so let’s take a moment to explain why we need to do this. The Fill Pattern requires a Solid Body, hence, the solid route we chose before. But the issue comes from how the loft is currently separated into 3 bodies. To demonstrate, I’ll attempt to combine these bodies and SWX is going to bark at us. This is due to a phenomenon labeled as zero thickness geometry. A very simple trick is to create extra material that shares the same profile but instead of combining the edges, we’re going to combine the faces. The fill pattern works by simply picking the one body and entering the correct dimensions. This can then be all combined into one single body.
Now that we finished the first part, the second part is to build the curved surface to wrap this surface around. To do this in the most minimalistic way, I’ll be using the Dome feature by modeling a very simple cylinder. The dome will ensure that the surface is completely smooth from the face up and that we’ll maintain a nice transition between the flat and the curve.
Before we start the process, I want to mention that currently, our two bodies are still solids, but the next part, we’re going to transform the solids by simply offsetting the surfaces we want. This idea comes from the fact that we did want surfaces all along, but it was much easier to model them as solids.
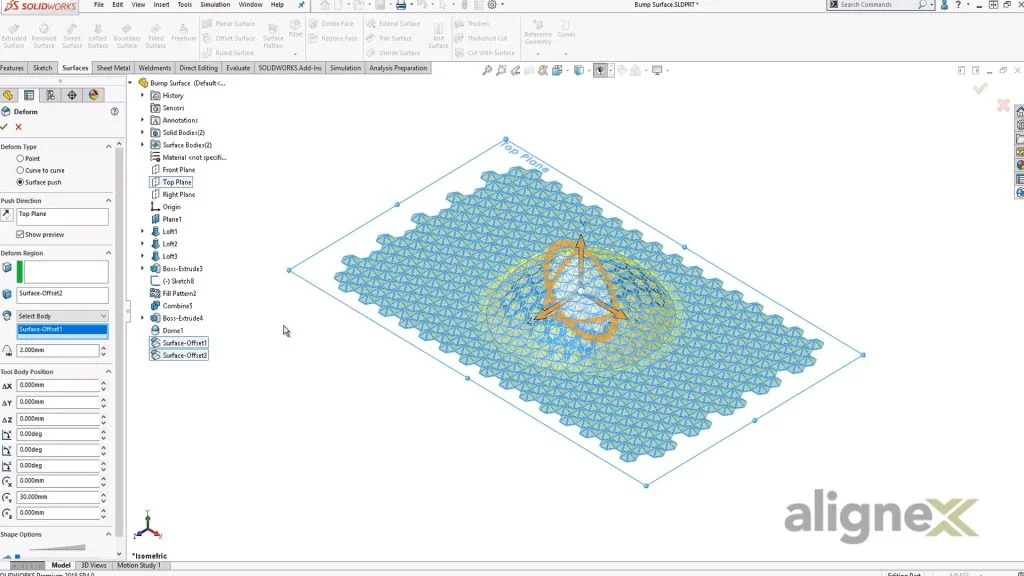
The final step is to deform this surface on top of the dome. We’ll select the surface push option along with the other two surfaces. There are a couple of limitations that we’ll need to keep an eye on. By simply rotating the surface around, we notice that deformation occurs due to the direction of pull being from the top. We simply wouldn’t be able to take the surface and wrap it around without this occuring. But also to note would be how relatively close the surfaces line up. This is due to the deviation setting that lets us place the surface as close as possible to the dome without it falling too far outside.
Lastly, I’ll trim the surface out just to keep the area we deformed. The surface can be used gently to model the shape we want back into a solid. Using a boss-extrude with any surface condition, we’ve gone from the surface back into a solid.
Thanks for reading! Don’t forget to check out the Alignex Blog for more great tech tips just like this one.