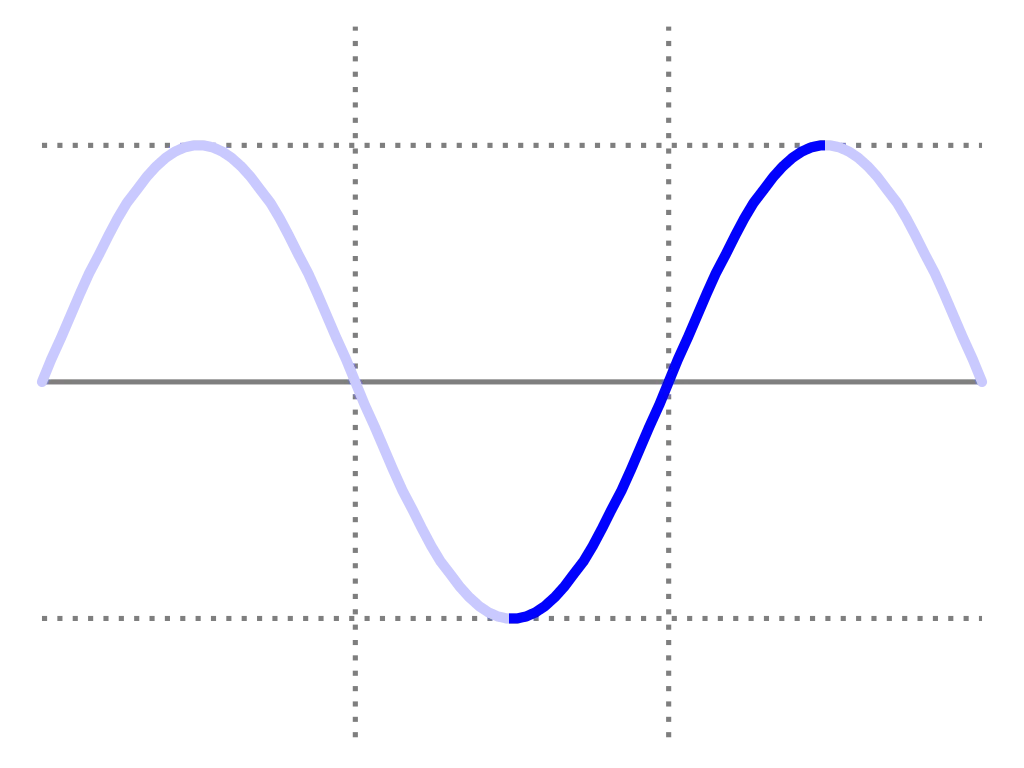
* This is one of a series of modeling challenges you can use to test your SOLIDWORKS skills. First, read the challenge and try to figure out a solution on your own. Then, compare your solution with my good, better, and best recommendations. As always, feel free to share even more tips and tricks in the comments below.
Let me start off with a disclaimer as I know I’m tip-toeing on shaky grounds considering the engineering audience that frequents this blog. In fact, our Product Development team would be the first to cry out, “It’s mathematically impossible to represent a sine wave (any part of it) with a Bezier curve!” (as I intend to do). I know, because that’s exactly what they told me. So please take note of the word “approximate” in the title of this blog post. My goal is to show you the quickest and easiest way to sketch an approximation of a sine curve. If you’re looking for an empirical sine curve to use to design ultra-precise cams, I would suggest checking out some of our Partner Products like CamTrax for SOLIDWORKS. If you’re cool with “pretty darn close”, then carry on.
Equation Driven Curve
One of the first tools I turned to was our Equation Driven Curves which were introduced in 2009. Both explicit and parametric equations can be used to drive the geometry on a 2D plane or within a 3D sketch. In our case, I’d just like to sketch half a period of a sine wave starting at the maximum negative amplitude and back up to the peak of the maximum positive amplitude (see below). Stringing together a sequence of these sine curves is a popular practice for designing an initial 2D layout of a cylindrical cam.
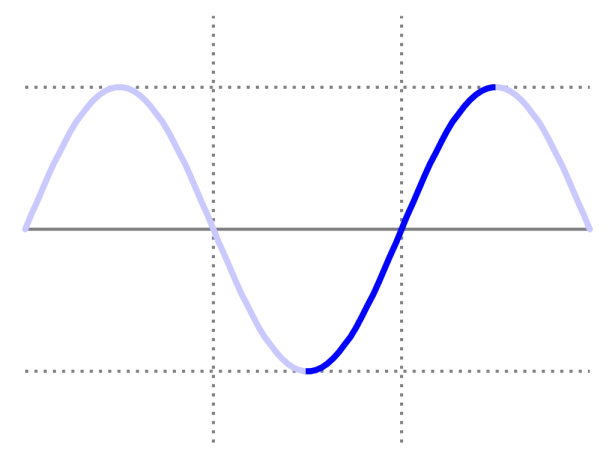
To make this happen, we’ll have to dust off our math books and recall that a sine wave function looks something like this: Y(x) = A * sin(Bx + C) where A is the amplitude, B is the angular frequency, and C is the phase… yada, yada, yada. Typically, too much for my simple mind to remember. All I care about controlling is the overall height (a.k.a. the amplitude) and the length (a.k.a. the period). Anytime you want to simplify and centralize the inputs that control your CAD model, consider using Global Variables (and in this case, Equations too). That way, I can save this as a template and use it over and over again by tweaking a couple of Global Variables rather than having to recreate it from scratch.
- Open the Equations dialog box I use equations a lot, so I recommend adding this button to my top toolbar (where the New Document, Save, and Print buttons are located) so it’s always easily accessible.
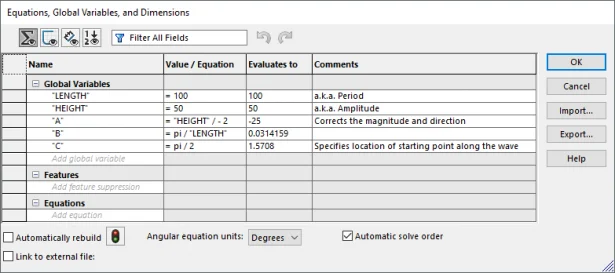
- Create two Global Variables for our primary inputs – “LENGTH” and “HEIGHT” Type any name you prefer and the current value.
- Create a Global Variable for each variable of the sine wave function – “A”, “B”, and “C”
Mathematical equations can be created by referencing other global variables, custom properties, or dimensions. To make it easier for you to recall the method to your madness, always make sure to add helpful comments to your equations.
- Start a 2D sketch
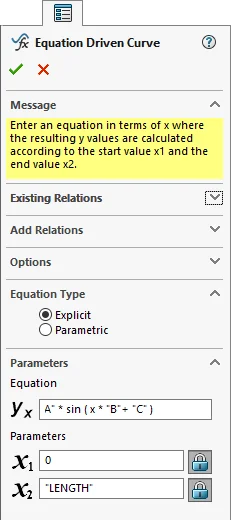
- Create an Equation Driven Curve by entering the following values in the PropertyManager’s input fields
You can reference Global Variables by typing their names in between quotation marks.
- You’ll need to define the location and position of the Equation Driven Curve using sketch relations and dimensions to fully define the sketch
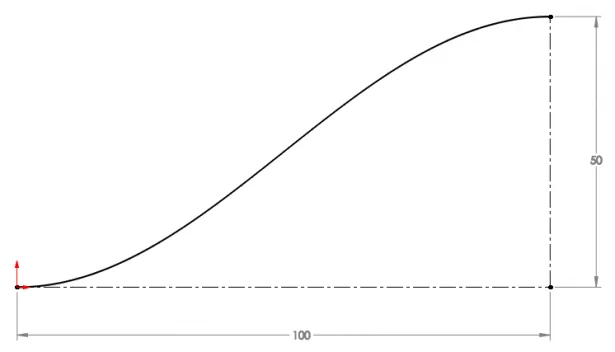
This is exactly what I was looking for shape-wise, but that took a lot more thinking than my brain would prefer to spend on a single sketch entity of an entire model. That said, don’t underestimate the power of Equation Driven Curves. Once you start playing around with 3D curves, the geometry you can create with some creative math is pretty sweet. It makes it very easy to design products such as wave springs/washers.
Reverse Engineer with a Spline
Admittedly, this example is a pretty hokey solution, but bear with me. When you’re desperate, you’ll try anything. Plus, there are a few tips to learn from this approach and it will conveniently set up my best solution quite nicely.
You can sketch pretty much sketch anything with splines. Let’s say you had an image of a sine wave profile to reference while sketching your spline. All you’d have to do is insert the Sketch Picture, scale it appropriately, and then start another sketch on top of it (I prefer keeping the sketch picture isolated in its own sketch so you can easily toggle its visibility from the FeatureManager tree while editing a separate sketch) to create your spline wave … I mean, sine wave. In my case, we already have the Equation Driven Curve I created from the previous attempt, so we’ll just use that as a reference.
- Sketch a 2-point spline by placing the two endpoints at both ends of the reference sine wave
- Select the spline so the spline handles appear
- Drag the diamond shape on the spline handle to reposition the initial trajectory of the spline and, while it’s still selected, add a horizontal relation to it Dragging different grips on the spline handle (diamond shape, arrowhead) isolate the type of geometric modification you’ll make (direction, magnitude). Or you can drag the dot at the end of the arrowhead to modify both direction and magnitude at the same time.
- Repeat step #3 for the opposite spline handle
- Drag the arrowheads of each spline handle until it closely matches the underlying reference
- Activate the Smart Dimension tool and apply a dimension to the arrowhead of one of the spline handles Don’t worry about the specific value. It’s only a magnitude and doesn’t correlate to an actual linear distance. Even though the value is a little mysterious, it’s pretty cool that you can use these dimensions to fully define a spline.
- Repeat step #7 for the opposite arrowhead, but rather than typing a numerical value, type “=” and then click the dimension created in step #7 to make the second dimension always equal to the first Typing “=” is a quick way to create equations on the fly. You can even do this within PropertyManager input fields. Additionally, you can add comments on the fly by typing “‘“ (an apostrophe) at the end of your equation followed by your comment.
- Modify the first dimension to automatically update both dimensions at once to fine tune the shape of the spline

This method is way too imprecise due to the manual nature of the technique. I wasn’t lying when I said it was hokey, but without experiencing the pain associated with this approach, you wouldn’t fully appreciate the convenience of my next (and best) solution.
Style Spline
Sometimes too much customization and flexibility is a bad thing. This can occasionally be the case with traditional Splines. Taking too much manual control over spline handles (especially on a spline with many control vertices) can make the final shape tricky to manage and a pain to fully define. In 2014, Style Splines were introduced to simplify spline creation when a high level of customization is not needed. By forfeiting just a little control, SOLIDWORKS can automatically manage the rate of curvature throughout the length of the Style Spline which ensures you’ll get the highest quality curve every time with virtually no hassle. Best of all, Style Splines are extremely easy to fully define which makes them a great fit for precise applications like this sine wave modeling challenge.
- Create a 4-point Style Spline following a slanted step pattern (see below) Rather than control handles, Style Splines are controlled by a polygon of construction lines making them much easier to fully define with traditional dimensioning schemes.
- Add Horizontal and Equal relations to the first and last construction lines
- Add overall length and height dimensions
- Add a dimension to one of the horizontal construction lines and make it equal to the overall length multiplied by the magical ratio of 0.3642. Don’t ask me to explain this value, but I’ve tested it on many spline curves and it proves to provide consistently accurate results.

That’s it! Not matter what the overall length and height of the curve is, this ratio produces great results. You don’t believe me? Create a solid body using your traditional technique, and recreate a separate body in the same location using my technique. Then use the Combine tool to subtract one body from the other and see what happens. If you receive an error, it’s most likely because the difference between the bodies was too small to calculate. If you own a license of SOLIDWORKS Professional or Premium, you can use the Compare Utility to compare the geometry of the two bodies with better visual feedback.
One of the best parts of this solution is that once you create this sketch the first time, you can drag and drop it into your Design Library where it’ll be stored as a Sketch Block. At anytime in the future, you (or anyone in your company if you store your Design Library on a shared server drive) can drag and drop this sketch block from your Design Library into an active sketch, snap it into place with sketch relations, edit the block, tweak the length and height values, and you’re done! In fact, you can download my pre-created 2018 sine wave sketch block here.
Impressed by the ease of use and the quality of Style Splines? Try this. Go back to one of your legacy designs that contains a spline, select the spline within the sketch it was originally create in, and then select ‘Convert to Style Spline’ from the context toolbar. Thanks to this helpful button, you can toggle between traditional Splines and Style Splines (and vice versa) at any time. For complex shapes, sometimes it’s easier to sketch the initial shape with a traditional Spline, convert it to a Style Spline, and then fully constrain it with relations and dimensions. Please explore this technique and let me know how you like it in the comments below.
