
Working with a large assembly in SOLIDWORKS can be a little challenging for slower computers. Fortunately, there are a number of techniques that you can employ in order to improve performance whilst maintaining functionality. Let’s take a look…
Consider the Mode
There are 4 different ‘modes’ that an assembly can be opened in, as seen in the image below; Resolved, Lightweight, Large Assembly Mode and Large Design Review, each opening the file in a different state.

Resolved
The default option when working within assemblies. Opens the assembly and all of the associated file information. For example, when opening an assembly, all of the associated parts feature history is loaded into memory.
Lightweight
Opens the assembly, but none of the associated file information apart from the primary planes and the origin. Restricts the files from being edited. An image of a feather appears next to the associated file in the FeatureManager Design Tree.
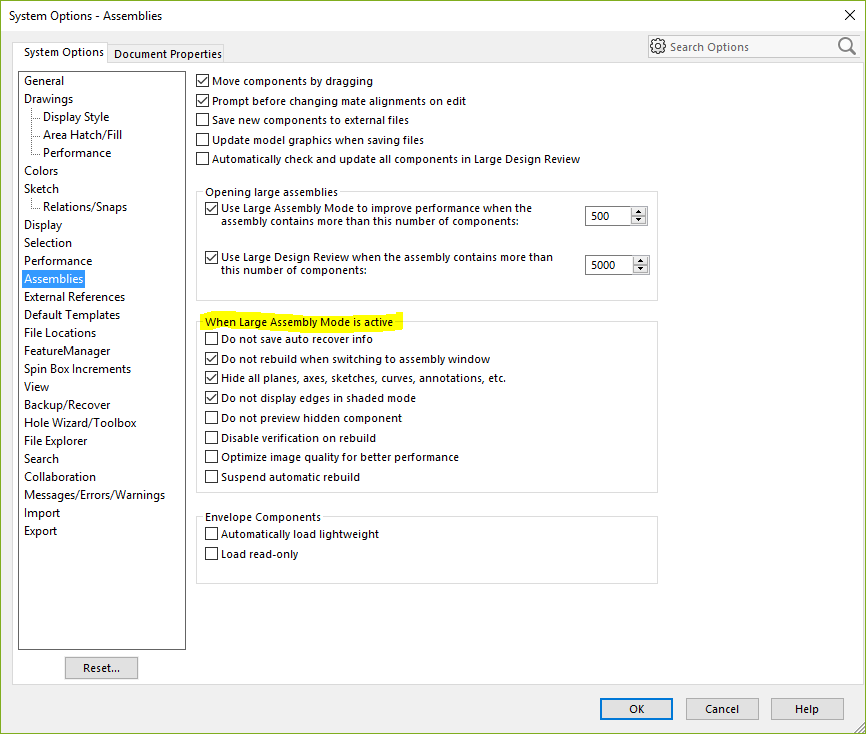
Large Assembly Mode
Performs the same process as the Lightweight mode option above, however, it involves a few more options that can be altered as seen in Image 2. Each option restricts particular processes and features to aid performance. These options can be accessed via: Tools > Options > Assemblies.
Large Design Review
This is very different to the other three modes of opening an assembly. This option presents the user with a very restricted command manager. It allows you to very quickly open your model for viewing purposes. You can navigate, take snapshots and take measurements. This mode does not open the file into memory, so it’s a great way of quickly opening and navigating very large assemblies.
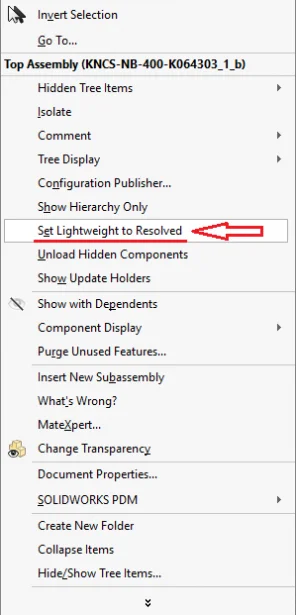
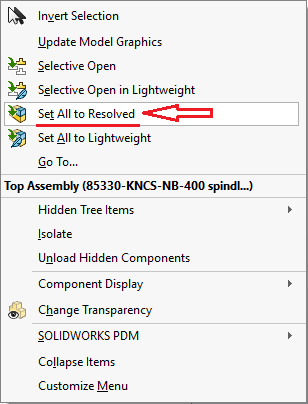
Note: All modes allow the file to be set to ‘Resolved’ at any point and the files to be loaded into memory as seen in Image 3. Assembly files of a certain size can be set to open automatically as a particular mode defined by the user as seen in Images 3 and 4 below.
Use Simplified Configurations
Another technique you can use to improve navigational performance is to create a configuration within the assembly, suppressing some unnecessary associated parts and subassemblies. For example, many configurations may be needed for a different combination of the components within the main assembly. These can then be loaded upon the file opening if chosen on the open dialog box as seen below.
Note: This effect can also be applied at part level which would have a positive knock on effect if also applied at assembly level.

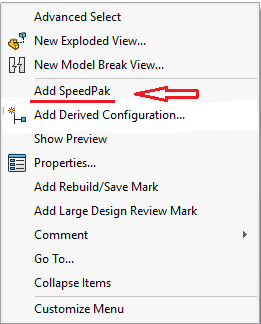
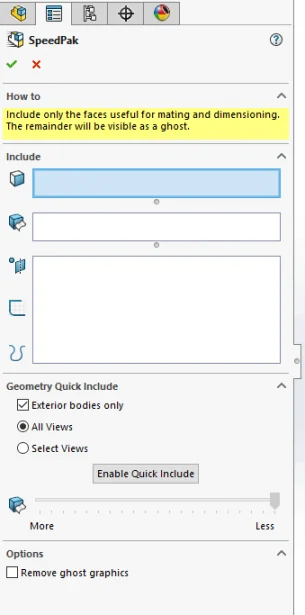
SpeedPak
A SpeedPak configuration reduces the file size by limiting the file to specific faces or bodies. These faces are required for mate referencing only. You can either create a SpeedPak at top level or within the subassembly, each providing you with different options as follows:
Subassembly
The SpeedPak configuration at subassembly level can be created in the ConfigurationManager via the right mouse button (RMB) as seen in Image 6. The aim is to remove all but the information required (faces, associated mates, etc) to maintain the references at the top level. This then becomes a derived configuration which has to be activated at top level.
Top Level
Once the subassembly is mated into position at the top level, RMB on the sub assembly and you are presented with two options as seen here:
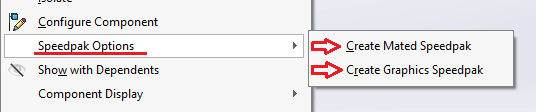
Mated SpeedPak
This option automatically keeps the faces that have been mated together.
Graphics SpeedPak
This is a purely graphical representation with no resolved geometry or mate references.
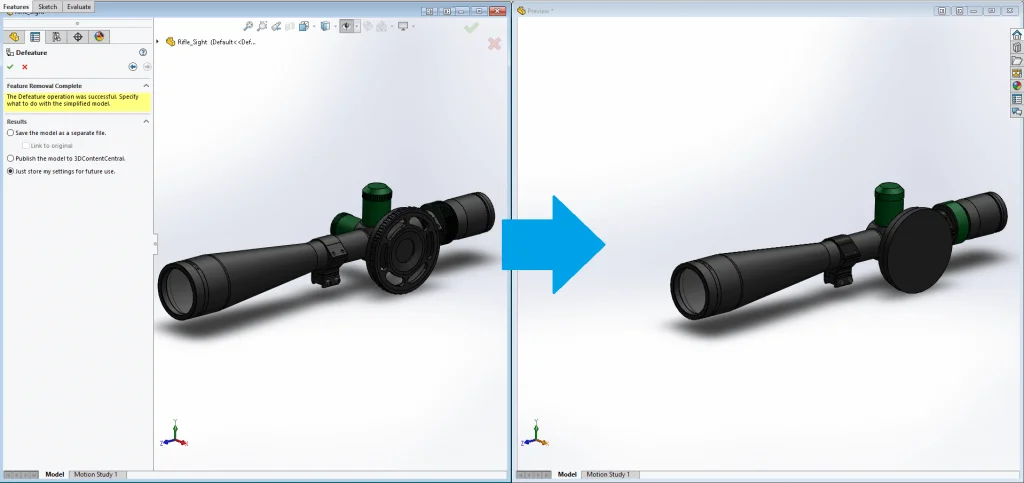
Defeature
Another technique similar to creating a simplified configuration is the Defeature tool. This tool removes the selected faces, features, etc. The file can then be saved as a “Dumb Solid”, which is a file without any feature definition or history. This is also a great for protecting intellectual property whilst maintaining a good understanding of the geometry.
Defeature can be found via: Tools > Defeature.
Assembly Structure
It is not always possible to have the foresight in terms of how your assembly will finally be constructed. Sometimes it may be necessary to build up your assembly using all of the relevant parts, this however can make it top heavy and result in poor performance. It is always best to construct your assemblies with as many subassemblies as possible, which can either be done by inserting them individually (as normal), or at assembly level.
In order to begin this process, you need to RMB on the relevant part you want to be included within the subassembly and select ‘Form New Subassembly’ as seen below.
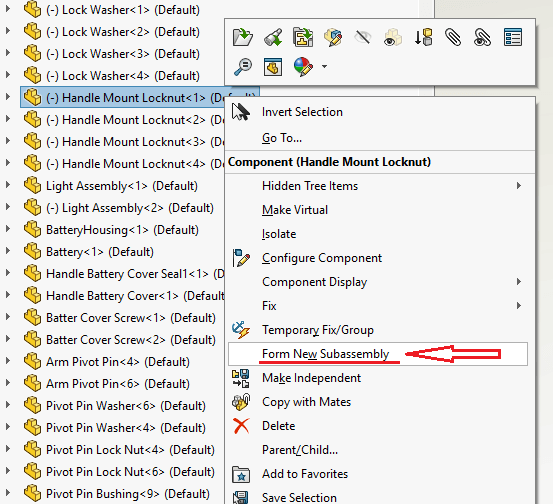

This then creates a new virtual Subassembly within the main assembly. Additional parts from either the main assembly or another subassembly can just be dragged and dropped into this new subassembly. Be careful when moving components as referenced components via mates, patterns or external references will be broken – unless all associated parts are brought with it!
Final Tips!
- Work locally, never over a network! (Even PDM creates a local copy for this reason).
- Ensure all files are up to date. Files saved in older versions will rebuild and open slower.
- Don’t include unnecessary details (e.g. threads).
We hope you found that useful!
Have you seen our blog archive where we have posted plenty of helpful articles? We also have a fantastic video library filled with easy-to-follow videos on a number of topics inspired by other SOLIDWORKS users – take a look. Also, don’t forget to follow Innova Systems on twitter for daily bite size SOLIDWORKS tips, tricks and videos.