In this post about the W16 engine I will show the calculation of the camshaft phase angles and then detail the mating of the components in the cylinder heads with the rest of the engine.
Another animation that better allows to see the full movement of the engine can be found here (https://www.youtube.com/watch?v=Ci7m0j5iCAQ).
See detailed explanations in the extended entry at the end of the post.
At the request of a reader I will upload the complete assembly but hide the parts that I have not presented yet. Download Engine.
Thank you for reading about this build and stay tuned for the next post which will detail the build of the intake manifold through top-down design strategy.
George Bucsan
Worcester Polytechnic Institute
Aerospace Engineering, 2014
I will start this by refreshing some of the information about the crankshaft found in the 4th post of the series. The crankshaft phase angles for the following way of counting are: (the piston numbers in bold)
13-540 15-630 14-567 16-657
9-360 11-450 10-387 12-477
5-180 7-270 6-207 8-297
1-0 3-90 2-27 4-117
Let’s think about the first piston and say that when it is at time 0 of its cycle the cam that opens the intake valve has the phase angle i and the cam that opens the exhaust valve has the phase angle e. All of the other pistons will have cams with phase angles as functions of i and e.
Considering that for each engine cycle, the crankshaft does two complete rotations and the camshaft – only one, we can deduct the angles for all the cams by dividing the above angles by two and adding these values to i and e.
For each of the columns in the above table there are two camshafts, for example for the first row (pistons 1, 5, 9 and 13) the 1st camshaft activates the exhaust valves and the 2nd – the intakes.
As we can see in the table, the differences of angles between the pistons on the crankshaft are the same for each row; this will lead us to the same differences on the camshafts, which means that we only have to construct one of them, the 3 others being identical.
The only adjustment left is the fact that between rows 1-2 and 3-4 there is an angle of 15 degrees (in the engine block). We will subtract that from the phase angles on the camshaft. Thus, dividing by 2 the angles above and subtracting 15 degrees for rows 2 and 4, we get the following angles for camshaft 1: 0, 30, 90, 120, 180, 210, 270 and 300.
Given the detailing of the actual construction of the camshafts in Solidworks from the previous post and the calculations of the phase angles above, I will move on to explaining the mating of the components.
As I discovered the hard way, if you mate the cylinder head and all its insides as a large assembly and then import that into the main assembly (block, pistons, etc.), Solidworks (at least version 2010) will have a hard time making it move properly. An easier way is to add the raw cylinder heads into the large assembly and then add the valves, the camshafts, and mate them one by one.
The easy parts are placing the valves in – concentric with their assigned holes, the camshafts – concentric with the half-holes carved at the top of the cam cases, and the finger assemblies – by placing the pins in their assigned holes. The cams are connected to the rollers through the cam mate.
The difficult part lies in connecting the ends of the rollers with the thin ends of the valves. In a real engine, the fingers would push the valves down and compress the springs, and then the springs would push the rods back up, like there would be a “tangent” mate between the fingers and the valves. But in Solidworks you cannot make a spring compress, at least not in a big assembly like this one. The solution I found most practical is eliminating the springs and just connecting the fingers and the ends of the valves directly. But how?

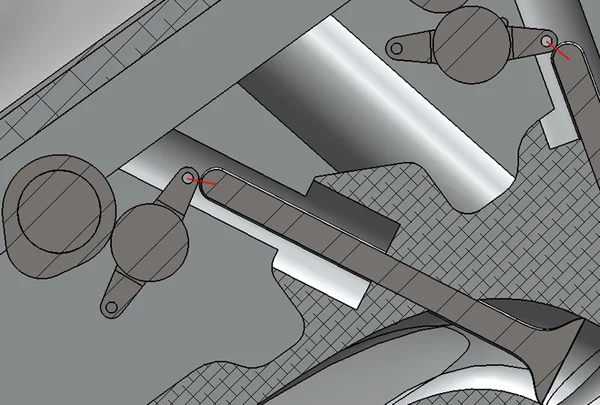
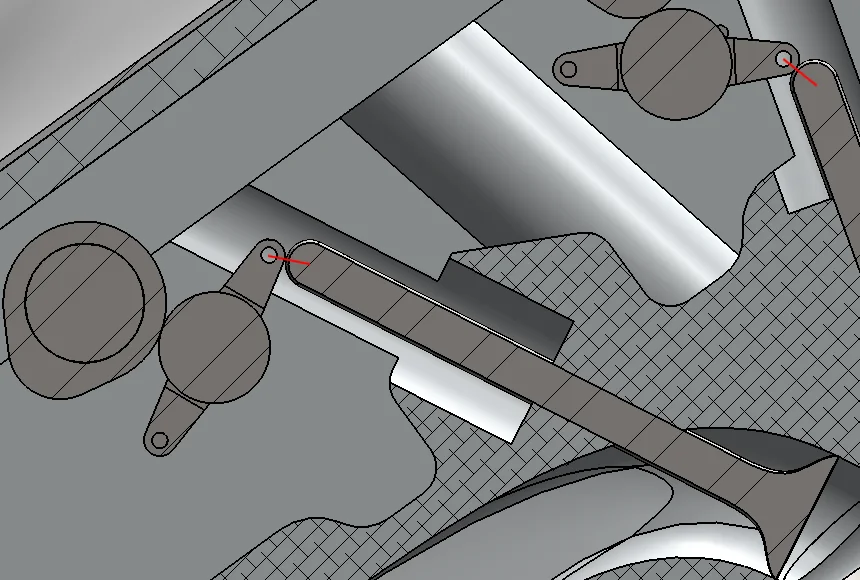
As you can see in the picture above, the two red lines connect the center of the half-cylinder that represents the edge of the fingers and the center of the hemisphere that represents the end of the valve. On the left, the cam does not push the fingers downwards – this is the top point of the valve’s travel, and on the right side the cam pushes the finger downwards by touching the roller with its eccentricity – this is the bottom point of the travel. In both cases, when regarded from the profile, the “half-circles” touch each other.
If you add up the radiuses of the hemisphere and the fillet at the tip of the fingers and set that value as a parameter for a fixed distance mate between the two center axes, you get a fake cam mate between the two that works perfectly in this context (a small valve travel – keeps the geometry valid).
Now that we mated the camshafts to the fingers and the valves, we have to mate the camshafts to the crankshaft and correlate everything. For this I made a triple pulley in the back of the engine and adjusted the radiuses such that the camshafts turn at half the speed of the crankshaft (the ratio of the speeds is the inverse of the ratio of the circumferences). I connected the two camshafts on the left with the pulley through a belt, the same thing on the right side, and then another belt from the pulley to the crankshaft.
Another issue is how to make the pulley visible. The pulley part initially is only a sketch. The trick is to extrude that sketch outwards (thin feature) to the width of the belt and assign a rubber-like material. It won’t move but it will at least look real.
The final part is synchronizing the camshafts with the crankshaft. For that, I used some calculations and then some fine adjusting, but the easiest method is just trial and error. First you suppress the belts and move the crankshaft such that the first piston is in its top dead center and you move the first camshaft in the adequate position (exhaust valve fully closed). After that, unsuppress the belt and move the crankshaft such that the 3rd piston is at its top dead center and. Suppress again the belt and adjust the second camshaft. Unsuppress and you get half the job done. Repeat for the two camshafts on the right side.
