

Trying to find out the very best methods is not easy. I must use experimentation in order to find you the best solutions that I can. Angle pieces cut easier now but this is a little higher end solution to cheaper ones that I have tried to find for you. Tools need to be very sharp first of all.
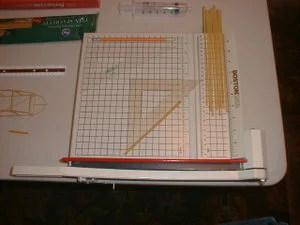
The paper cutter works but I only advise teachers and not students to use this. However, if you would like to precut the pieces for your youngsters than this can work I guess. Slow and not fast cutting seems to work better. Also, for whatever angles you are going to cut notice the plastic triangles I used to set the angle of cutting. There is a 45 degree triangle there in the upper left. A little trial and error can work wonders with this method. Large Emory boards do wonders with taking off any hang nails, excuse the pun. Careful on your selection of Pastas. Check with those that know but some flat Fettuccini brands are not exactly flat. This greatly adds to the difficulty of any project.
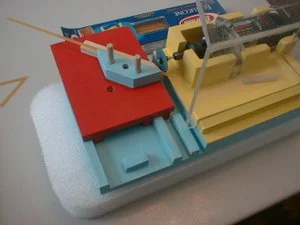
To show you what is possible after trying different things out. The picture down below is a beginning chassis of a helicopter. After forming the outside structure it would be covered in tissue paper and spray coated with a plastic. Light as a feather but my Cockatoo would not donate any for this project. She is keeping a very close eye on me along with my wife.

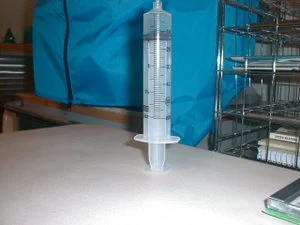
I bring your attention to another method that might work out with the large plastic IV syringe. This is not used for under the skin or intravenous insertions. It has plastic tips. This is an experiment in progress folks.
Well that’s all there is to tell you with this experiment using different materials that can be used in your classes. I’m going to go shopping at our supermarket for more ideas on this subject. Contact me for anything else you might want to know about either paper or pasta building. I do have the paper physical characteristics now and I will make them available too upon request.
Here is hoping that someone, somewhere, doing something, at sometime, will be happy for this information or just get a good laugh. Either way I am happy to serve all the teachers out there. Ain’t, SolidWorks Great? Oops! Is that a word? Bye.
Richie Williams
Trying to find out the very best methods is not easy. I must use experimentation in order to find you the best solutions that I can. Angle pieces cut easier now but this is a little higher end solution to cheaper ones that I have tried to find for you. Tools need to be very sharp first of all.
The paper cutter works but I only advise teachers and not students to use this. However, if you would like to precut the pieces for your youngsters than this can work I guess. Slow and not fast cutting seems to work better. Also, for whatever angles you are going to cut notice the plastic triangles I used to set the angle of cutting. There is a 45 degree triangle there in the upper left. A little trial and error can work wonders with this method. Large Emory boards do wonders with taking off any hang nails, excuse the pun. Careful on your selection of Pastas. Check with those that know but some flat Fettuccini brands are not exactly flat. This greatly adds to the difficulty of any project.
To show you what is possible after trying different things out. The picture down below is a beginning chassis of a helicopter. After forming the outside structure it would be covered in tissue paper and spray coated with a plastic. Light as a feather but my Cockatoo would not donate any for this project. She is keeping a very close eye on me along with my wife.
I bring your attention to another method that might work out with the large plastic IV syringe. This is not used for under the skin or intravenous insertions. It has plastic tips. This is an experiment in progress folks.
Well that’s all there is to tell you with this experiment using different materials that can be used in your classes. I’m going to go shopping at our supermarket for more ideas on this subject. Contact me for anything else you might want to know about either paper or pasta building. I do have the paper physical characteristics now and I will make them available too upon request.
Here is hoping that someone, somewhere, doing something, at sometime, will be happy for this information or just get a good laugh. Either way I am happy to serve all the teachers out there. Ain’t, SolidWorks Great? Oops! Is that a word? Bye.
Richie Williams
Well that’s all Folks. Have I given any ideas to you to consider? I hope so. Please get this to anyone that is doing these jobs in the schools or even arts and crafts departments. Believe it or not the Supermarkets carry all of the supplies you need. That was one of the parameters for doing this feasibility study. Materials had to be easily obtained from places like that. I’ll keep you posted on the finishing of this project just as soon as my wife lets me back into our house. Bye. Richie Williams
The above article was done awhile ago and posted on MCADCafe.com which is an engineering type of web site and since that was published, I have been allowed back in our house. Terms of surrender are not allowed to be posted here. Here are a few more pictures for you down below with quick and simple explanations.
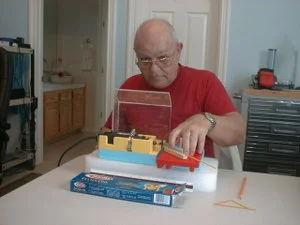
Yes, I had to go invent a Pasta Cutting Machine. It uses a Dremel Tool with foot pedal switch and cuts with much more precision with very small cutting teeth on the circular blade. All plans and the article about it I will make available upon request. I used SolidWorks 2007.
Trying to find out the very best methods is not easy. I must use experimentation in order to find you the best solutions that I can. Angle pieces cut easier now but this is a little higher end solution to cheaper ones that I have tried to find for you. Tools need to be very sharp first of all.
The paper cutter works but I only advise teachers and not students to use this. However, if you would like to precut the pieces for your youngsters than this can work I guess. Slow and not fast cutting seems to work better. Also, for whatever angles you are going to cut notice the plastic triangles I used to set the angle of cutting. There is a 45 degree triangle there in the upper left. A little trial and error can work wonders with this method. Large Emory boards do wonders with taking off any hang nails, excuse the pun. Careful on your selection of Pastas. Check with those that know but some flat Fettuccini brands are not exactly flat. This greatly adds to the difficulty of any project.
To show you what is possible after trying different things out. The picture down below is a beginning chassis of a helicopter. After forming the outside structure it would be covered in tissue paper and spray coated with a plastic. Light as a feather but my Cockatoo would not donate any for this project. She is keeping a very close eye on me along with my wife.
I bring your attention to another method that might work out with the large plastic IV syringe. This is not used for under the skin or intravenous insertions. It has plastic tips. This is an experiment in progress folks.
Well that’s all there is to tell you with this experiment using different materials that can be used in your classes. I’m going to go shopping at our supermarket for more ideas on this subject. Contact me for anything else you might want to know about either paper or pasta building. I do have the paper physical characteristics now and I will make them available too upon request.
Here is hoping that someone, somewhere, doing something, at sometime, will be happy for this information or just get a good laugh. Either way I am happy to serve all the teachers out there. Ain’t, SolidWorks Great? Oops! Is that a word? Bye.
Richie Williams
Wow, there sure are a lot of things to tell you about but I’ll start from the beginning
which is only way that I am allowed to post on this particular web site anyway. This is a follow up on last week’s article about some different materials to think about in your class building bridge projects or anything else that it would be useful for. Have you ever thought about, here it comes, PASTA? Yup, I’m not kidding you. It is a material that is easily obtained, a lot cheaper to buy than Balsa Wood and if it doesn’t work for you, you can eat it minus the glue of course. I have been using it for awhile and have discovered some interesting ways of using it. I’m going to cut and paste an article I wrote awhile ago and it did stir up some interest. At the present I am building a bridge just over 24 inches long. It will be submitted to you hopefully in the near future. I first started to work with Linguine but wow you have to be steady and somewhat patient too. The older children might be okay with that but teachers out there know better than me what age would be appropriate. Since after first using Linguine, I have moved up to Fettuccine. It works great and it is a lot easier to work with. However, there are some setbacks with it. Cutting always seems to be a problem, since it doesn’t always cut where you want it to because of its brittleness. Following a pattern you draw out in 2D and then filled in with glue. I’ve been using Elmer’s wood glue watered down but I don’t want to re-write the article here. Read my article and I think you will understand what I did more easily. You can also find it on https://www.mcadcafe.com/ down in the pink section left-hand side under Spaghetti Building. Oh yes, I am certifiable which means to say that those guys in those nice clean white suits just haven’t caught up with me yet. Hey, this is for a good cause right? Our kids and they are worth it. I work to serve you the teachers out there. I’ll pick it up again on the other end of this article.
Spaghetti Building Part 1
I know that this is going to sound kind of “way out there” but I am building one of these at this writing and it works, it works very well. (Please do take this idea and run with it. Talk it over with some of your school kid’s teachers. Do it as a father son or father daughter project. However I would not recommend doing this with your wife because then she will know who took her pasta.) So here it is folks.
This is for the pre-engineering school building projects like bridge building, that are tested later on after they are built to scale models. I know that materials like balsa wood are being used which could be kind of expensive in large quantities, enough to outfit a big class or even groups of youngsters in the same class. I have done some experimentation and a feasibility study which led me to use Linguine Spaghetti (first time around) and Elmer’s Wood Glue diluted to 50% strength so it runs into the joints needed to become permanent. This “Spaghetti Building” material as I call it, is much cheaper than balsa wood. I am constructing a bridge now using two main base supports and proper bridging to hopefully support a one pound weight in its middle section. Here is how I am doing it.
First I produce a 2Dimensional design (computer or sketched by hand) using SolidWorks for the design of the bridge and its component parts and then printing it out at full scale which can still be done on normal typing paper for individual sub-assemblies of the bridge. I then tape that 2D print out down onto a flat piece of plywood or other flat surface so I can assemble the individual pieces on top of the taped down printed design. Using a small pair of wire cutters or toenail clippers, I size them up by cutting the linguine pieces that are going to be superimposed on top of the printed out design. Small pieces of tape can be used to hold the pieces down in place until all the parts are glued together using very small drops of the diluted glue. I am using tooth picks to pick up a drop of glue and then place it where I want it to be. I also use a large commercial finger nail emery board to sand down lengths that might have been cut a mm too long or have un-squared ends and need just a little shortening or smoothing. The glue as I stated before is diluted by 50% with water so it runs into the joints better. Gluing only one side with a very small drop of glue is best at this stage. . You don’t want it to glue itself down to the paper below it, so use very small drops of glue at first. In about one hour or less you can cut the tape off and peel it back from the immobilized taped pieces and carefully flip it over to glue the other side. In tests that I have done by over stressing the parts and assemblies, rarely have any of the glued joints broken. With proper bridging techniques and reinforcement of these structures it can become amazingly strong. 2D designs become 3Dimensional after they are glued together using exact mirror images of itself to form solids instead of just flat surfaces.
This method of building is much cheaper and I’m not going to add the comment that “you can eat it too.” Let’s just say that it is cheaper and more flexible in its abilities than balsa wood. It can also be bent to the proper shapes by soaking it in hot water for a few minutes until it becomes (yes you guessed it, Al Dente) and then formed and let dry and finally glued in place to whatever assembly you are working on. As we all know, there are many different shapes and sizes to this excellent model building material. For instance Lasagna can be made into a road driving surface or siding on a house or perhaps a roofing material. This method can be instrumental in teaching patience and hand, eye coordination and finger dexterity along with proper bracing methods for building a strong structure. I have no data on the engineering characteristics of my spaghetti building material, so I will have to leave that up to people that can generate that kind of data to this very easy obtainable building material. Those engineering physical characteristics of the material needed for a computer analysis cannot be done for the testing on this design material and we must resort to an actual physical stress test on it. At least not until someone can do those physical characteristics of Pasta. After the many hours of building it, some people might not fancy destroying the model during the engineering testing phase. For an even stronger structure, yes you guessed it again, you can use spinach pasta. My bridge is gaining in stature and strength all the time and it is getting impressive looking. Even my wife stopped shaking her head at me and has come closer to look at it. Perhaps she is sizing it up for whatever pot to use on it. I don’t know. I remember many years ago putting together a balsa wood top wing piper cub with those materials but of course that utilized very thin balsa wood. A flying spaghetti plane would be a first here. Who ever got hurt on one built with spaghetti? I know you are laughing while you are reading this but there it is sitting on my work bench standing up on its own, ready to be mated to the other component structures. I know as long as my house roof doesn’t leak it should stand up on its own and support that one pound weight or more. You don’t have to be crazy to think outside of the box but it sure helps at times. If you don’t believe me then you have to try it. I think you will be amazed at what can be created with some imagination, sound engineering and some time. If you are not successful then what have you lost, maybe some lunch or dinner? Look at the handiwork that those with imagination and creativity can come up with in arts and crafts, when they use an idea others haven’t used yet. The finishing on this would be to use some food coloring or non-toxic paint (in case you are made to eat what you stole from your wife’s food cabinet to do this project) or maybe to spray the whole thing with a liquid plastic to help it stay nice. This is pretty way out I will admit but it works very well, really. Bon appetite, or er I mean, Good Building, your choice. A more definitive look into how this is coming along and the procedures I use is down below.
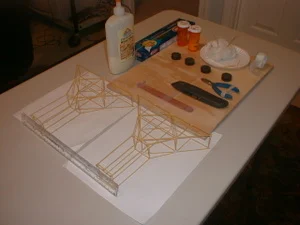
This picture shows the two bottom bridge supports. I’m still bracing things in between the two halves. Here I have four halves that were the same and that makes two pairs of three dimensional parts. Click on pictures for a larger picture.
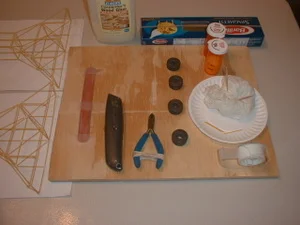
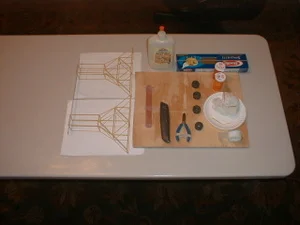
Here is another screen shot of the “Spaghetti Bridge Building Project” along with my work board. I will explain the use of these tools down below in the next picture to come under this one.
Starting from the top left of the board you will see the glue that I am using. I’m diluting it to 50% of its consistency so it runs into the tiny spaces of the noodle joints. This works out good but not perfect. If you are not careful it will run onto the paper printout that is used for a template to build upon. Then comes the box of spaghetti. Keep in mind that this is a very thin type of pasta and it can be considered to be an extra level of difficulty. This could be good practice for surgeons. Next we come to the two pill containers. Great news here. The glue does not make a mess inside of it by coating the inside. For some reason the glue due to cohesion drains back nicely even after a rough shaking of the contents to keep it mixed well with the water. The second bottle contains those small leftover pieces that can be used somewhere I’m sure. “Waste not want not.” The round black magnets add weight to hold down parts that are springy. Anything similar would work. They also are easily added to for more weight in an area and don’t slip off of each other. The only problem I had with them is that you have to get the polarities right or you will push the one off that is there already and cause a compound fracture of a part. Luckily the parts are cheap and easily procured. The tape is used to hold parts down to the paper template so you can get things glued together following the pattern you made. Since this building material is very light in Mass, it doesn’t take much for it to move when bringing other parts ready for gluing into the assembly. Afterwards you could use the tooth picks to pull up the tape so you can get an edge to pull it back off of the part. Toothpicks used for the project are the preferred gluing choice so far. Small droplets that do not fall off from the tip when you are holding it up vertical seem to be the ideal amount of glue. In the paper plate are my wet paper towels to clean the fingers of glue. Another alternative method for gluing could be a very good eye dropper with a small tip for more precision in placing of the glue. I would have reported on this possible method but I cannot find my wife’s eye droppers. I think she is starting to hide things on me. Could be? The wet paper towels of course keep the toothpick points clean from any residue of glue. Keeping the fingers cleaned of glue is very important in this project because these pieces are like magnets to anything that will glue them together including fingers and nervous perspiration. I found one small piece on my eyeglasses after I adjusted them. I looked for quite awhile and never found it until I took a break. You get the idea. I tried a scissor to cut the spaghetti and although it did work okay it was awkward to use a normal pair to do this with. A small pair of toenail clippers works very well for this project using Linguine. Another problem I found with the cutting of the spaghetti is that the piece you cut usually goes flying across the floor if you don’t stop it by using the wet paper towels or a small box to act like a backstop. I tried a shear cut method using the box cutter but it creates more of a problem then it solved and is too dangerous to use in classrooms. I’ve had to keep students in mind at all times during this creation and it is all about them anyway. Now we move over clockwise to the emery board used by women mostly to do their fingernails. By the way, fingernails can be very useful tools in doing this by adding to the picking up ability of these parts from a flat surface area. Girls might have a decided advantage with them. I keep mine short so I can type which works out fine for me, but not so good for this act. Oh yes, the emery board is used to sand down a part that might be a millimeter or so too big or have a jagged edge. Just rubbing it on the medium rough surface can quickly shorten the part. No biting off the extra is allowed. This emery board was donated by my Umbrella Cockatoo who does not like it at all and she doesn’t even want it back. It also pays to have a very smooth flat surface to work on. Any deformation of the surface (my plywood work surface has a small curve in the side that I am working with) can be detrimental to producing continuity of parts that are meant to be alike in symmetry. I don’t think I missed anything but you know how to get in touch with me to ask me if I did. One last point. Enjoyable music playing in the background lends a more pleasurable assembly of these parts. Angel hair spaghetti is even smaller in diameter than the linguine. I would not advise it unless your mental health insurance is paid up. I purposely picked this size figuring that larger sizes would be even easier. I know I am right about that without even using something bigger like Fettuccini. Bigger is easier but smaller is more impressive. Here are a couple of more pictures down below.
Well that’s all Folks. Have I given any ideas to you to consider? I hope so. Please get this to anyone that is doing these jobs in the schools or even arts and crafts departments. Believe it or not the Supermarkets carry all of the supplies you need. That was one of the parameters for doing this feasibility study. Materials had to be easily obtained from places like that. I’ll keep you posted on the finishing of this project just as soon as my wife lets me back into our house. Bye. Richie Williams
The above article was done awhile ago and posted on MCADCafe.com which is an engineering type of web site and since that was published, I have been allowed back in our house. Terms of surrender are not allowed to be posted here. Here are a few more pictures for you down below with quick and simple explanations.
Yes, I had to go invent a Pasta Cutting Machine. It uses a Dremel Tool with foot pedal switch and cuts with much more precision with very small cutting teeth on the circular blade. All plans and the article about it I will make available upon request. I used SolidWorks 2007.
Trying to find out the very best methods is not easy. I must use experimentation in order to find you the best solutions that I can. Angle pieces cut easier now but this is a little higher end solution to cheaper ones that I have tried to find for you. Tools need to be very sharp first of all.
The paper cutter works but I only advise teachers and not students to use this. However, if you would like to precut the pieces for your youngsters than this can work I guess. Slow and not fast cutting seems to work better. Also, for whatever angles you are going to cut notice the plastic triangles I used to set the angle of cutting. There is a 45 degree triangle there in the upper left. A little trial and error can work wonders with this method. Large Emory boards do wonders with taking off any hang nails, excuse the pun. Careful on your selection of Pastas. Check with those that know but some flat Fettuccini brands are not exactly flat. This greatly adds to the difficulty of any project.
To show you what is possible after trying different things out. The picture down below is a beginning chassis of a helicopter. After forming the outside structure it would be covered in tissue paper and spray coated with a plastic. Light as a feather but my Cockatoo would not donate any for this project. She is keeping a very close eye on me along with my wife.
I bring your attention to another method that might work out with the large plastic IV syringe. This is not used for under the skin or intravenous insertions. It has plastic tips. This is an experiment in progress folks.
Well that’s all there is to tell you with this experiment using different materials that can be used in your classes. I’m going to go shopping at our supermarket for more ideas on this subject. Contact me for anything else you might want to know about either paper or pasta building. I do have the paper physical characteristics now and I will make them available too upon request.
Here is hoping that someone, somewhere, doing something, at sometime, will be happy for this information or just get a good laugh. Either way I am happy to serve all the teachers out there. Ain’t, SolidWorks Great? Oops! Is that a word? Bye.
Richie Williams