Get Zooming with SOLIDWORKS Flow Simulation
This post sets out to introduce more people to a very useful, but not well known, feature in SOLIDWORKS Flow Simulation that is colloquially known as “Zooming.” There are a couple of mentions of this technique in the documentation, but who reads those, am I right? One is in the Technical Reference and the other is a Tutorial problem (both documents are PDFs already located in your Flow Simulation install directory, under …>lang>[English]>Docs). The official name given for Zooming is Transferred Boundary Conditions, but that’s more boring technical terms than is necessary and doesn’t sound as cool, so I’ll stick with using “Zooming.”
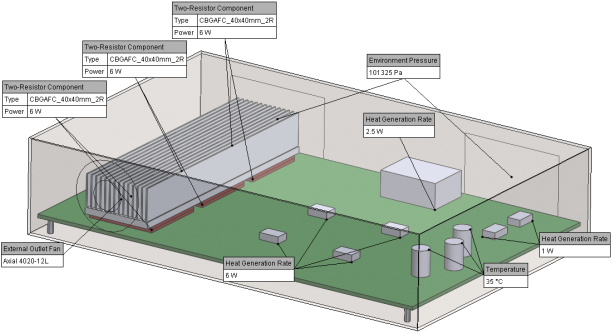
Zooming is essentially a submodeling technique that allows the user to focus the calculation (and results) on a small sub-region of a previously solved larger (and assumed) more coarsely meshed domain. For example, I recently encountered an electronics enclosure example from a customer where there was a region inside the enclosure that required a further more detailed investigation. I created a simplified mockup of this enclosure, see image below, to share with you in this post.
From a top view of the board inside the enclosure, there are three integrated circuits (ICs) on the left side that, because they are large heat dissipators, are being actively cooled by an exhaust fan pulling air through the heat sink. Additionally there are other groups of chips mounted on the board to the right, but are not directly cooled like the ICs because they don’t dissipate as much heat; instead there is a second perforated opening on that side of the enclosure that hopefully will work to remove the heat. When analyzing the results of the fluid flow and thermal simulation, the active cooling does its job in sucking out the heat from the ICs, but the other chips are not so cool and are a burning red color. The focus of the simulation was on the ICs and not in the region of the smaller chips, but now the focus has shifted there because it potentially can be a bigger issue. Purposefully the mesh in this region was fairly coarse, so the air currents and heat transfer from the chips in this area are not sufficiently resolved to capture the reason for the heat up. So in this case, Zooming is the perfect tool to run a more detailed study that specific region.
How to perform the “Zooming” technique (aka Transferred Boundary Conditions)
From the Help: The Transferred Boundary Conditions allows you to focus on a specific region within your model by using results obtained in a previous Flow Simulation calculation as a boundary condition for the current Flow Simulation project. The only requirement is both the used results and the current project must have the same Global Coordinate System.
- Clone your original project. At the top of the Flow Simulation tree, right-click the project name and choose “Clone Project” from the menu list.
- Resize your Computational Domain (CD). Click the CD feature in the tree to show arrows/handles on the screen to re-position the cube over where you want to focus your Zooming study.
- Tools > Flow Simulation > Insert > Transferred Boundary Conditions. (This is the drop-down menu selection for the 2015 release, and for previous release start with Flow Simulation instead of Tools.)
- In “Step 1 – Selecting Boundaries,” see below image, select each Computational Domain boundary that you re-positioned earlier, and Add this to the list of boundaries to transfer.

- In “Step 2 – Selecting results to transfer,” see image below, browse to your original Flow Simulation project.

- In “Step 3 – Specifying type of condition,” see image below, (for most cases that I can think of) choose Ambient. The Ambient boundary condition consists of specifying flow parameters at the boundary’s section lying in the fluid, so they will act in nearly the same manner during the calculation as ambient conditions in an external analysis.

- If there are any items in the Flow Simulation tree not inside the newly defined Computational Domain that came over from your original project when it was cloned, you will need to remove them before solving or the software will warn you that it cannot run until they are removed.
- Also you will want to make changes to your Initial and Local mesh settings before solving because isn’t this the purpose of Zooming.
- Ok, now go ahead and solve the project.
The Results
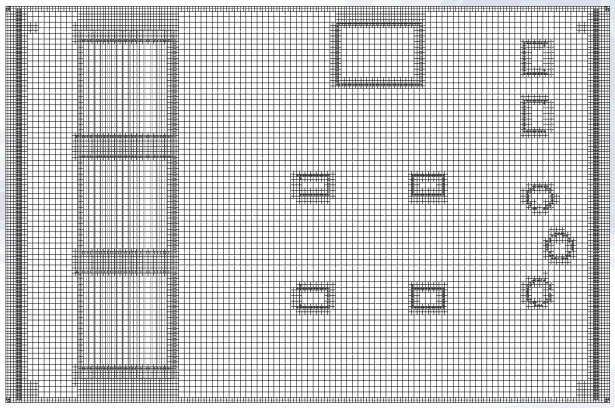
Click the below image to see the GIF animation showing the original mesh followed by the Zoomed mesh laid overtop the original mesh for visual clarity (and this overlay had to be done in a photo editing program). Note that the Zoomed study is run only in the smaller region where you see the finer mesh.
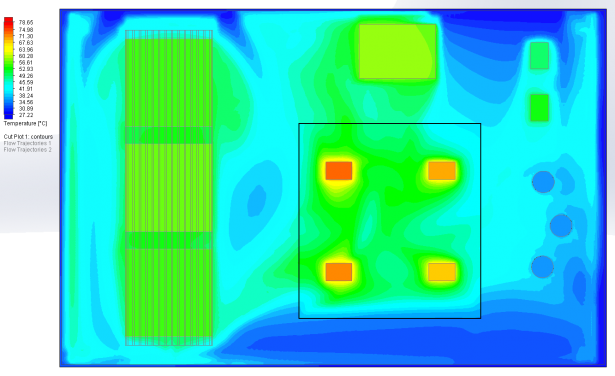
In this next result image, you can see again the Zoomed results laid overtop the original Temperature results. You can see the blue temperatures of the external air entering through the perforated opening on the right hand side, but it’s not doing too much to cool down some of those smaller chips. I’d like to point out and highlight the fact that the results for the Zoomed study, even though solved separately, matches up very well to the results of the original coarser model, thus demonstrating that the transferred conditions work well.
External Flow Example Case
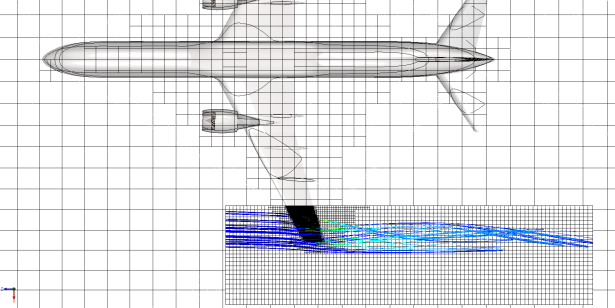
I had to share this next example with you because I think it’s too awesome not to do so. When solving an external aerodynamic problem, for example on a full commercial aircraft, you have two opposing needs for the mesh that are fighting the computational effort: 1) the domain has to be sufficiently large, especially behind the vehicle, to capture the pressure drag; and 2) the mesh near the surface has to be sufficiently fine to capture all the geometry and flow details around it. Large and fine don’t mix well when you need to solve a problem like this in a reasonable amount of time. Again, here is a case where Zooming can help. If I wanted to study the swirling flow coming off the wingtips, I first need to include the information from a large domain including the entire aircraft, and then I can transfer those results to a focused study in the are of the wingtip with a much finer mesh (note that in general the original mesh is much more coarse than it really should be, but was intentionally created this coarse so that the image information was not so dense).
Zooming for design variants
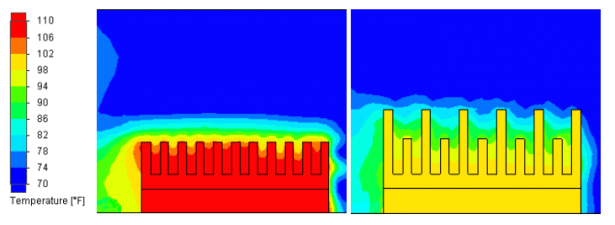
Lastly, Zooming could be useful in the context of testing out subtle design changes, such as a different heat sink extrusion profile as shown in the Tutorial example. I encourage you to try Zooming out for yourself by going through the tutorial example to see how easy and powerful this newly learned functionality can be!
Looking to learn more about SOLIDWORKS Flow Simulation? Register for the recorded Essentials of Flow Simulation 22-minute webinar to learn how you can quickly simulate fluid flow and heat transfer under real world conditions, and see how straight forward it is for designers and engineers to interrogate the results to determine fluid forces, temperature, and other parameters that are critical to the success of your design.


