

Hello to all,
Welcome to the new edition of the SOLIDWORKS® Support Monthly News! This monthly news blog is co-authored by members of the SOLIDWORKS® Technical Support teams worldwide. Here is the list of topics covered in this month’s Blog :
-
Taking control of the SOLIDWORKS® PDM login dialog prompts
-
In SOLIDWORKS® Flow Simulation, how do I define the direction of rotation and the swirl for Axial fans?
-
SOLIDWORKS® PDM Report Generator Dynamic Arguments
-
3DEXPERIENCE SOLIDWORKS® “Rename title” VS “SW Title”.
1.Taking control of the SOLIDWORKS® PDM login dialog prompts
– by Tor IVEROTH
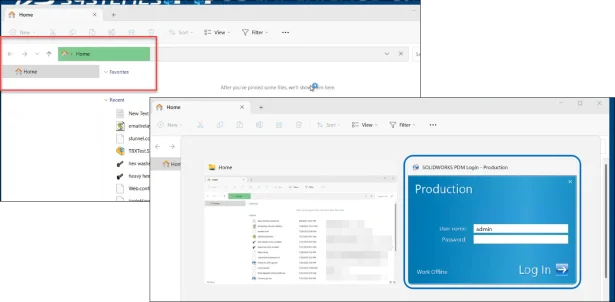
If you have used SOLIDWORKS® PDM on a system for a while, you may find that sometimes a PDM log in prompt to one or more vault views on the system shows up – Even though you had no intention to access or log in to that particular vault.
These login prompts also seem to have a habit of showing up when least expected. Some examples where a login prompt may show are:
- Starting a new email in Outlook.
- Changing name of a folder completely unrelated to the vault view.
- Running a Windows search.
- Typing a path in the File Explorer address bar.
- Starting up a new File Explorer after a reboot.

And if the login prompt for some reason does not show up modally, the prompt might show behind other application windows or on another monitor – the process that triggered the login prompt would wait until you acknowledge the login dialog. So for example, if you open File Explorer which in turn triggers a login prompt that is not displayed, to the end user this may seem as if Explorer now hangs. Explorer has not really frozen, but it is waiting for the user input. As this image illustrates, the login prompt is not initially visible until you ALT+TAB to display it.
Depending on the environment, there are even reports of some situations (often with Windows 11) where the prompt is not shown at all. With the characteristics of Explorer behaving as if it has stopped working.
You may ask, why is this happening?
A file vault login prompt will show when you are not logged in and there is an application on the system that requests access to the files or folder paths within a local file vault view. The login is needed to get the up to date information from the vault database for the file, and potentially cache a copy.
This will most often happen when you use File Explorer to browse into a vault view, in which case PDM logically will show a prompt for you to log in. However, the login prompt may also be triggered in many other circumstances. For example:
- When you use the File, Open or Save dialog from within an application and the last saved path points to the vault view.
- When Windows File Explorer tries to display recently accessed files or folders that includes paths under a vault view.
- When the Windows desktop search index scans the vault view folders, and thereby triggers the login prompt when you are requesting information involving a vault view path – such as typing values into the File Explorer address bar.
To close the login prompt you would proceed with the login. The prompt will then not show again until you log out, or restart the SOLIDWORKS PDM process (edmserver.exe). If you do not want to log in, you have the option of exiting the dialog and a message informs you that this will disable the login prompt until you explicitly log in.
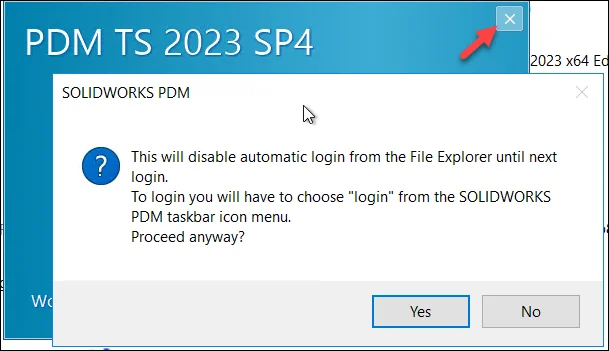
If you exit the login and thereby suppress the login dialog, it will remain suppressed from all future requests from processes that scans the vault view. However, as soon as you exit the PDM process via the tray icon, or edmserver.exe is killed, or system is restarted, the prompt will show again.
How to avoid the prompts?
To date, there have been no viable option to persistently suppress the login dialog (and remain logged out) for a vault view. While some systems only shows prompts when accessing a view, others may show them more frequently and unexpected.
Some options to reduce the frequency of the login prompts:
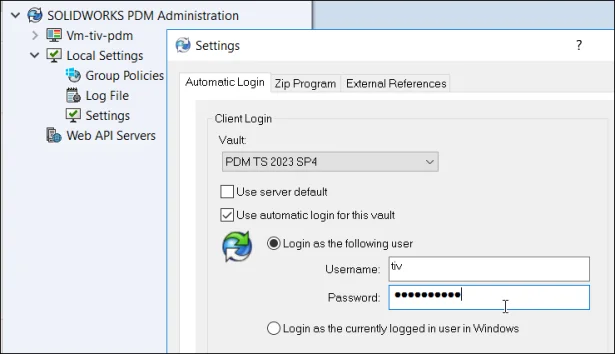
- Use automatic login:When any process accesses a vault view, PDM automatically logs in to the view. The setting can be controlled via the administration tool, local settings, automatic login.
- Set view to offline: An offline view will not prompt for login until it is set to online again. The offline/online flag is stored in the registry – so you could create a .reg file that sets the value to offline, and another to online. When user wants vault access, run the online reg file first. When disconnecting from the view, run the offline reg file. You could even have it run the offline reg file on system startup to ensure it is always starting offline.
- Disable Outlook Attachment menu. If login prompts show each time you open Outlook or create a new email, disable the setting that is outlined in Knowledge Base article QA00000121507.
- Clear recent accessed locations
The Quick access menu in File Explorer has settings to disable or clear recently accessed files. Changing those may reduce the frequency of the login prompts.
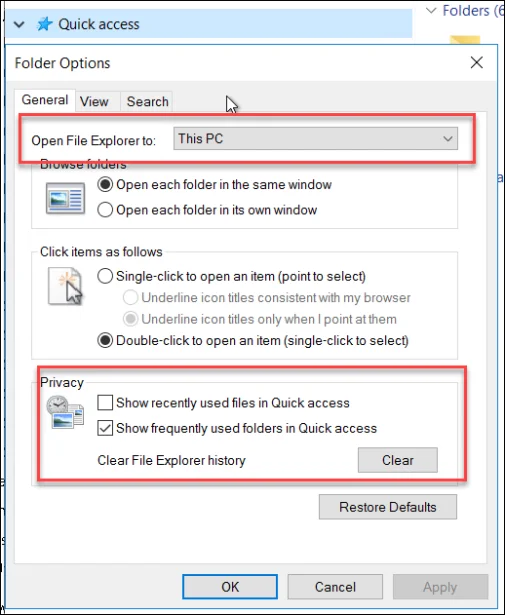
Clear recent accessed locations The Quick access menu in File Explorer has settings to disable or clear recently accessed files. Changing those may reduce the frequency of the login prompts.
A new feature to control the display of the login prompt is introduced in SOLIDWORKS PDM 2023 SP4 and 2024 SP0.
You can now fully control if the login prompt should show, or remain suppressed until you explicitly select to login. This means that no process will trigger the login prompt automatically, thereby avoiding unwanted prompting.
To suppress the login prompt for a vault, on a 2023 SP4 or later client
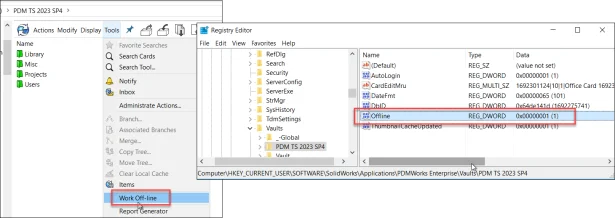
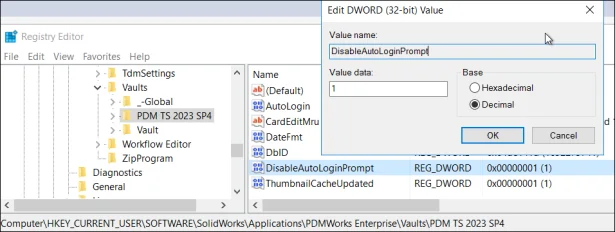
- Open the registry editor.
- Browse tob: HKEY_CURRENT_USERSOFTWARESolidWorksApplicationsPDMWorks EnterpriseVaults[vaultname]
- Create a new DWORD (32-bit) value named DisableAutoLoginPrompt
- Set value to 1 (1=on, 0=off)
- Repeat with each vault view you wish to suppress the login prompt.
- Restart system (or exit SOLIDWORKS PDM via tray icon and restart Explorer.exe process via Task Manager.
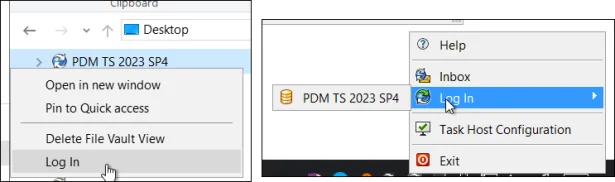
From now on, the prompt will only appear when you right-click the vault view or tray icon and select Log In.
Notes on the new feature
- The setting is defined per current user profile and per vault.
- When enabled, the setting will supersede the automatic login (if enabled).
- Exiting PDM via the tray icon, or logging out will suppress the login prompt again.
2. In SOLIDWORKS® Flow Simulation, how do I define the direction of rotation and the swirl for Axial fans?
– by Julien BOISSAT
The direction of rotation of fans affects the direction of the downstream swirl. The swirl is responsible for the helicoidally shape of the trajectory of fluid particles. The direction of rotation of the fan determines the direction the helix winds in.
Swirl from Axial fans in SOLIDWORKS® Flow Simulation
SOLIDWORKS® Flow Simulation considers swirl automatically for the Axial and Radial fan types. For the general Fan Curve type of fan, you define the swirl manually. For more information, see QA00000105645.
In the SOLIDWORKS® Flow Simulation software, when you define an Axial fan, you can set the Direction of rotation to Clockwise or Counterclockwise.
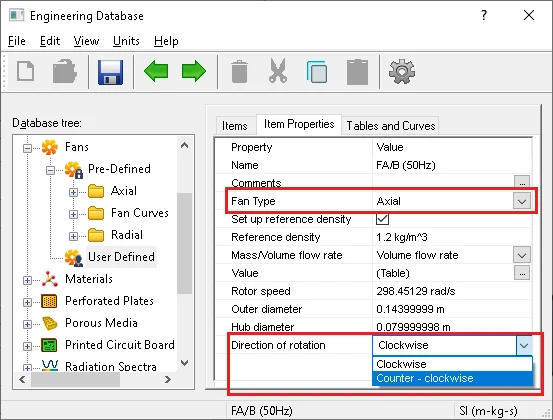
The Clockwise direction of rotation corresponds to a clockwise swirl downstream of the fan, when you view the face selection in Faces Fluid Enters the Fan.
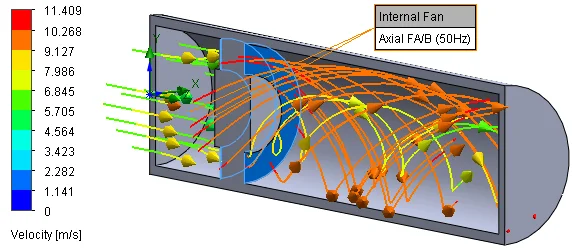
The Counterclockwise direction of rotation corresponds to a counterclockwise swirl downstream of the fan, when you view the face selection in Faces Fluid Enters the Fan.

Estimation of the amount of swirl
It is possible to estimate the swirl of gas just after an axial fan with the following relation:
Vfi = ΔPtotal / (Ρ * Reff * ω * eff)
Where:
ΔPtotal is the total pressure drop on the fan.
Ρ is the gas density.
Reff is the characteristic radius of the fan. A common value is Reff = ½ * (Outer radius + Hub radius).
ω is the angular velocity of the fan.
eff is the efficiency of the fan. A typical value is » 80%.
Vfi is the velocity of the gas in the circumferential direction.
You can then calculate the angular velocity of the gas wFlow with this formula:
ωFlow = Vfi / Reff
Numerical application for the model in attachment:
DPtotal = 72.5 Pa
Ρ = 1.19 kg/m^3
Reff = 0.056 m
ω = 298.45 rad/s
Eff = 0.8
Vfi = 4.556606 m/s
ωFlow = 81.36796 rad/s
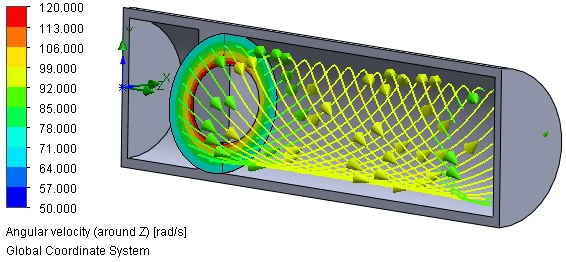
A plot of the angular velocity confirms the estimation of ωFlow is correct:
3.SOLIDWORKS® PDM Report Generator Dynamic Arguments
– by James FALCONER
What is a PDM Report?
SOLIDWORKS® PDM extends the capabilities of the client interface by allowing users to create, save, and print detailed information about files from the Microsoft® SQL database. The report generator uses the DML subset of Microsoft T-SQL, which is the read-only collection of commands that make this a powerful and safe tool to use.
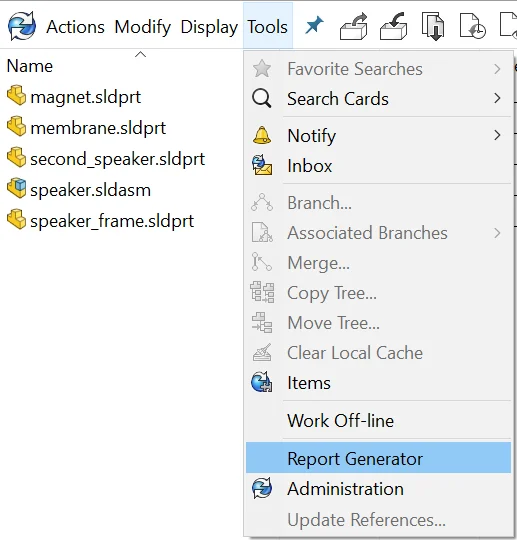
The SOLIDWORKS PDM report generator is found in the Microsoft® Windows Explorer Interface, under the Tools menu, when navigating within the PDM Vault.
How to Modify, or create a Report
The sample file, which has several excellent examples, is located in the installation folder of PDM : C:Program FilesSOLIDWORKS CorpSOLIDWORKS PDM

To test and become familiar with the tool, you can import the Report Examples file. Once you import the .CRP file the tool will remember the queries you imported automatically until you delete the queries from the tool.
Use any text editor to modify the sample file, such as Notepad. Here I am using Notepad++, but all you need is an editor that can save ANSI formatted text files. The easiest way to get started creating reports is to open the sample ‘Report Examples 1.crp’ file. You can see how the file is formatted and you can begin to get familiar on how it functions. Make sure you perform a SAVE AS before making any changes because you want to keep the original WORKING queries without corrupting them.
Creating a SQL query
If you’ve never written SQL queries, or if you’re unfamiliar with SQL Server Management Studio, then we recommend working with someone who is familiar before opening a PDM database. We never recommend performing any unapproved action that performs a change on the database. Remember, you can only use the read-only subset of DML to write these Report queries.
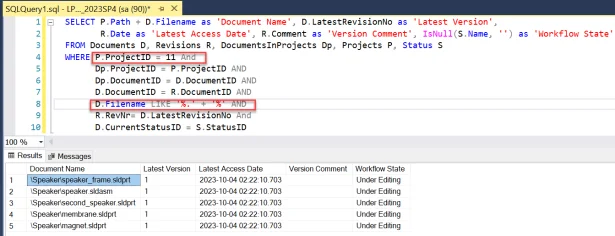
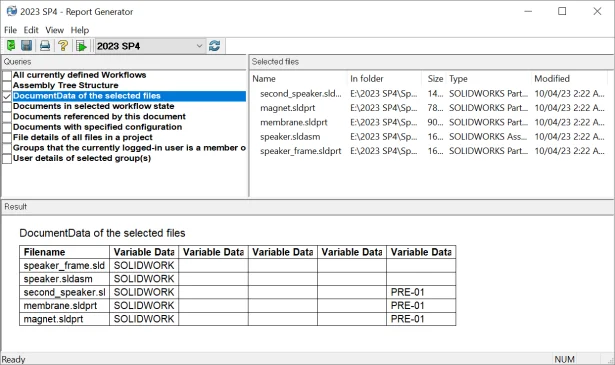
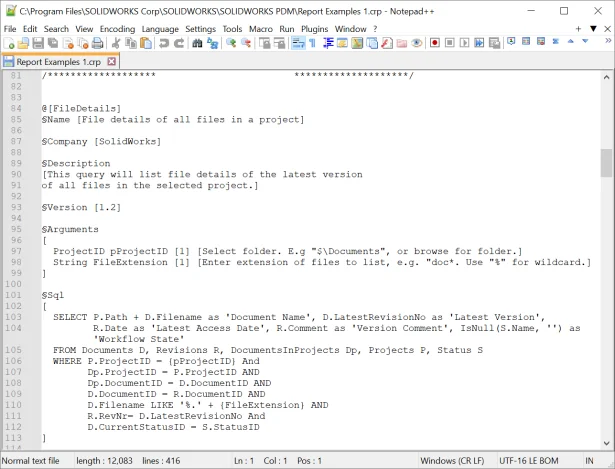
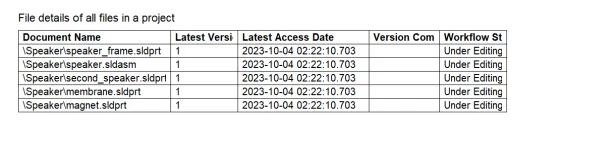
The query above is extracted from the report ‘File details of all files in a project’ to create a stand-alone query inside SQL Server Management Studio. I red-boxed two important components of the query. In this query we want to view the file details of all files within the Speaker folder. First we figure out from the database which ProjectID contains the Speaker folder, which turns out to be 11. Then we use the % symbol to choose all filetypes. This gives us the 5 results on the bottom.
The sample file has most of the commonly used tables which you will use to make report tables. Look through them, write down which tables were used to output what information. This is much better than going table by table in a database.
Variable Declaration: Can prompt for user input
Instead of wasting time searching for which ProjectID value corresponded to the Speaker folder, as we did in the example above, we can instead utilize the power of Report arguments. This is very, very useful, and makes life easier for both the programmer and the end user.
Let’s take a look at the query named ‘File details of all files in a project’ in the Report Examples file.
§Arguments
[
ProjectID pProjectID [1] [Select folder. E.g “$Documents”, or browse for folder.]
String FileExtension [1] [Enter extension of files to list, e.g. “doc*. Use “%” for wildcard.]
]
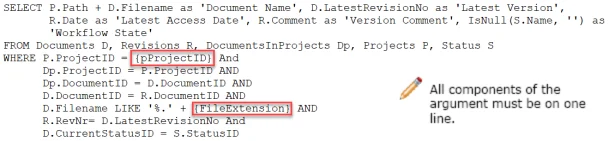
In the Arguments section of the query we declare two variables. One called pProjectID of predefined type ProjectID, and another named FileExtension of predefined type String.
After we define these two arguments, next we’ll need to modify the sql query that we created inside SQL Server Management Studio (SSMS). Instead of using the value 9, we substituted the variable pProjectID, surrounded by curly brackets. Next, instead of the percent symbol wildcard we had defined before we insert the variable Filextension with curly brackets. This is shown within the red box highlights below.
This will now give us the power, and ultimately the user power, to dynamically choose what values to use as query parameters. (In this case which folder to search for, and which filetype to display).
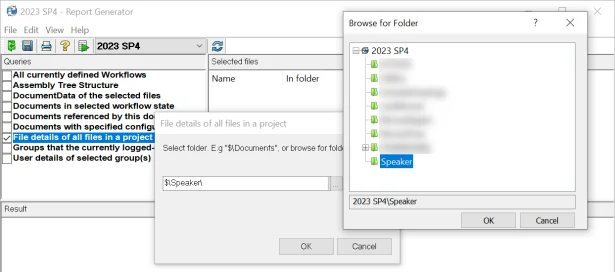
Here I show the two dynamic arguments in action. This prompts the user to select a folder in which to perform the search. I simply click on the Speaker folder.
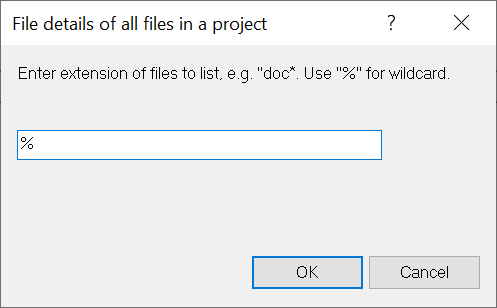
Next, it gives us a choice for what file extension to search for. I typed in the percentage sign, which is the wildcard. The result list is shown on the bottom, which corresponded to results from the much more rigidly designed original SQL query from SQL Server Management Studio.
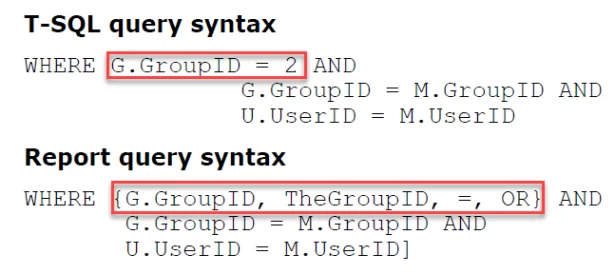
The Admin guide also has some excellent examples describing dynamic arguments. The following example is not as elegant, but it shows a more difficult substitution. In the larger redboxed Arguments section we declare the variable TheGroupID of type GroupID.
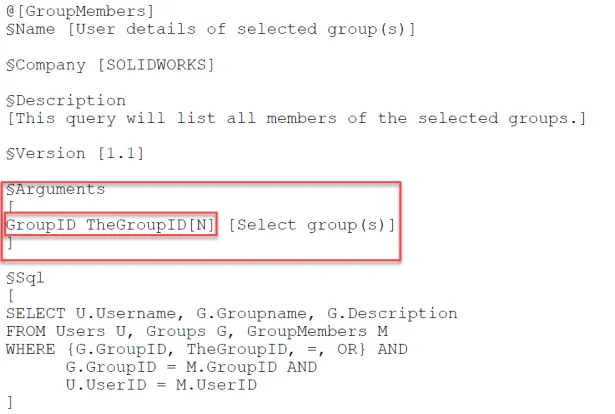
On the bottom we show the original SQL, which had rigidly defined the query to only use GroupID 2, but the report query instead utilizes dynamic assignments, which is shown in the curly brackets above. The G.GroupID, TheGroupID, =, OR} simply means that it will find an OR match from the input the user inputted.
The SOLIDWORKS PDM Administration guide lists all the predefined argument types you can use for dynamic arguments. As well as the rules you need to follow to make them work properly.
4. 3DEXPERIENCE SOLIDWORKS “Rename title” VS “SW Title”
– by Ankit GUPTA
To modify the title of a physical product, we have multiple options like Rename Title from Feature manager tree and the SW Title in the save to 3DExperience dialog box.
Rename Title
When we rename title from Feature manager tree and save it to platform then the component name and title will be same as “Rename_Title”. However, the filename remains default “part1“
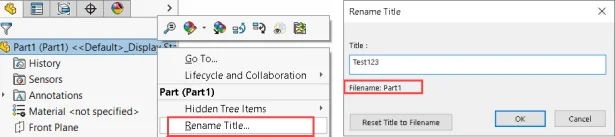
Rename title command renames Title and Component Name only. However, if you try to save the part locally after using rename title command, then the same is applied to filename (you can make changes to the file name as per requirement ). Filename is generated only once when the file is being saved to the platform and cannot be changed later.
Please refer the following video for visual demonstration:

SW Title
SW Title gives us the capability to make changes to the title if there are components with same details already present on platform. This will allow users to avoid the need to revisit and revise the title.
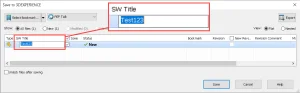
Now, if you have created a new part and have not saved locally, it means that the file name has not been generated and fixed yet. Therefore, when you apply some name in “SW Title” the same will be applied to Component Name and Filename as well.
Please refer the following video for visual demonstration: