Did you know that SOLIDWORKS CAM can handle about 80% of your day-to-day CNC programming needs? It’s simple to learn, fully associative and saves CAM data directly within your SOLIDWORKS model. Best of all, it’s already included in your seat of SOLIDWORKS!
In this video, we are going to show you just how simple it is to use SOLIDWORKS CAM to take your SOLIDWORKS model from conceptual design to machined product in a fraction of the time.
Bringing the Part to Life
The process starts inside SOLIDWORKS with the CAD Model. Here we use SOLIDWORKS CAM to program the machining without leaving SOLIDWORKS.
To start the CAM Setup, the correct Mill Machine must be chosen. Next the size of the Machine stock is set, and lastly the Machining Coordinate System is established at the Top Center of the Part Model.
Once the setup is complete, we need to create SOLIDWORKS CAM Features. This can be done using Automatic Feature Recognition, which compares the Final Model Geometry to the machine stock and creates Machining Features that are linked to the SOLIDWORKS Model geometry. Machining Features can be created interactively as well. So 2.5 Axis or Multi-Surface Features can be created that way if needed.
After the Machining Features are finished, Operations are generated based on the Strategies specified in the CAM Features. If the CAM Feature is setup with a Rough and Finish Strategy, Rough and Contour Mill Operations will be created. The Default Parameters used for those operations are stored in the SOLIDWORKS CAM Technology Database. Which is customizable database that can be modified to match the desired practices for machining.
Once Operations are setup as needed, SOLIDWORKS CAM will generate the Toolpaths needed to machine the workpiece. These Toolpaths can then be simulated for review to make sure the workpiece is being machined correctly, and also to detect any collisions between the Tool or Holder. The final Machined Geometry can be compared back to the SOLIDWORKS CAD geometry for any differences to assure accurate final geometry.
The last step before going back into the shop is Post Processing. SOLIDWORKS CAM will generate the G-Code program needed to run the Mill for both setups used to machine the workpiece.
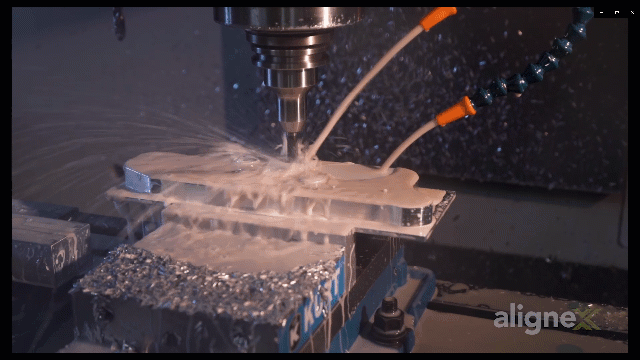
After everything is complete in SOLIDWORKS CAM, the Mill machine needs to be setup. The first step in that process is to Qualify each tool to the height of the stock.
After all the tools are qualified, we need to set the machine zero to match our Setup Coordinate System in SOLIDWORKS CAM, which was set to the Top Center of the Workpiece. Once that is complete, the G-Code Program is loaded and it is time to make chips.
Once the first setup is machined, the Mill will need to be re-zeroed to match the SOLIDWORKS CAM coordinate system for second setup. The reamed hole from the first setup was used in CAM. In doing so, the second setup references a machined feature from the first setup and increases accuracy. Now the second side of the workpiece can be machined.
Now you see how simple it is to take your SOLIDWORKS CAD Model from conceptual design, to finished product using SOLIDWORKS CAM.