The Line Format Toolbar can be used in drawings to change an entity’s appearance. Using this toolbar, we have the ability to control an entity’s color, line thickness, and line style. These appearances can be managed through layers to maintain consistency across a series of selections. This blog post will summarize and show how to use these capabilities.

Starting with how to turn on the toolbar, we can do this by right clicking anywhere in the CommandManager and selecting the toolbar we want. This can also be done through the View menu dropdown under the Toolbars flyout. We see that when we make this selection, the Line Format toolbar appears at the bottom left of the screen. However, this can be undocked and dragged to wherever the user prefers.
Working from left to right across the toolbar, we first have Change Layer and Layer Properties. These allow us to change the active layer and set Color, Thickness, and Style properties for entities.
We create a layer by defining these options in Layer Properties. Creating a new layer automatically makes it the active layer.
We’ll start by moving some existing annotations onto the newly created dimensions layer by using the Change Layer button.
Additionally, any newly created entity is automatically added to the active layer and assigned that layer’s properties. In our case this consequentially added the new dimension onto that layer.
As a note, the layer information will be included when both importing and exporting *.dxf or *.dwg files.

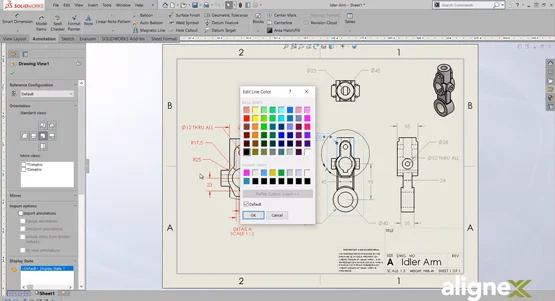
The next button on the toolbar is Line Color. In summary, it allows us to change the color of edges, sketch entities, and certain types of annotations. This selection will override the system defaults which are defined in System Options under Color. I’ve used it here to make my geometric tolerance blue.
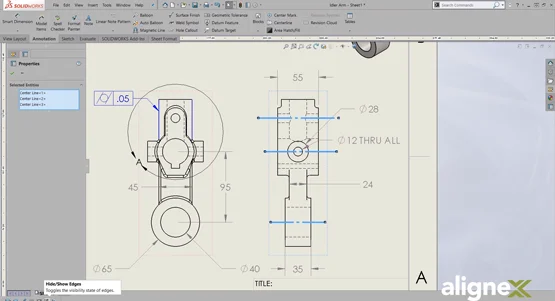
Line Thickness gives us the option to change the thickness of selected lines. We can choose a thickness from the list or enter our own value. We can also switch it back to the default as defined in the template’s document properties. I’ve created a few centerlines on this side view that I’d like to thicken up for stronger emphasis.
Line style behaves similarly, instead changing the appearance of the selected edges.
Hide/Show Edges brings us into a tool where we select the edges we want to hide, either individually or with box selection, to toggle visibility of the edges. To force the edges to show again, we just toggle the Hide/Show Edges button again which allows us to set hidden edges back to show.
Lastly, the Color Display Mode button will toggle between any custom-defined colors (either defined in Layers or with Line Color) and the system-defined colors.