Using SOLIDWORKS and 3D Printing to Breathe New Life into Broken Toys

1. Uncovering a childhood memory at the thrift store!

I love thrift stores. There’s something magical about walking into one of these places and uncovering a treasure or seeing something from your childhood resurface. The latter is what happened to me when I went to my local thrift store last weekend. The thing that caught my eye this time was Guitar Hero.

Guitar Hero

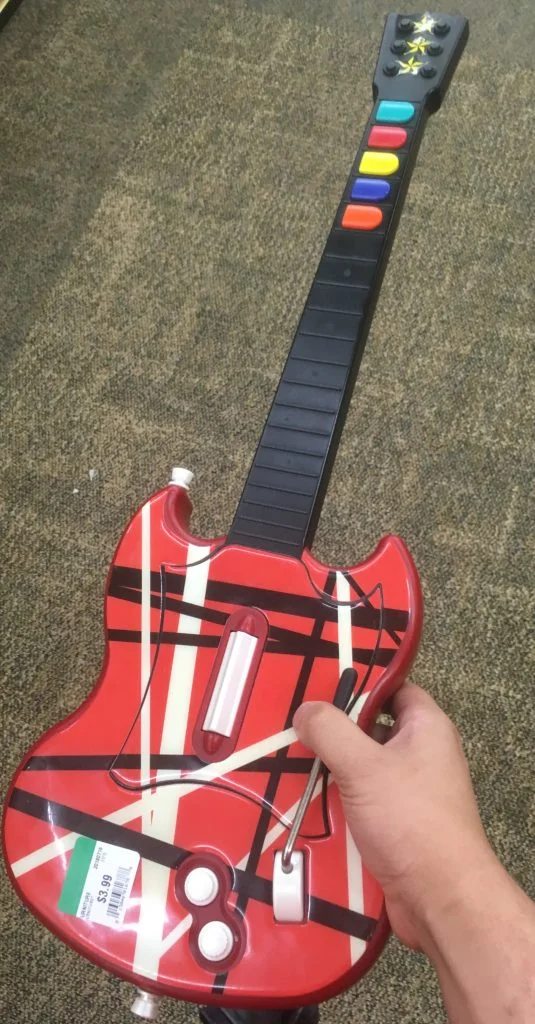
Guitar Hero was a video game released by RedOctane back in 2005. The main goal of the game is to use this plastic guitar controller to hit colorful notes that would fly at you on the screen. It was all the rage back in the day. Memories flooded of me hanging out with my friends, enjoying music from Aerosmith to Coldplay to Metallica in a new interactive way! I had to have it. And for four dollars, the price was right!

But before I could reconnect with my childhood, there was a problem: The Whammy bar was broken. The Whammy Bar is the metal rod that sticks out the base of the guitar. It is supposed to stick up, and you can press it down repeatedly to “bend” the pitch of notes in the game, which earned you extra points (and was always super fun to wail on!) Well, the whammy bar that came with my controller was a little bit more…. Sad. Take a look:

We can deduce that there is a spring in there that is not doing its job. Maybe the spring dislodged? Perhaps something else is broken in there? Only one way to find out. Let’s open it up! I did just that by removing a handful of screws, and then the problem was immediately apparent. Pictured below is the whammy bar extracted from the body of the guitar, as seen from the back. The problem area is circled in red. There is a little white plastic tab that is supposed to interface with the levers holding the spring. The plastic has yielded to the point of failure, no doubt from intense (fun) use.

Whammy Bar Extracted From Guitar Body

In my opinion, this is poor design. The plastic tab was molded with almost no radius on the inside corners. This coupled with a kid’s soda-fueled punishing of the mechanism, probably lead to a very high stress concentration on the tab, causing it to fail. After that analysis, another realization dawned on me.

This is unfixable.

If I was a kid back in 2007 facing this problem, what could I possibly do to repair it? That plastic tab is part of the piece of plastic that the whammy bar inserts into. They didn’t exactly sell that in any store. Some of you may be thinking “Super Glue”. It’s a valiant effort, but I will give anyone $100 if they can glue that back on straight so that it fits in the mechanism. Remember, the plastic has yielded and deformed, at this point its practically impossible. Still, let’s say by some miracle, you were able to do that and take my money. I bet you another $100 that it wouldn’t even last a day. A super glue joint will be nowhere near as strong as the original part. You’d put it back together only to have it snap after trying out the whammy bar a few times. I’ll take my money back now.

The only option (if you wanted the whammy bar functionality) is to buy a new guitar. That leaves this old guitar to be thrown in the closet, given away, or worse yet, landfilled. This guitar had no chance of being played again…

Until now!

It’s 10 years later. I have a mechanical engineering degree, expert certification in SOLIDWORKS, and some 3D printers in the DesignPoint office. Let’s see what we can do.

2. Modeling a replacement in SOLIDWORKS

As we discussed, the plastic part has no chance of being repaired so let’s just make a new one! First thing we need to do is model it in SOLIDWORKS. Since the part is very prismatic in nature, using calipers to measure it all over is the simplest method.

SOLIDWORKS Model of Replacement Whammy Bar Component

I start with the base semi-circular prism, and then add features that I can easily measure. Most of the measurements are good enough as approximates, but there are a couple of critical fits that I need to be cautious of. One one hand, there is the hole that is the axis of rotation of the whammy bar (shown in blue in the image below). This needs to be a slip fit. If it is too tight, the mechanism may bind even with the spring applying a force. On the other hand, the hole shown in red is what accepts the metal whammy bar itself. It should be able to rotate in the hole if you turn it manually but stay where it is placed when a force is not applied. Therefore, a slight interference fit is most appropriate.

Interfacing Components

I measure the interfacing components’ outer diameters (a potentiometer for the blue face, and the whammy bar itself for the red, and add 0.008 inch to the diameter for the blue face and 0.001 inch for the red face.) The nice thing about 3D printing is that if this needs to be adjusted, it isn’t expensive to print out another prototype (and of course, we can very quickly modify the dimension(s) in SOLIDWORKS!)

Now that I have the base part, it’s time to add the pièce de résistance: the tab. Remember the tab is what transfers the force between furious Guitar Hero players and the spring, so we can use this as a chance to beef up the design.

Cantilever Tab Connected To Larger Boss

Shown here in gray is an approximation of the original design. We can see that it consists of a cantilever type tab connected to the larger boss. I mentioned earlier, the problem here is that the fillets (pointed out in red) are very small, which leads to high stress concentrations and failure.

Cantilever with Doubly Supported Overhanging Design

Contrast this with some of the design changes I made, shown here in teal. I changed the cantilever design to a doubly-supported overhanging design, which should give it better resistance to the bending moment that it experiences during use. NOTE: this would make it very difficult to mold without the use of side cores, but since we are 3D printing, we have that design flexibility!

The size of the fillets were also changed. The fillets pointed out in orange are sized very generously to handle the shear stresses induced during use. The fillet in purple was also made larger, but not to the degree that the orange ones were. The tab has a pretty close fit with this mechanism, so making the fillet any larger would likely interfere and propose a problem. I’m confident that the other changes make up for it though.

With these changes done, it is time to print!

3. 3D Printing and testing

I set to print this on our Markforged printer. The Onyx plastic that it uses is very strong and has a very beautiful deep black finish. After sending the print and waiting, this is what I got:

Markforged Onyx Plastic Part

All the features came out great and it is time for a test fit! The slip fits that I mentioned earlier were nailed perfectly, so no problems there. The interference fit too, however, it is a little bit too tight. I add 0.002 inch to the diameter of the hole, give it another try and the fit is perfect the second time around!

New Whammy Bar with 3D Printed Component

Here is a picture of the whammy bar installed in the brand-new part. Looks slick!

New Whammy Bar Installed in Guitar

Here is another picture of the new part installed in the guitar. You can see the new black tab fits perfectly into the hole left by the two white levers with the spring. When the whammy bar is used, the tab pulls the levers and stretches the spring, which give the upwards force. Clever!

All that is left to do is close it back up and give it a spin! Check it out!

As a final deed, I also gave the guitar a good cleaning and removed all the stickers and decals…. Looks like it just came right out of the box!


Old Guitar Hero Alongside The Fixed and Cleaned Version

Within a day, I was able to turn thrift store junk into hours of amusement using the power of SOLIDWORKS combined with the power of Markforged! Now, let’s see if I can beat my old high scores…

Check out more blogs like this one here. You’ll find helpful articles and educational videos on a wide range of engineering and manufacturing topics to help you maximize efficiency in your job role!

And don’t forget to follow us on FacebookTwitter and LinkedIn to stay up-to-date on our latest blogs, videos, promotions and more!


Author: Robert Maldonado, Application Engineer at DesignPoint

DesignPoint
DesignPoint is passionate about building solutions that help product design, engineering and manufacturing companies maximize their potential. By developing trusted partnerships, we help our customers achieve game-changing results and support them in their journey as they strive for more. With DesignPoint, More is Possible.® Our solutions include SOLIDWORKS 3D software, 3D Systems and MarkForged 3D printers, technical support, training and more. Contact us today at design-point.com!
DesignPoint
DesignPoint