SOLIDWORKS 2017 takes another step towards making 3D printing as easy as 2D printing. Quite a bold statement, and to be honest, it will never be quite that straight forward; after all, there is a whole extra dimension to it.
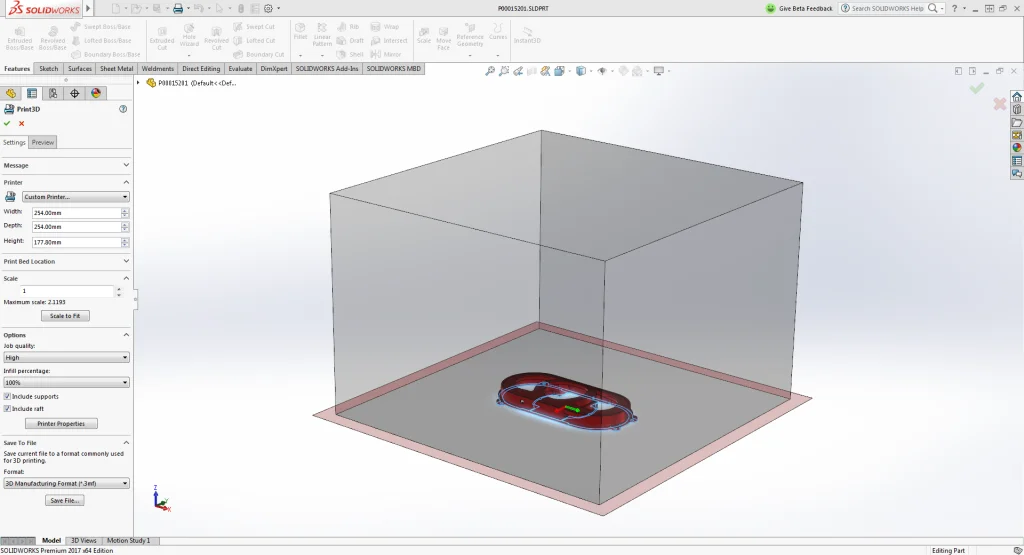
In the File drop down menu, underneath Print (for 2D prints), you will see Print3D, which has been enhanced significantly over the last couple of releases. Now there is the ability to create your own custom printer. This is so you can plan the location on the build platform that you want to build the model, and check it fits on your machine. The plane selected for the build direction is usually key when 3D printing and once this is selected, the information is stored in the new 3MF format (that SOLIDWORKS helped to create, see 3MF Consortium for more details).
This new file format, created specifically for Additive Manufacturing, is now supported in SOLIDWORKS 2017, for both import and export. This is great news for anyone wanting to print in color. The 3MF format supports colors, base materials and also label mapped decals so what you see on screen can now be 3D printed in full color, if you have a capable 3D printer, of course. If you don’t have a color 3D printer at home, or the office, 3MF is supported by online printing service i.materialise.
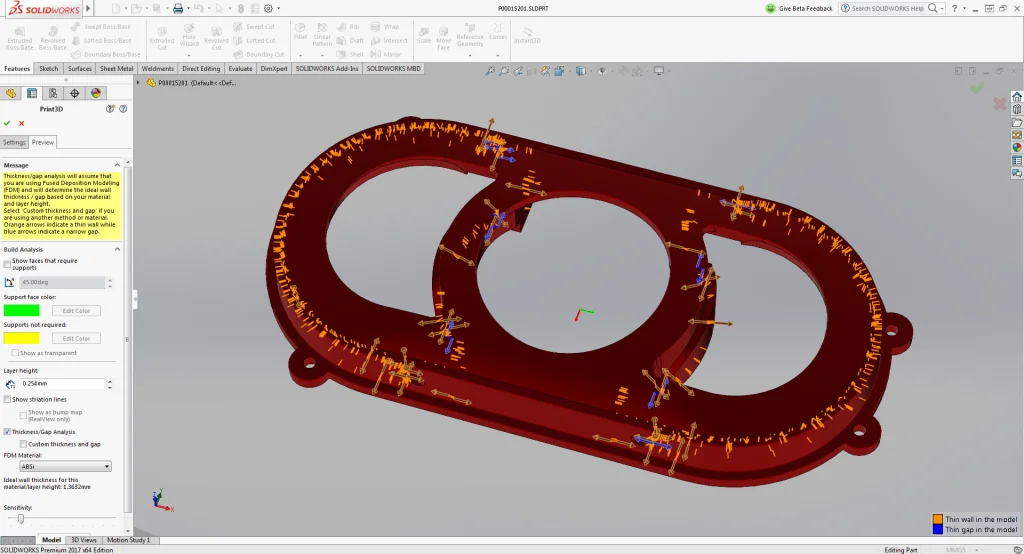
A new addition to Print3D is the new print validation section under the Preview tab. One of the most common cause of a failed 3D print is because there are features in the model that are too small to print, or gaps too small to be recognized. To help prevent these failed builds, there is now a Thickness/Gap analysis check. This check is particularly useful when you are creating a scaled down model to fit on your printer. Small features and gaps can easily be overlooked when you are scaling down. An additional benefit comes if you are not sure what value of thickness or gap to check for. If you are using a FDM/FFF 3D printer (and since well over 50 percent of machines out there are of this type, it is quite likely), then there is a list of materials with some ideal wall thicknesses allowable based on the layer height. If the material you want to use is not in the list or you are using a different additive technology, you can use the Custom Thickness and Gap check box to specify your own value. As expected, this checks the geometry very quickly and highlights where you may have unprintable features, upfront and before you send the job to the machine. This could save hours of wasted build time and also a lot of material.
SOLIDWORKS 2017 makes 3D printing easier and more streamlined than ever before, ensuring more successful builds whether prototyping, designing tooling and fixtures or production parts via additive manufacturing. To learn more about the more than 200 new, user-driven enhancements in SOLIDWORKS 2017, explore the website here or contact your reseller.