This article is based on an article that originally appeared on SolidWorks Legion.

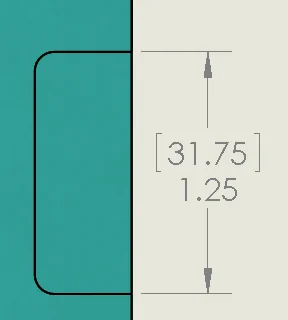
Dual dimensioning is the drafting practice of using multiple units of measure in a dimension in the same direction of a feature. SolidWorks and many other CAD programs support dual dimensioning. At one point, it was a surprize to me (and often is to others too) that no current drafting standard actually supports dual dimensioning. In retrospect, this makes perfect sense.
My experience is with ASME Y14.5M-1994 and 2009. When invoking ASME Y14.5 (or even ANSI Y14.5M-1982), one will find that rules regarding dual dimensions do not exist. ANSI Y14.5M-1982 does mention in its appendix that support for dual dimension no longer exists in the standard. This is apparently because it was mentioned in a previous version. There is wording in the ASME standard that suggests dual dimensions aren’t compliant. It may vary between versions, but carries the same meaning in all versions. In ASME Y14.5M-1994, that wording is as such in 1.4(d),
Dimensions shall be selected and arranged to suit the function and mating relationship of a part and shall not be subject to more than one interpretation.
General practice in the use of dual dimensions is that they are of equal importance to the primary dimension. This creates issues in that it allows for more than one interpretation of the dimension. It is nearly impossible for nominals and tolerance ranges to be identical between units of measure. This means that the dual dimension tolerance range is usually resized to fit within the tolerance range of the primary unit of measure. This creates a situation where the dimension has more than one interpretation, which is specifically prohibited by 1.4(d). The conclusion that can be drawn from this is that dual dimensions are actually not allowed by ASME Y14.5. This is the hard argument against the use of dual dimensions. I could end this article right here. However, I will also explore the soft arguments against their use.
ASME Y14.100-2004 paragraph 4.32.3 uses soft language to discourage the practice of converting inch to metric and vise verse (“should not be used”). This is known as soft conversion. This is not an outright prohibition against dual dimensioning by itself. However, the practice of soft conversion is integral to using dual dimensions. With this practice discouraged, dual dimensioning is also discouraged.
ASME Y14.5M-1994 defines a reference dimension as such,
A dimension usually without tolerance, used for information purposes only. A reference dim is a repeat of a dimension or is derived from other values shown on the drawing or on related drawings. It is considered auxiliary information and does not govern production or inspection operations.
By definition of reference dimensions, dual dimensions should be treated as reference dimensions. It could be said that dual dimensions are disallowed unless they are considered reference only.
With all of these arguments aside, CAD applications do accommodate users who need this capability. However, if used, caution must be exercised. Handling of dual dimensions using common practice can create confusion on a drawing. In the effort to avoid issues and violations of the standards, it may be helpful to control dual dimensions with a note that states they are for reference only on the drawing. This can be accomplished by adding a note similar to “DUAL DIMENSIONS IN BRACKETS ARE FOR REFERENCE ONLY.” This avoids problems caused by multiple interpretations for dimensions. Of course, over use of reference dimensions is also discouraged by ASME Y14.5. But hey, who’s it hurting?
For SolidWorks, dual dimensions on a drawing may be employed by going to Tools>Options>Document Properties>Dimensions. Go to each dimension type and check mark Dual dimensions display. Also, individual dimensions may be set to Dual Dimensioning by check marking the Dual Dimension group box in their PropertyManager.

