On my way to earning my CSWE, the most challenging step – in my estimation – was earning my CSWPA-Surfacing certification. It was a fun exam, but challenging nonetheless. In general: creating organic shapes has historically been more challenging, in my opinion, than it really needs to be.
At times, utilization of surfacing tools in SOLIDWORKS 3D CAD has proved to be the most straight-forward way to make swoopy, organically-shaped geometry. You can get very creative with the types of end result bodies/parts you can create using these tools.
Over time, you can also garner quite the reputation as a modeling ‘wizard’ – if you’re able to gain a healthy command of surfacing techniques. But for tools representing the ability to create beautiful faces and shapes (in general), the barrier to entry to create these faces and shapes always seemed a bit too daunting to me as a SOLIDWORKS user.
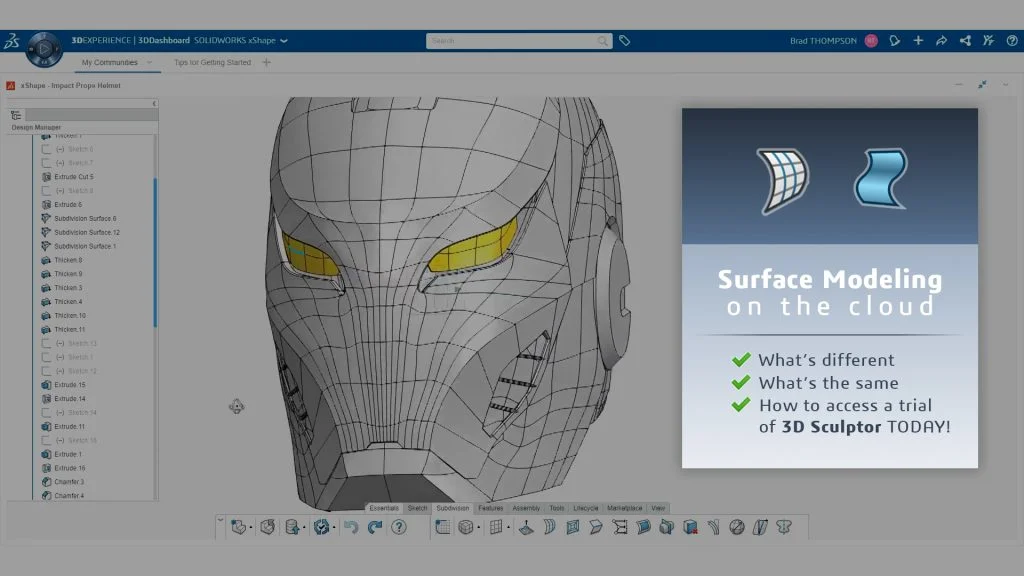
In fact, this was the exact premise of the first conversation I had with Brad Thompson of Impact Props, resulting in this video showing the modeling of this amazing Iron Man concept helmet we collaborated on:
In the tutorial video embedded above, you’ll see one of the more common SOLIDWORKS 3D CAD surfacing workflows – defining/trimming a surface by a sequence of curves. With xShape, you’re practicing a type of modeling called subdivision surface modeling. This refers to the push-pull functionality lending malleable control of all surface edges and faces dynamically, as seen in Brad’s video.
With that said, of course, you need to model within ‘some’ constraints most of the time. As you can see in Brad’s video, modeling around photos (and reference sketches, if preferred) is a great way to do this.
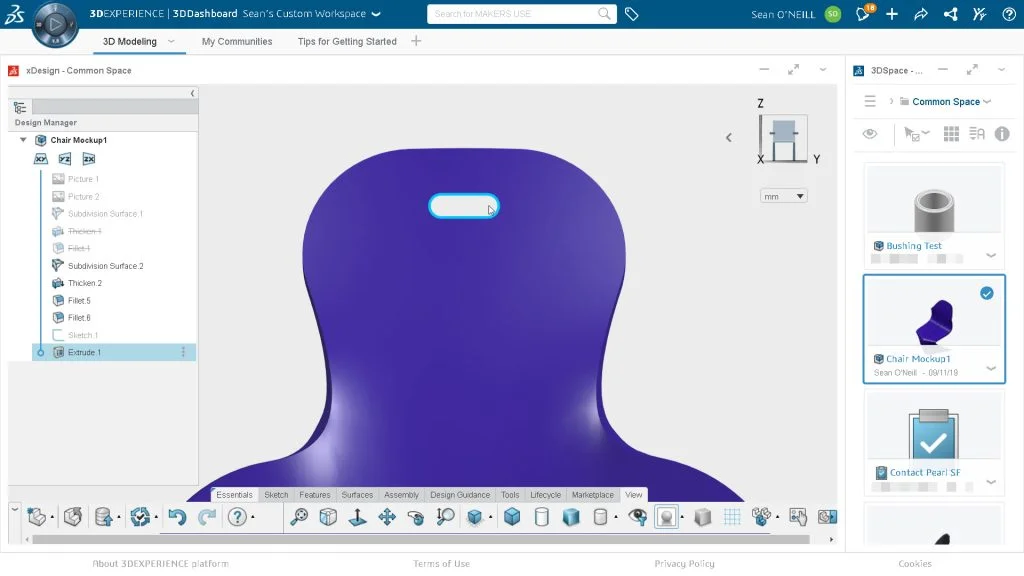
Just like with surfacing tools found in SOLIDWORKS 3D CAD, the end goal is typically to form your creation into a solid body. With xShape, you can automatically convert subdivision surfaces to solid geometry when finished. You can also use the tools available in xDesign (part of the 3D Creator role) to parametrically edit/append to these bodies as needed, with exacting cuts, extrusions, etc. as Brad does.
You can see another example of this interplay in a model I’ve created, pictured below. I challenged myself by creating a seat design based solely on a 2D primitive (a planar surface inserted into the modeling space). Once I was done pushing and pulling, I smoothed out its edges with a couple fillets, and then added a fully-defined, sketched-based slot cutout to the end result solid geometry (I needed an easy way to pick up and place the seat!).
Another thing to note in the screenshot above is the Surfaces tab. We’ve focused heavily on the subdivision surface modeling capabilities available in xShape, and how these can intertwine with xDesign for the ‘best of both worlds.’ It’s worth mentioning, however, that you can access many of the same sorts of curve and/or face-defined surfacing tools you may have used in SOLIDWORKS 3D CAD over the years (shout out to my CSWPA-Surfacing holder compatriots!).
And just like you can leverage what you’re accustomed to on the desktop side within the cloud app environment, you can reap the benefits of 3D Sculptor in both locations. This is something Eric Haddad of 3DAeroventures shows quite well, bringing an xShape-modeled wing tip designed into SOLIDWORKS 3D CAD. There are a few ways you ‘could’ do this; however, the cleanest way is to drag and drop these components directly via an add-in on the SOLIDWORKS 3D CAD side.
Want to try 3D Sculptor for yourself? Click the banner below to request a free trial today!