
“I have a point cloud, now what”, is a question that often arises in the SOLIDWORKS user community and how that question is answered varies on who you ask.
While my personal experience over the years working with point clouds often brings back memories of the game “Connect the Dots” in the Highlight magazines stacked high on the end table at my dentists’ office, I must admit although not quite as easy, working with point clouds elicit the same mental happiness when the image magically appears on the computer screen. Being able to “see” the hidden features is a task that will serve you well when working with point clouds!
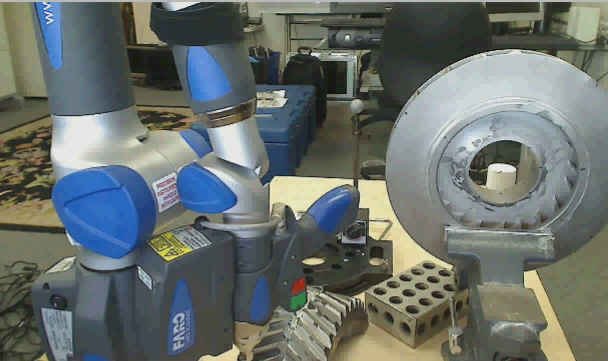
Scanning a mold, model or part is where a point cloud starts. There are several hardware manufacturers that offer scanning devices for this task resulting in a file usually as a common file that is easily read by most computers in the marketplace today. Please note that I said easily read but NOT easily processed.
You can either scan your part yourself or hire the scanning services from a vendor. If doing it yourself you will need a scanner, a computer, scanning software and of course your part set-up within an environment that lends itself to being able to capture all necessary surfaces of your part.
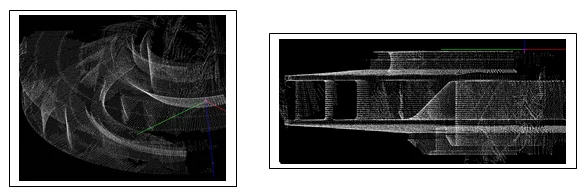
Processing the file is where the real work begins. Depending on the horsepower of your computer, reading a 200 megabyte file can be a most challenging task and one might want to launch this task before you leave for lunch and hope that the machine has had enough time for the entire file to be read and visually on your computer screen upon your return. After all, time is everything!
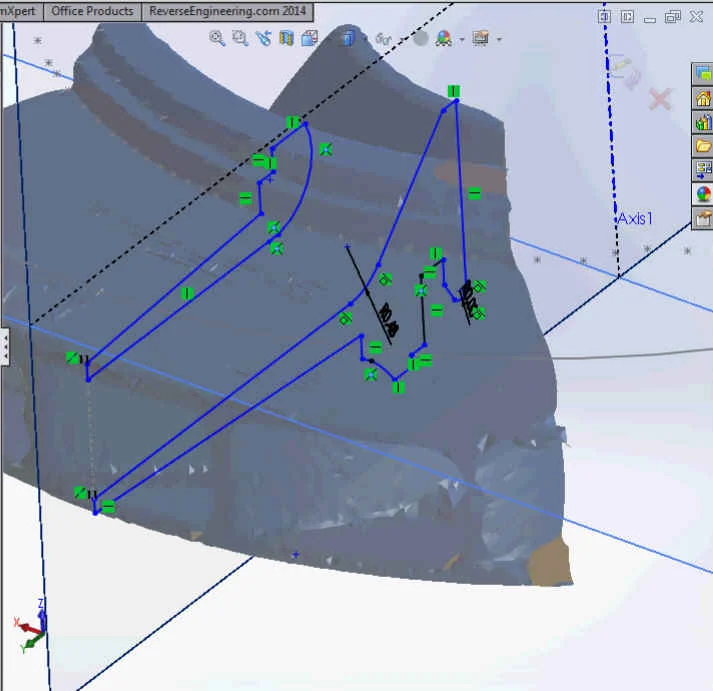
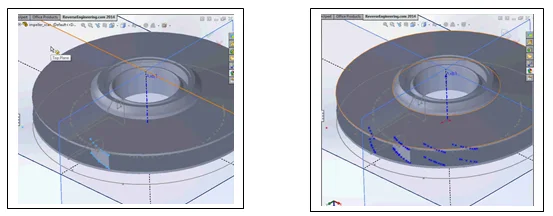
Reading the scanned file into CAD can easily be done in SOLIDWORKS Premium by choosing the “file read” task. The speed of the “file read” is relative to the size of your raw point cloud file. “Raw”, meaning a file as is, not cleaned up and very little post processing prior to sending it into your native CAD design software. Now that you’ve read the file into SOLIDWORKS this is where the real work begins. Thinking in reverse will be helpful at this point. Since the file is of a mold, model or part that has already been designed, an engineer needs to analyze the point cloud and look for those “hidden features” that are critical to the remanufacturing or the redesign of this point cloud.
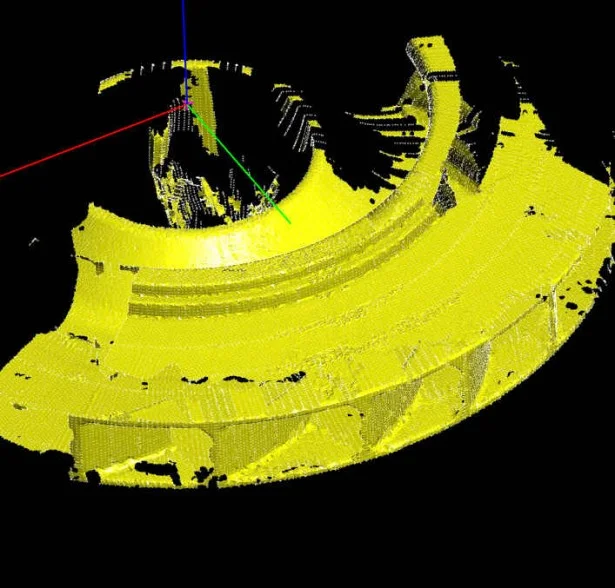
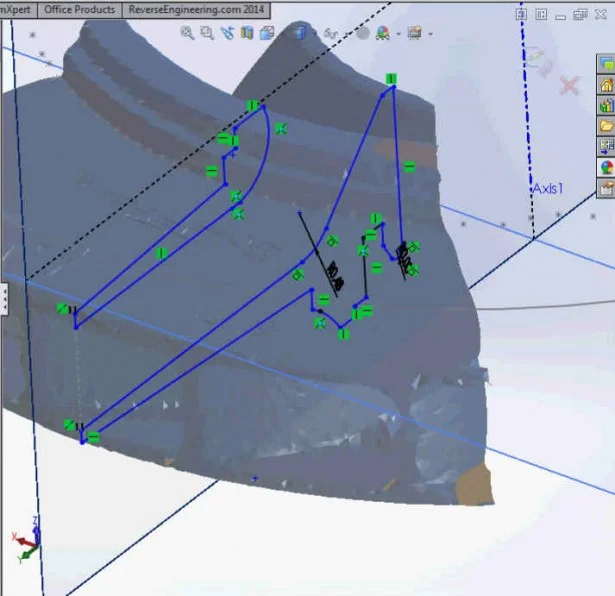
The file size of a point cloud is only the first challenge but also one of the most important steps in working with a point cloud file. As previously mentioned, finding the critical features within a cloud is imperative and the points within a cloud determine where those features are relative to the drawing’s coordinates.
Third party software solutions are available that claim to post process point clouds for the sole purpose of making a point cloud more user friendly. Ultimately, now that you have a point cloud the best practice would be working with it directly in your native CAD package. SOLIDWORKS Premium and the Scan to 3D module contain a multitude of assets that are valuable to you when working with your point cloud. Yet you still need to be confident that your point cloud is in position (post processed) to be brought into your CAD.
In my experience, there are several 3rd party point cloud post processors ranging in price up to $40,000 per software license. Keep in mind, these software solutions often by pass your native CAD modeling environment as they attempt to become your “modeling solution”. Ultimately you still end up with a non-native drawing.
HIPP (HighRES Integrated Point Cloud Processor), from ReverseEngineering.com is a relatively new point cloud post processing software solution that does NOT by pass your native CAD software and in fact it provides the ability to quickly and easily bring your point cloud directly into your CAD design software such as SOLIDWORKS. The HIPP software can manage extremely large point clouds and creates a manageable file without degradation of features. HIPP software prepares your point cloud as a .res file and then it feeds that file directly to SOLIDWORKS as native sketch entities. The benefits of the HIPP post processing solution are many. It is easy, quick, accurate, economical, and best of all keeps engineers directly in their CAD of choice to continue the redesign or analysis of the point cloud.
Now that you have the point cloud in SOLIDWORKS the rest of the task of working with your point cloud is intuitive. The previous learning curve of working with the redesign or analysis process of a point cloud, within a non-native environment has been eliminated.
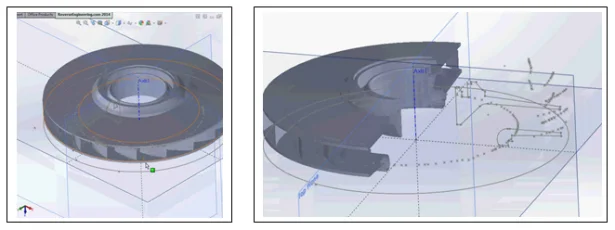
When working with your point cloud in SOLIDWORKS, the Scan to 3D add-in offers options to create meshes, delete points, select points to draw curves or create curves at the intersection of a plane and mesh. Most tasks can be performed relative to an end-users modeling style, workflow, and level of experience.
With the mystique of working with point clouds now removed, HIPP provides users the ability to prepare the point cloud for an easy and cost effective handoff to your native CAD. The task then becomes intuitive as you re-design or analyze your geometry directly in design software such as SOLIDWORKS.
At this point, you have scanned your part, you have fed the scanned file into the HIPP software for point clouds, then the scanned file was passed from HIPP to SOLIDWORKS and the rest of your work was performed directly inside your native design software. This process keeps it simple, takes the mystique out of a dense cloud of points and quickly eliminates the need to spend hours learning a new modeling package for the sole purpose of working with point clouds. Now you know what to do with a point cloud.