
As I had mentioned in my last post, I am going to make a mold of the dog bone from that post. In order to simplify it for the mold making process, I decided that it would be best if I removed the text from it. If the text was left on the bone, then a draft would have to be put on all of the text in order to make sure it would come out of the mold.
The first step is to create a split line of the bone. This is where the two halves of the mold will come together. To do this, create a new sketch on the top plane as this plane runs through the middle of the bone. Select the drop down arrow under convert entities and then select intersection curve. Choose all the surfaces that intersect with that plane. Next go under the features tab and click the drop down under curves and select split line. Have the sketch that was just created selected and then choose all the faces that intersect that plane. Another way of doing this is to not do the sketch and go directly to the split entities feature. From there choose intersection, the top plane, and then choose all of the surfaces. Both of these ways result in the same thing which is that all the faces that run through the top plane are now split in half. The next step is to go under insert, mold, parting line and select the top plane as the direction of pull. Under the parting line area choose all the lines that were just created using the split feature.
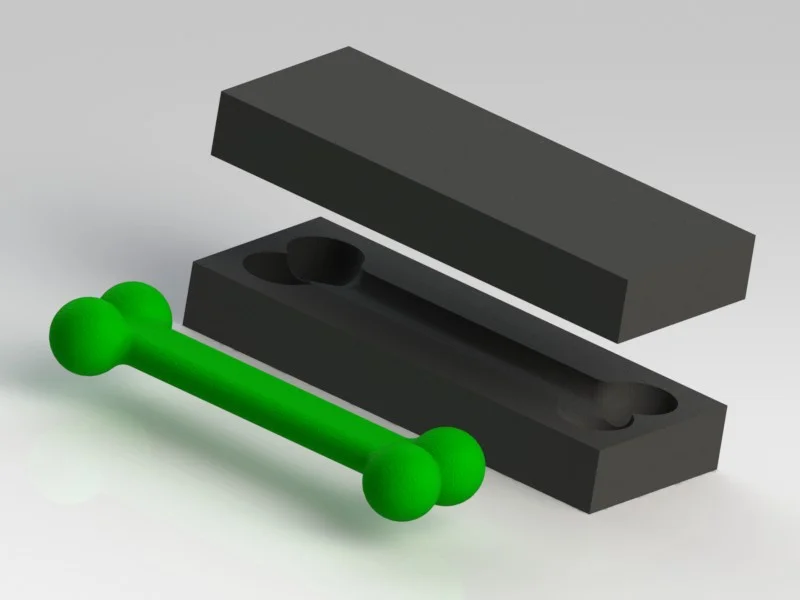
Once that step is done a parting surface needs to be created. This is the surface that splits the mold up into its two pieces. To do this go under insert, mold, then select parting surface. For the mold parameters select perpendicular to pull and then choose the parting line that was created. Under the parting surface tab, choose a distance for the offset which I choose to be 1.5 inches. Click the checkmark and there will now be a surface that looks like a large flattened dog bone around the outside of the actual dog bone. Next, a rectangle was drawn on the top plane that fit the boundaries of the parting surface. The surface trim feature was then used, located under insert, surface, trim, in order to make the parting surface into a rectangle. Once that is done, the next step is to create the blocks that will turn into the actual molds. To do this, select tooling split under insert, and molds. When prompted select the top plane for where the cross section of the mold will be. Draw a rectangle that is the same size as the parting surface that was created. Exit the sketch and then increase the dimensions of the block created so that it extends above and below the bone. Click the check mark and now there is a rectangular box that is encompassing the bone. To see the inside of the mold go under insert, features, then move/copy. Select the top part of the mold and move it vertically upwards. You can then hide the bone itself by hiding the parting line under the bodies’ folder in the feature manager as well as making sure that the surface bodies are also hidden. These two molds could be saved as their own parts if wanted by right slicking the body and clicking insert into new part.
This is how I created a mold for my dog bone feel free to download my model below. This is a very simplistic mold as this is my first time making one. Further things could be added to this mold such as a hole to fill the mold. But I hope that I have given sufficient explanation as to how I created it in hopes that you will try to make one of your own.
Ian Jutras
Mechanical Engineering 2013
Worcester Polytechnic Institute
?