
Like most SOLIDWORKS users, I have my favorite settings to make my workflow more seamless and productive. There are some settings that are fairly obvious, and others that are a little more hidden but deliver a big bang.
Change how your arrow keys function
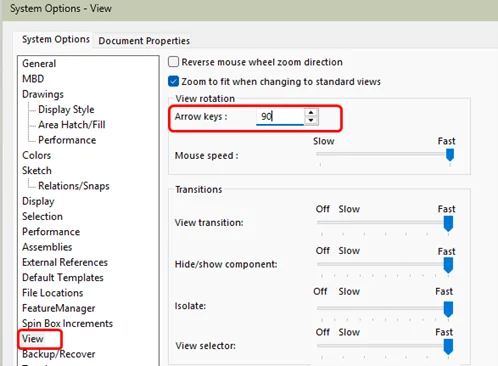
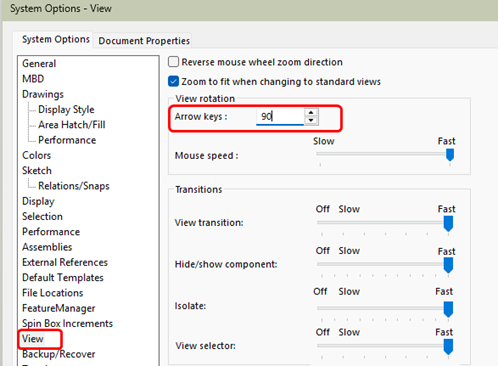
By default, the arrow keys are set to 15 degrees. This never really made sense to me. Instead, I set my arrow keys to 90 degrees. This means I can press an arrow key on my keyboard and quickly flip my view from FRONT, TOP, BOTTOM or BACK. I can check the orientation of parts, whether I flipped my features in error, or check for fit between components quickly using just the arrow keys on my keyboard. It’s fun and it’s fast.
To find these settings, go to Tools > Options. Highlight View, and change the Arrow Keys setting.
Customize the View toolbar
New users struggle with switching views, but even experienced users can get frustrated. Some quick adjustments to the View toolbar, located on the top of the display window, can serve up your favorite tools and make your viewing experience a lot more seamless.
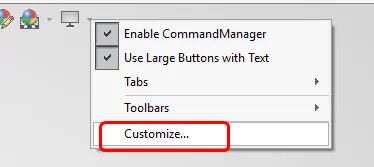
Right click on the View toolbar and select Customize.
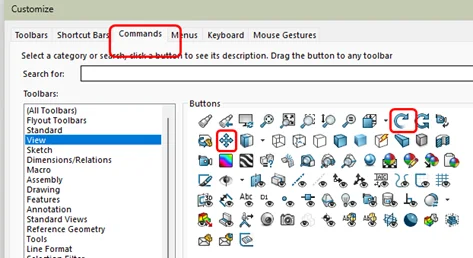
Select the Commands tab. Highlight the View toolbar in the left pane. Drag and drop the pan and orbit tools onto your toolbar.
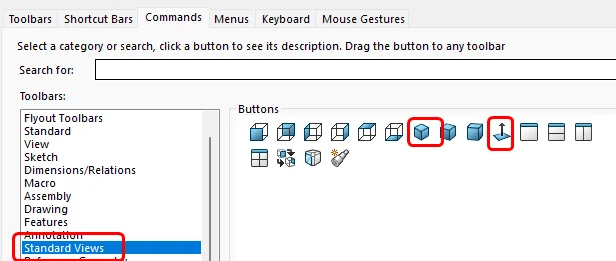
Highlight the Standard Views toolbar in the left pane. Drag and drop the default isometric view and the Normal To tools onto your toolbar.
As long as you have this dialog open, highlight the Tools toolbar and drag and drop your favorite tools onto the Standard Toolbar. I usually add the measure and mass properties tool.
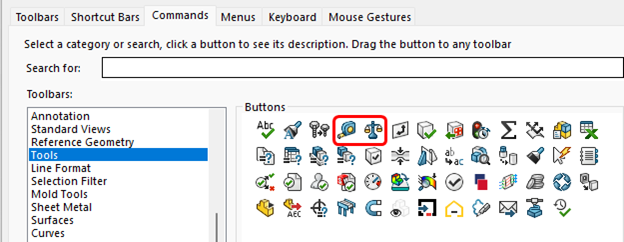
You can search for a tool you find yourself using all the time and add it to the ribbon or toolbar. Once you are happy with your changes, click OK.
My customized view toolbar looks like this:

My customized standard toolbar looks like this:

Notice I have added a SaveAs tool as well as the Measure and Mass Properties tool. Having these tools easily accessible means I work more efficiently.
Enable Input Dimension Value
This used to be off by default, but I think the newer releases of SOLIDWORKS have seen the error of their ways. However, if you find yourself having to click on a dimension after you have placed it to modify its value, save yourself a couple of mouse clicks.
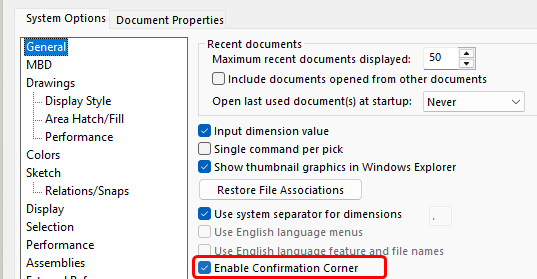
Go to Tools > Options. Highlight the General tab and enable the input dimension value. Now, every time you place a dimension, a small dialog will pop up that lets you enter the desired value.

Auto-Rotate on Sketch Creation and Sketch Edit
Sometimes it’s the simple things that can make your life so much better. You highlight a face to place a new sketch, right-click, and select New Sketch. Now you have to figure out how to rotate the part to get a normal or parallel view of the sketch so you can start your sketch.
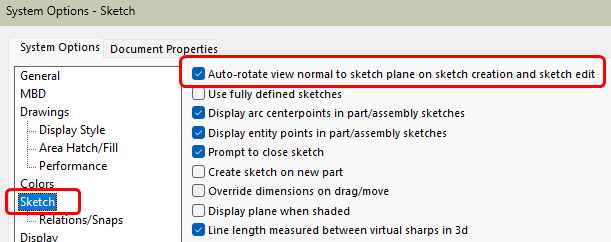
Instead, you can instruct SOLIDWORKS to serve you up a normal view every time you start a new sketch or edit an existing sketch.
Go to Tools > Options. Highlight the Sketch tab and enable Auto-rotate view normal to sketch plane.
Voila! Your transition to sketching is now seamless, and you can move directly to the desired task.
Turn On Backup & Auto-Recover (Before You Regret It)
I call these options my “Do You Feel Lucky?” settings. The reality is that SOLIDWORKS, like any software, could crash. Not often. But if it does, it will be right before a deadline. Future-you will be grateful if you follow these guidelines.
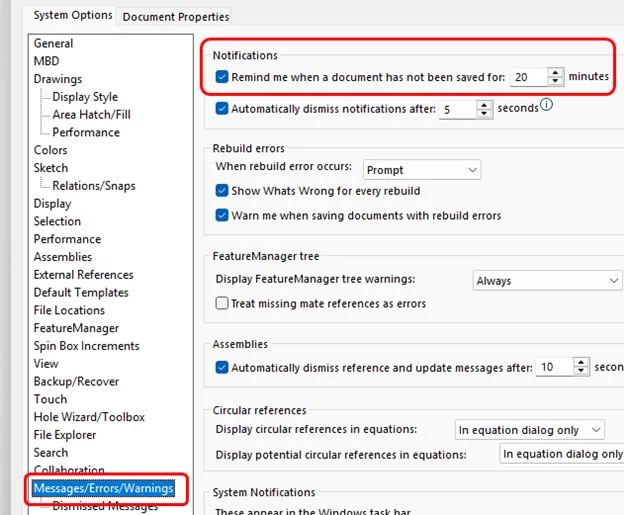
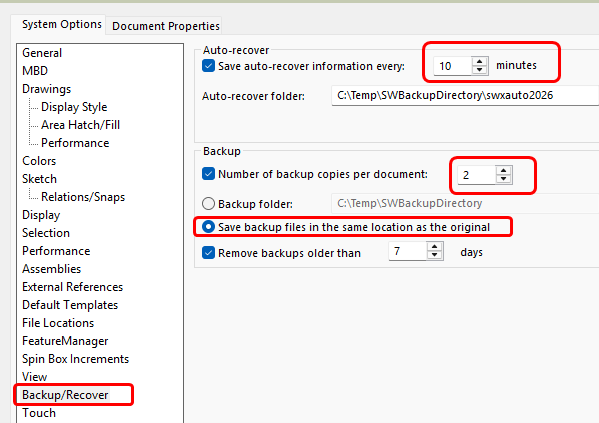
SOLIDWORKS doesn’t have an auto-save. It has what I like to call an “auto-nag.” The software will display a small bubble that reminds you to save at regular intervals. How often do you want to be reminded? How much work are you willing to lose? By default, you will be reminded every 10 minutes. Many users find that too distracting, so you can adjust that to every 15 minutes or every 30 minutes.
To set how often you want to be reminded, go to Messages/Errors/Warnings in the Options dialog.
At the same time, you want to visit the Backup/Recovery options. SOLIDWORKS also has an auto-recover setting.
Auto-Recover and Auto-Save (often referred to as Backup) serve different purposes: Auto-Recover acts as a safety net that captures temporary data to restore files after an unexpected crash, while Backup creates copies of files when you save, allowing you to revert to previous versions. Auto-Recover files are temporary and deleted upon a normal save, whereas Backups are permanent, archived copies. I prefer to save my backup copies in the same folder as the original document to make the files easier to locate.
I also limit the number of backup files that are saved with each document. I don’t have unlimited storage space. I normally archive my projects at milestones, so those backups are accessed only if my files become corrupted or something serious goes wrong.
Enable “Verification on Rebuild” (For Serious Work)

You made a change to your assembly or model, and you click Rebuild or use CTL+B so you can see the changes.
Before you perform the next Rebuild, go to Tools > Options. Highlight Performance and enable Verification on rebuild.
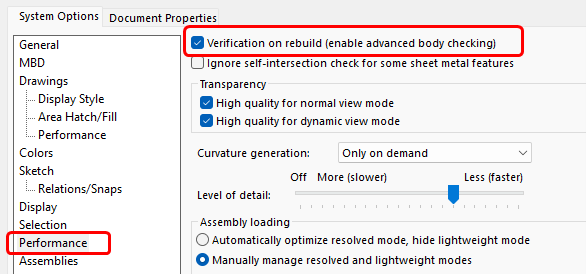
This forces SOLIDWORKS to properly validate geometry during rebuilds rather than assuming everything is fine.
It slows the rebuild slightly — but it catches hidden geometry errors that can absolutely wreck downstream features.
If you’re doing production work or complex parts? Turn it on. Nobody likes seeing those red warnings in the browser or the yellow indicators that let you know sketches or features have gone bad. However, I would like to know sooner rather than later if a feature has gone south.
Whatever you do, ignore errors at your own peril. The errors can often be repaired by deleting an unnecessary constraint or mate.
Turn On “Stop Feature Rebuild on Error”
By default, SOLIDWORKS tries to keep rebuilding after an error. That often causes a cascade of 30 red features.
Stopping early makes debugging much easier. You fix the root cause instead of chasing ghosts.
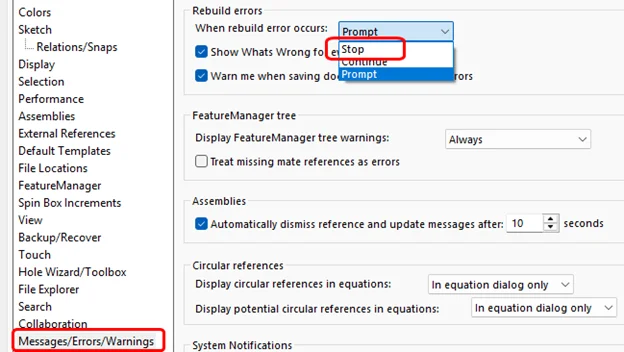
Go to Tools > Options. Highlight the Messages/Errors/Warnings tab in the left panel. Under Rebuild Errors, set the drop-down to stop when a rebuild error occurs. This means SOLIDWORKS will stop the rebuild and require you to make the proper repair before work can proceed. You may find this change annoying at first, especially when working on large, complex assemblies, but it will save you time in the long run, and you will learn where the “gotchas” are in your design.
Adjust Image Quality (Performance Win)
Go to Tools > Options > Document Properties > Image Quality.
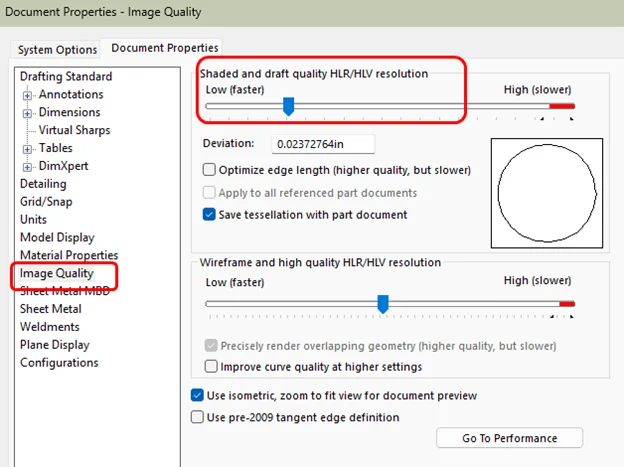
Slide Shaded and Draft Quality HLR/HLV slightly left (not all the way). Keep it moderate unless you’re doing render-level visuals. The default settings are often higher than necessary and can slow large assemblies.
Lower image quality = faster graphics performance. Your GPU will thank you.
This setting is document-specific, so you may want to adjust it on your end and in the assembly templates. That way, you don’t have to adjust it every time you open a new document.
Change Default Templates & Units
This one’s subtle, but important.
Go to Tools > Options > System Options > Default Templates.
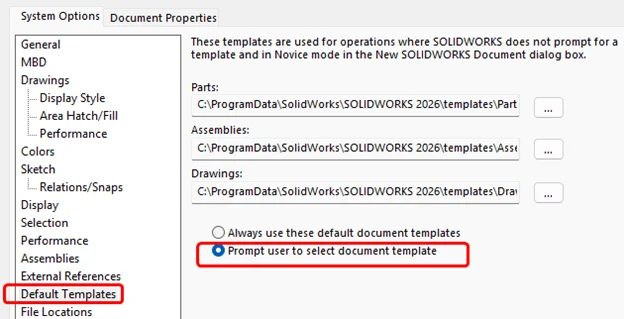
I normally have mine set to Prompt user to select document template. This is because I constantly switch between clients and units (Imperial/metric). However, if I am in an office situation and only using a specific part, drawing and assembly template for all my projects, I will browse to the location for each template type and select the desired template.
If you don’t do this early, you’ll constantly need to fix unit mistakes and formatting issues.
By setting up your templates and assigning the desired default files, you maintain consistency and improve your efficiency.
Turn on Confirmation Corner
Confirmation corner is a symbol you should be familiar with that appears in the top-right corner of the graphics window.

You see a Green Check or a Red X. If you are in an active sketch, you should be familiar with the Confirmation Corner.
If you are missing the Confirmation Corner, go to Tools > Options. Open the System Options tab. Highlight the General tab and Enable Confirmation Corner.
Settings for Success
It will only take you a few minutes to make these changes in your settings, but it will save you hours of frustration. Consider this article a brisk tour of some basic system and document options that can improve your SOLIDWORKS experience. Even better, you now have the bragging rights of a power user.