
Have you moved your SOLIDWORKS Design data to the cloud yet? If not, you’re missing out on real-time collaboration, simple data management, a single source of truth, and centralized project data that everyone can access—from anywhere, on any device.
Saving your data to the cloud-based 3DEXPERIENCE platform is simple! In this blog, I’m going to cover three options for saving data to the platform, including one for bigger migrations.
- Save to 3DEXPERIENCE from MySession
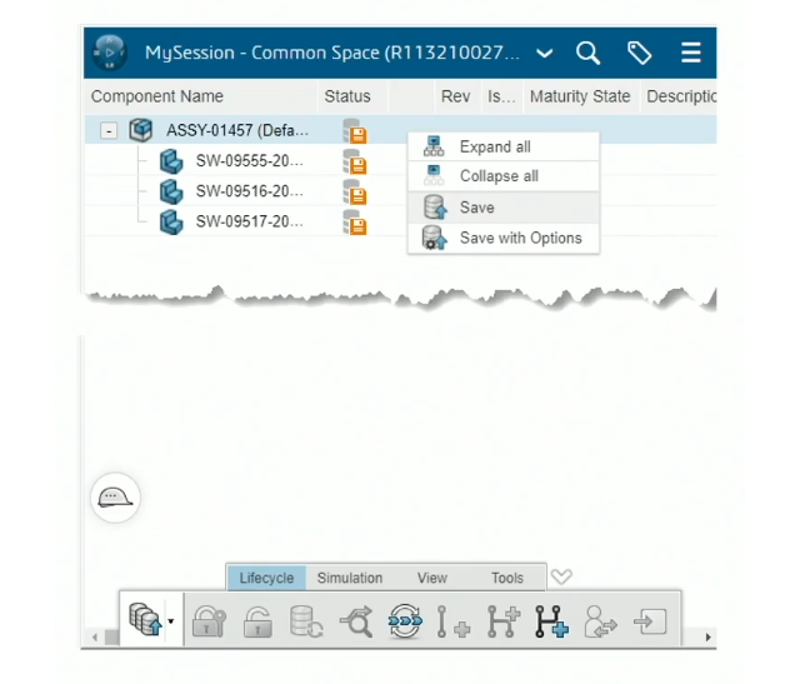
You can use the Save command directly from within SOLIDWORKS to upload data to the 3DEXPERIENCE platform.
Benefits include:
- Easy to use and implement
- Accessible to the end user
- Included with SOLIDWORKS Design
- Supports revision mapping
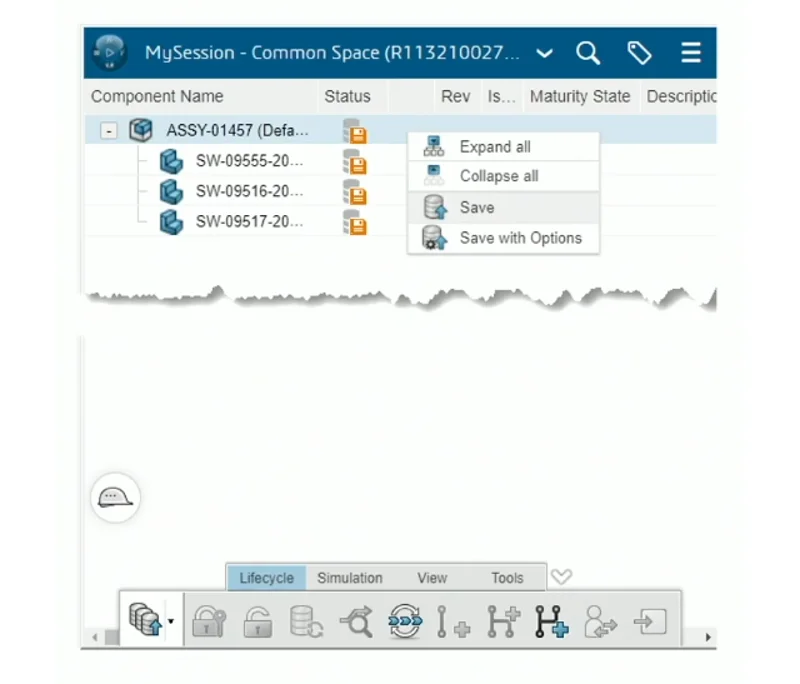
Here is the step-by-step process:
1) Access the Save Menu: Open your local model or assembly and access the lifecycle and collaboration tools. Right-click on the file in the 3DEXPERIENCE task pane (or use Ctrl + Alt + S) and select Save with Options.
2) Select Collaborative Space: In the dialog box, ensure you are saving to the correct storage area we call a Collaborative Space. Collaborative spaces provide an area where people with different job functions and responsibilities can work together to produce and deliver content.
You can create as many collaborative spaces as required for your business purposes. You can add users as members with a responsibility, regardless of their organization.
3) Organize with Bookmarks: Click Select Bookmark to organize your data into bookmark folders, similar to a local directory. You can create new bookmarks here to keep your project structured.
4) Finalize Upload: Click Save. The platform will upload the parent file along with all its references, and update the orange “unsaved” icon to a green check mark to confirm the upload was successful.
I recommend using the Save to 3DEXPERIENCE option directly in SOLIDWORKS when you have a small number of files or just one assembly or drawing structure to upload. For larger amounts of data coming from multiple folders, use the Batch Save to 3DEXPERIENCE tool, which I’ll cover next.
2. Batch Save to 3DEXPERIENCE
The Batch Save to 3DEXPERIENCE tool, available from the SOLIDWORKS Tools menu, allows content from multiple folders to be uploaded to the 3DEXPERIENCE platform. This is an automated, asynchronous tool that has the same secure upload and database object-creation capabilities as the Save to 3DEXPERIENCE command. It allows saving SOLIDWORKS files and other documents from multiple folders into various collaborative spaces and assigning bookmarks. This command is suitable for large data sets that contain multiple projects, with each project generally less than 5GB.
Benefits include:
- Easy to use and implement
- Accessible to the end user
- Included with the platform connection for SOLIDWORKS
- Bookmark automation
- Asynchronous
- Supports revision mapping
Before you run the Batch Save, you’ll want to analyze your data and fix issues before uploading. We offer a cool tool called the File Preparation Tool, which can be accessed from the SOLIDWORKS Tools menu or from the Batch Save to 3DEXPERIENCE tool. I’ll discuss this in more detail in the steps below.
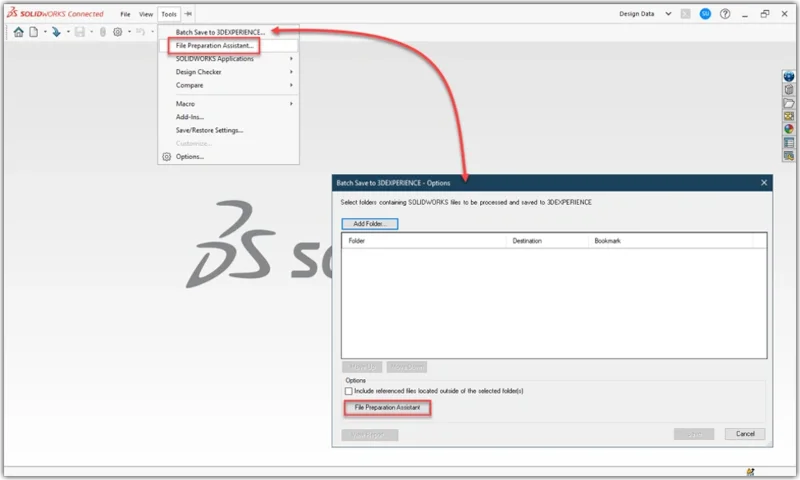
Steps include:
1) Enable the Add-in: Open your CAD design software. Navigate to Tools > Add-ins and ensure Batch Save to 3DEXPERIENCE is checked.
2) Run the File Preparation Assistant: Go to Tools > Batch Save to 3DEXPERIENCE and click File Preparation Assistant. This handy utility will scan your files for duplicate names, missing references, and custom property data types before uploading.
The File Preparation Assistant is designed to analyze the quality of legacy file sets and identify compatibility issues that could cause downstream problems when working with the data later.
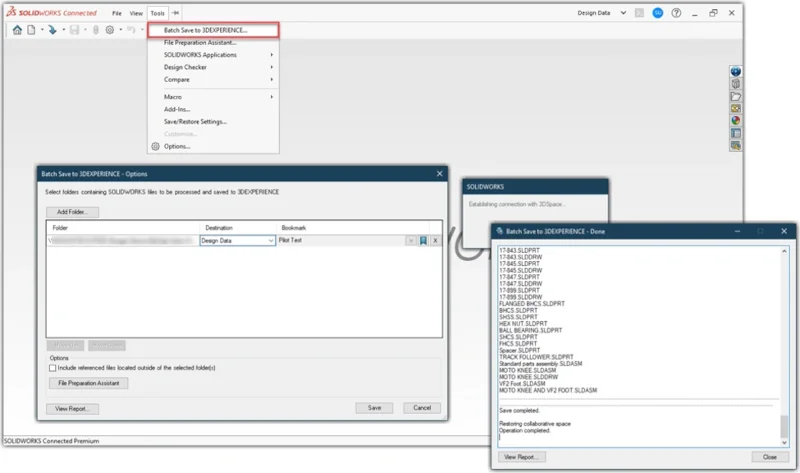
3) Select Your Folders: Return to the Batch Save to 3DEXPERIENCE dialog box and click Add Folder to select the root directories containing your files. You can prioritize upload order by using the Move Up and Move Down buttons.
4) Choose Your Destination: Specify the Collaborative Space and designate a Bookmark to keep your files organized on the cloud.
5) Set Options and Save: Check the option to Include referenced files located outside of the selected folder(s) to ensure dependencies aren’t left behind. Select a folder for log files and backups, then click Save (or Start) to upload your files.
The Batch Save tool improves efficiency because it save runs asynchronously, in a separate process. This allows you to use SOLIDWORKS while the save processes.
I’d recommend using Save to 3DEXPERIENCE (or Asynchronous Save) for day-to-day, single-project changes, and Batch Save for migrating larger legacy datasets, managing multiple folders, or replicating directory structures.
3. 3DEXPERIENCE Transition Assistant (for resellers)
The 3DEXPERIENCE Transition Assistant is a dedicated utility designed to migrate CAD and non-CAD data from legacy environments, such as SOLIDWORKS PDM, ENOVIA SmarTeam, or other local file systems, directly into the 3DEXPERIENCE platform. It is not a customer tool, but one that resellers can use to help your migration go smoothly.
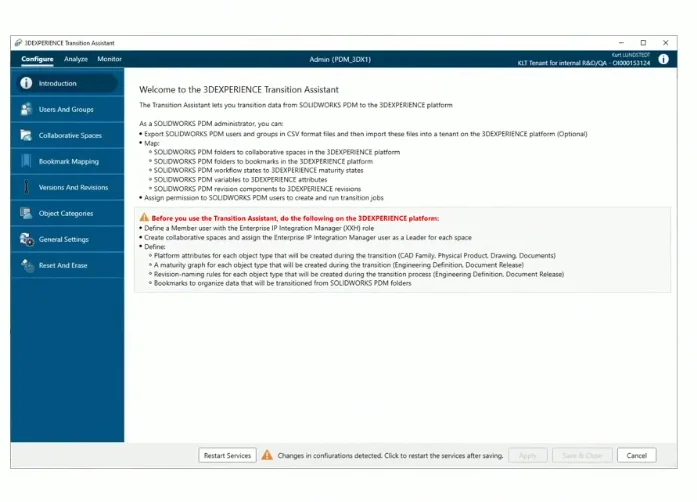
The benefits of using the 3DEXPERIENCE Transition Assistant include:
- Migrates CAD and non-CAD files
- Works with SOLIDWORKS PDM or Windows folders
- Suitable for large migrations
- Revision and maturity mapping
- SOLIDWORKS PDM variable to attribute mapping
- Bookmark mapping to folders
Ask your reseller for a demo!
As a reminder, to get the 3DEXPERIENCE platform cloud capabilities, you must have one of the SOLIDWORKS Design Standard, Professional, Premium or Ultimate plans or SOLIDWORKS Design with Cloud Services. Learn more about licensing options here.
For more on saving data to the platform and data management best practices, check out the following resources, including my presentation from 3DEXPERIENCE World 2026 that includes a walkthrough of the 3DEXPERIENCE Transition Assistant and customer examples who have moved their data to the cloud:
Customer Journey to the 3DEXPERIENCE Platform
Move Your Data to the Cloud to Unleash Its Full Potential
Get the Most Out of the File Preparation Assistant
Mapping Attributes in SOLIDWORKS
You can also access additional resources on the 3DEXPERIENCE Edu SPACE online learning portal.